After syncing your OUs, you can now deploy the Securly Chrome Extension to your organization. This extension enforces web filtering on Chrome devices, regardless of location.
Before starting the installation process, ensure that your school domain and subdomains are registered with Securly. Our team will initially register the school’s domain. You can then view your registered domains or add more from the Domains tab under Settings.
Deploying Chrome extension
-
Login to Google Admin Console and navigate to Devices > Chrome > Apps and extensions > Users & browsers.
-
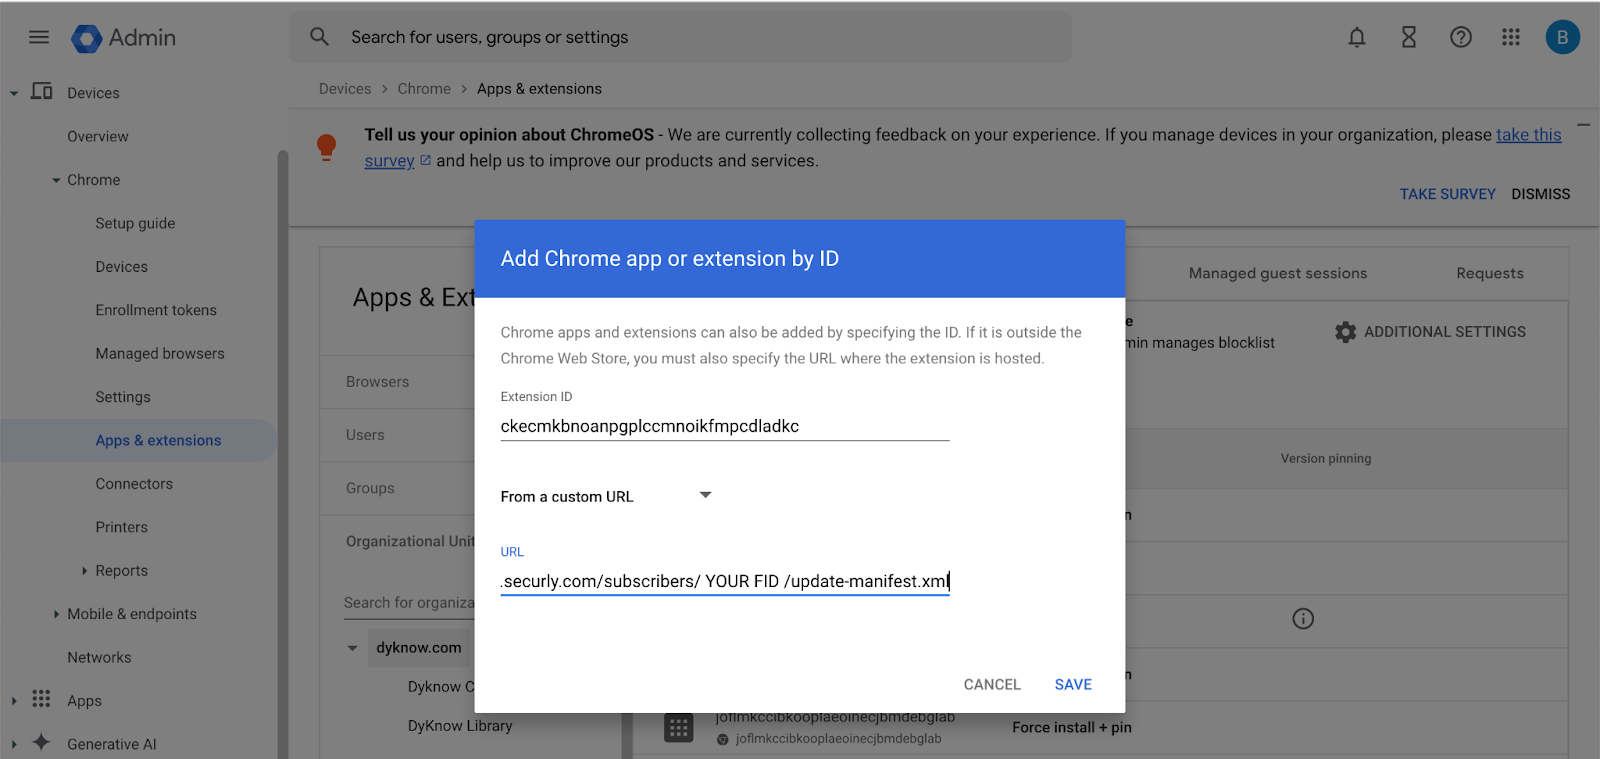
Select the OU you want to deploy the extension to and click the '+' button in the bottom right and select 'Add Chrome app or extension by ID'.
-
Input the extension ID, leave the setting at 'From a Custom URL', and paste in your Installation URL. The extension ID and installation URL can be found in Filter by navigating to Settings > Account Details.
-
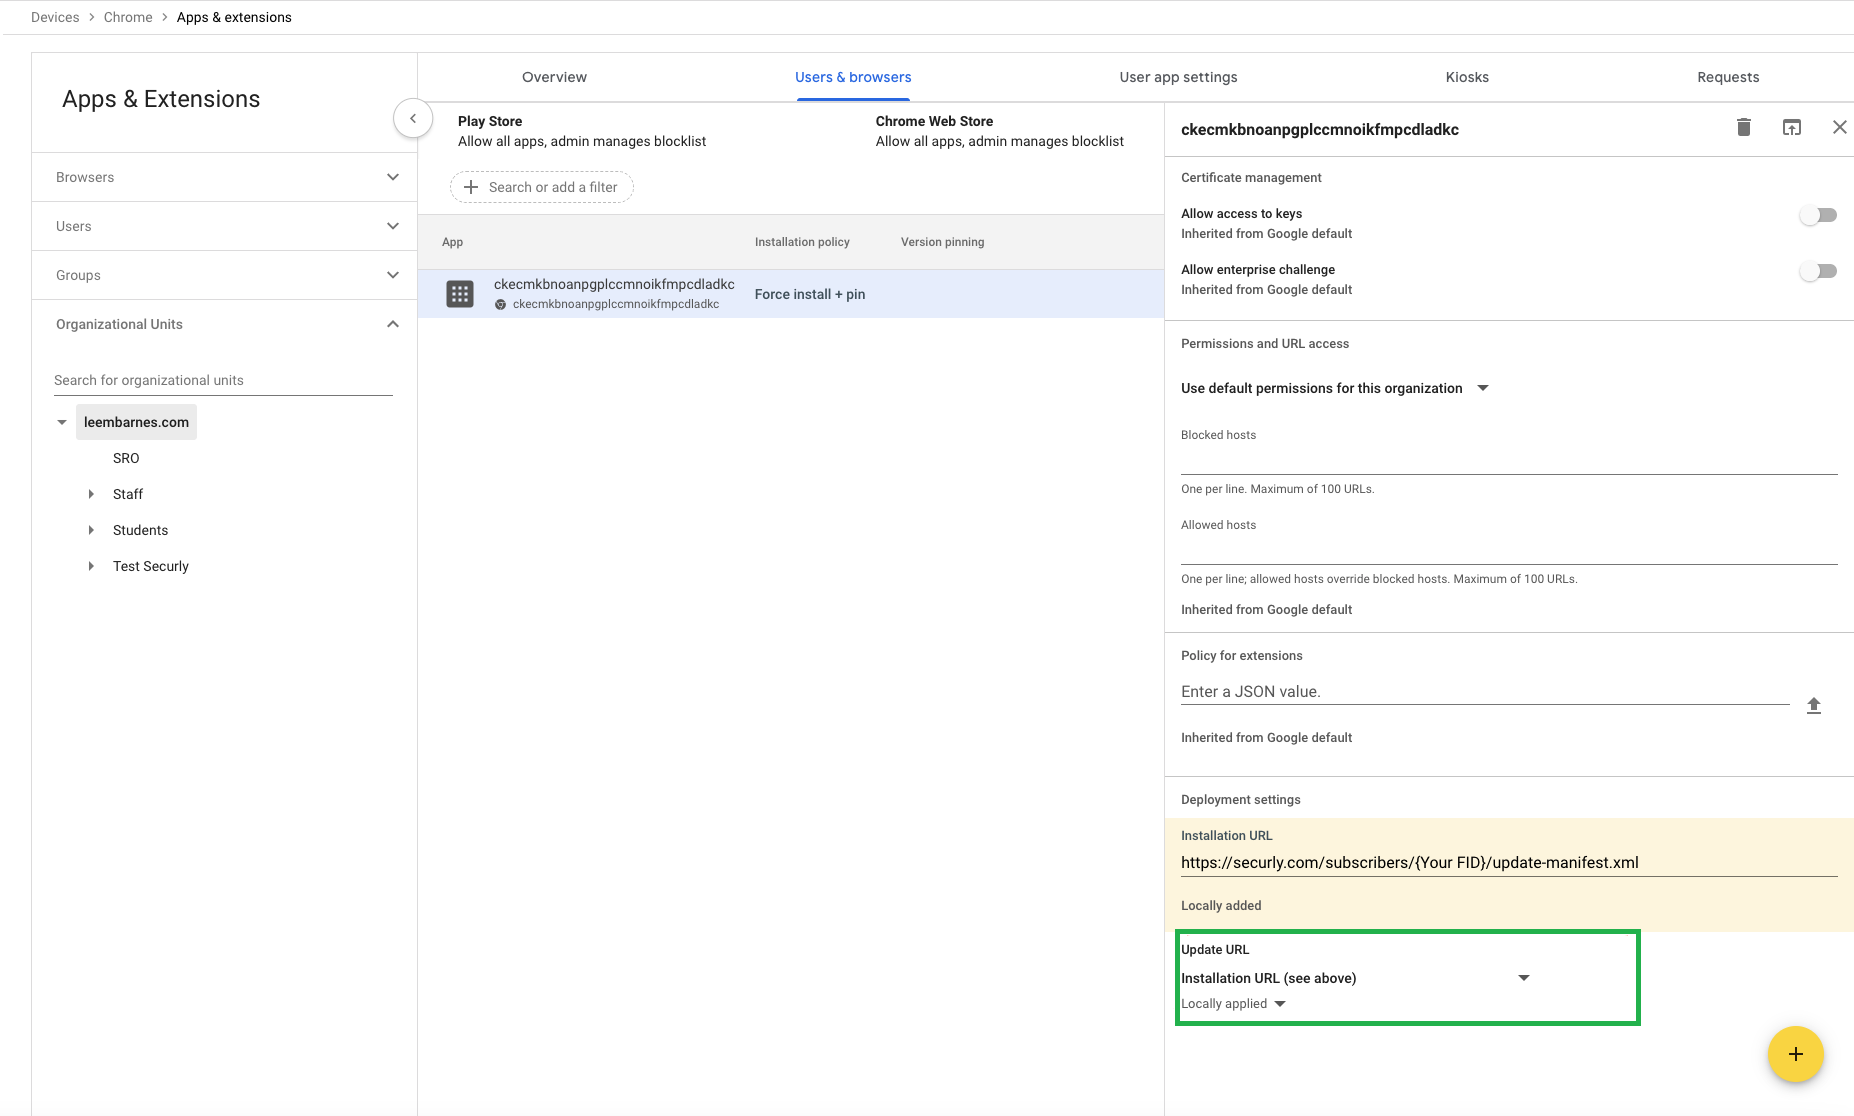
Set the installation policy to 'Force install' or 'Force install + pin'. This will allow you to see the extension in your browser's toolbar.
-
Set 'Permissions and URL Access' to 'Allow all permissions'.

-
Scroll down in the right-hand pane Configure the update URL. Under Deployment settings, set the Update URL to 'Installation URL'.
-
Click on 'Save' in the top right corner.
This will push the Securly Chrome extension on all Chromebooks, as well as Chrome browsers on Windows and Mac devices belonging to the OUs selected (the OUs are user OUs and not device OUs).
To manage and lock down Windows PCs and browser extensions even when users are not signed into browsers, you must use Intune. In this case, Intune will override any extensions managed through Google Admin Console. Therefore, extensions must be managed by Intune to ensure they are pushed to Windows devices regardless of user sign-in status.
To force users to use Chrome and ensure they are always signed in, you do not need to use Intune to push extensions. You can continue managing and pushing extensions through Google Admin Console, as users will always be signed into Chrome.
Testing
Make sure to test a few Chromebooks to ensure they have the new extension. You can see the extension ID by visiting chrome://system and expanding the "extensions" section. To ensure filtering is working as expected, you can use a testing site like http://unsafewebsite.com.
Troubleshooting
Extension is missing or not functioning as expected
If the extension isn't showing up, isn't enabled, or isn't functioning as expected, it is likely you have not enabled extended MV2 support. Your other MV2 extensions likely work because they are grandfathered in.
How do I enable MV2 extensions in the Google Admin Console?
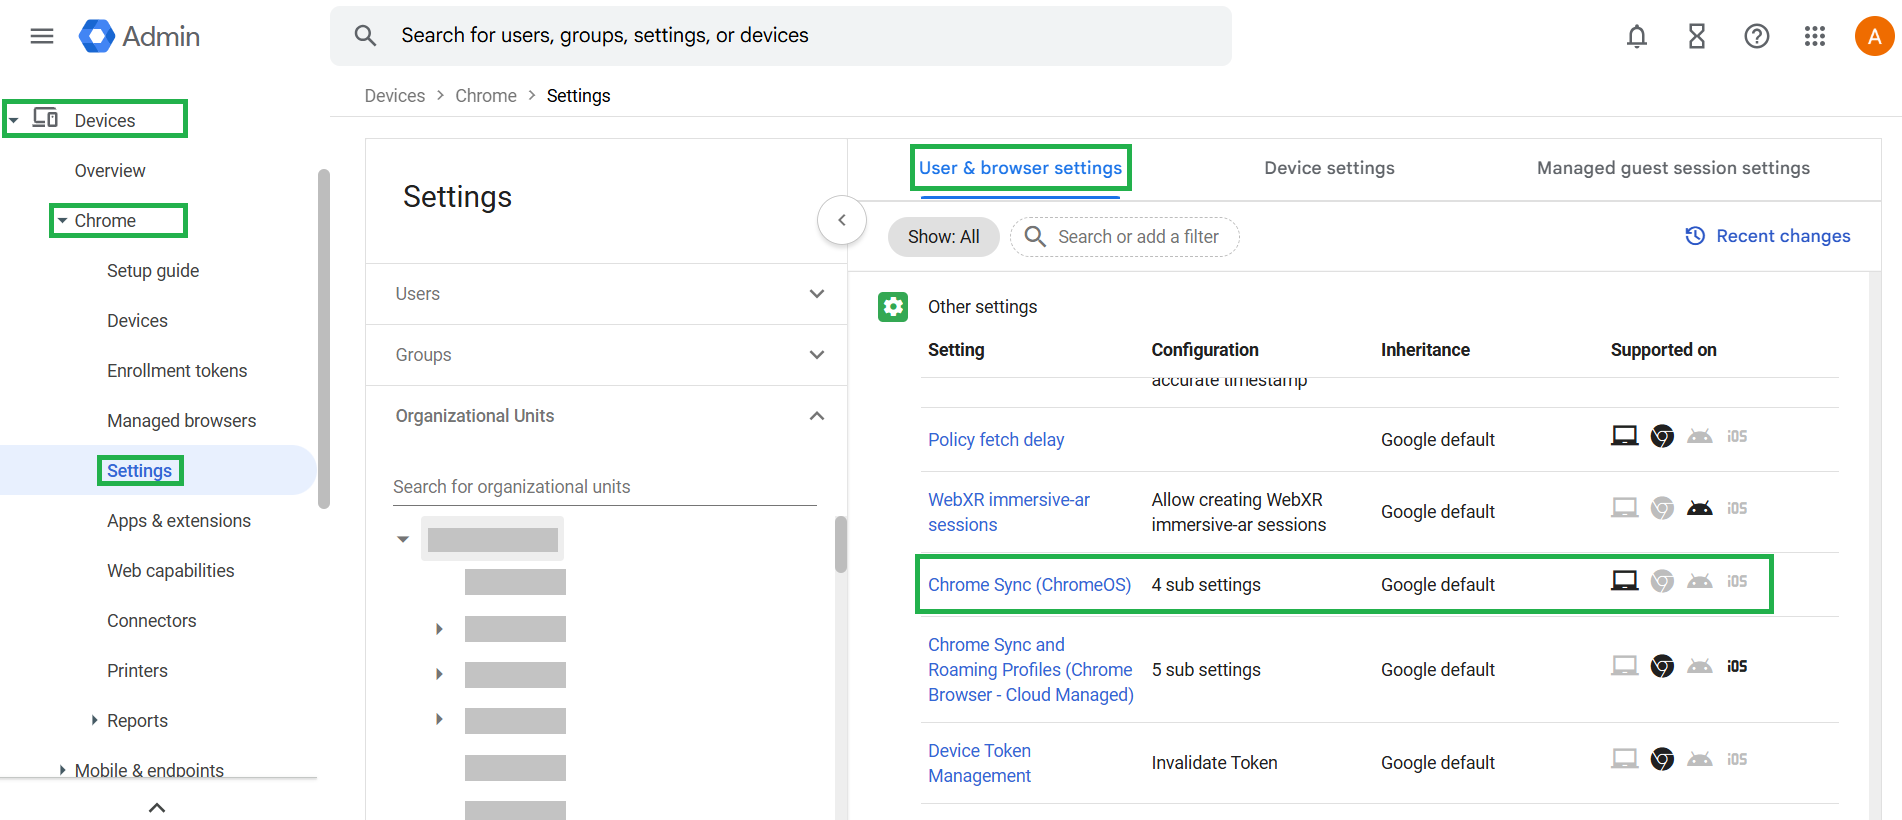
- Log into the Google Admin Console (admin.google.com).
- Navigate to Devices > Chrome > Settings.
- Select Organizational Units (Use either the root OU or specific OUs where Securly extensions are deployed).
- Under Users & Browsers, go to the Apps & Extensions section.
- Find the setting for Manifest V2 extension availability
- Change to Enable manifest v2 extensions
- Save your changes to ensure the setting is applied.
Extension is not working in ChromeOS 140+
In ChromeOS 140 and higher, Google has changed the way it enforces the Chrome Sync policy, resulting in the Securly extension lacking the necessary permissions to function properly. If extension syncing is not enabled from the Google Admin Console and a student disables sync for extensions from their browser settings, the extension doesn't function properly. To ensure extension syncing is active, follow the below steps:
-
In Google admin console, navigate to Devices > Chrome > Settings > Users & browsers > Other settings > Chrome Sync (ChromeOS).
-
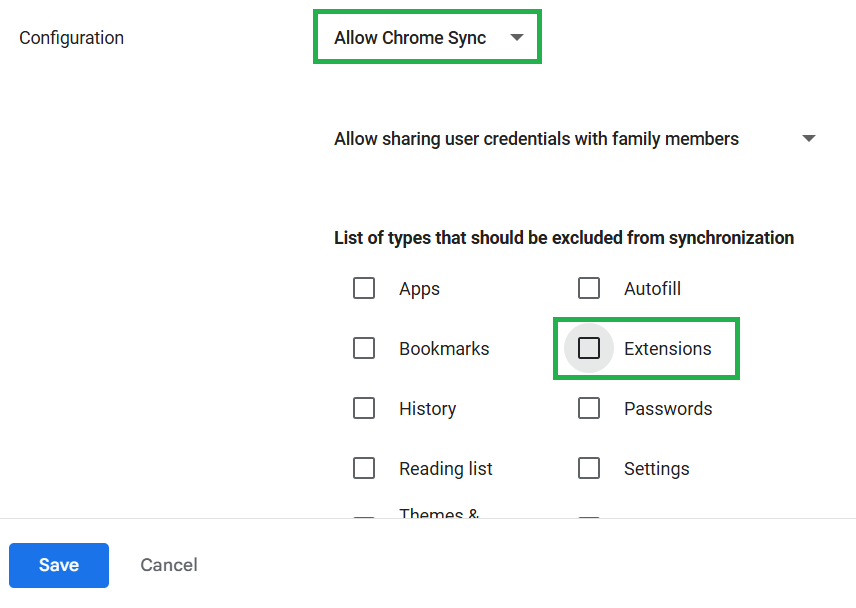
Ensure the ‘Allow Chrome Sync’ configuration is selected.
-
Uncheck ‘Extensions’ from the section for excluded sync types to ensure extensions are included in sync, and save your changes.