
Administrators Guide
Welcome to the Flex Admin user guide! If you have any questions or need any type of assistance related to Flex, please contact us through the Flex Help Desk (Securly Support): https://support.securly.com. Please see the Help Desk Portal Instructions for more information.
Use “Ctrl+F” or “Command+F” to search document by keyword(s) |
|---|
Making a Flex Period “Inactive”
Flex Periods “Actions” (Preview, Edit, Copy, and Delete/Archive)
Autoassign with Catchall by Room
Enforce Room Size (with Homeroom Catchall)
Controlled Access Periods (CAP)
Adding Rooms via CSV File Upload
Room Cap (Shared Room) Functionality
Maintaining Users (Editing/Archiving)
Agenda Notifications & In-App Notifications
MAIN MENU - ADDITIONAL “ADMIN” FEATURES
Teacher Attendance / Substitutes
Technical Information Document (for Technical Support)
Attendance Import & Export Files
How can I train my teachers & staff?
What resources are available for teachers/staff?
Do you have any tips for conducting large group in-person training?
What is the best approach for training students?
How do we handle Flex questions from our teachers and students?
Flex Help Desk - Securly Support (Link to create a new ticket.)
How to Create an SIS Attendance File & Upload Manually
Flex Mobile App for iOS and Android
LOGGING IN
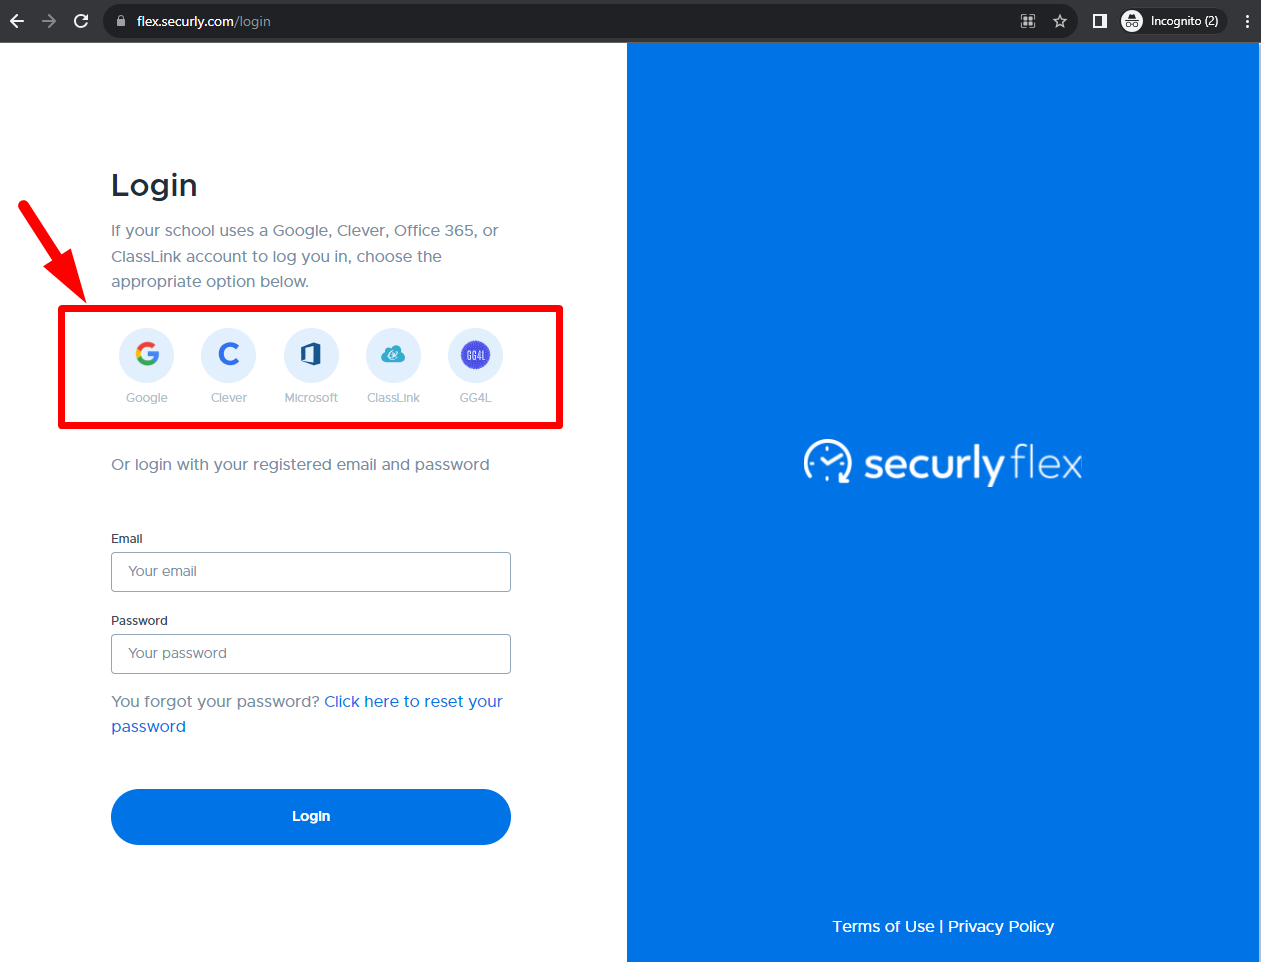
Your Client Project Manager (CPM) will provide detailed instructions to log into your Flex system for the first time. Most likely you will use your school email and password for your school’s authentication type. The Flex URL is: https://flex.securly.com/login, which then provides single sign-on (SSO) options for Google, Clever, Microsoft (Office 365), ClassLink, and GG4L.
- Below is a chart that provides direct URL links for various types of login methods. These direct links save users a step in the login process. This may be especially helpful if your school pushes the URL link out to users and/or creates shortcuts.
Direct URL | User Login Type |
|---|---|
Clever | |
Microsoft / Office 365 | |
ClassLink | |
Manual |
Email Verification
For security purposes, users must have a valid email account in order to log into Flex. For users who do not use one of the single sign-on methods mentioned above, an email verification process will be required (multi-factor authentication via email). Please reference the “Email Verification - Edit Email Instructions” for more details.
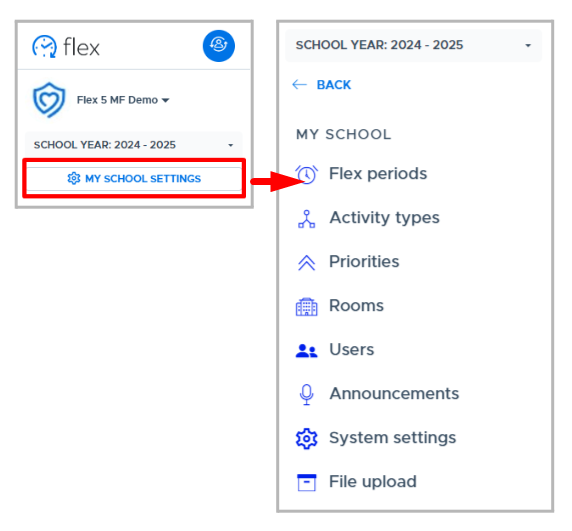
MY SCHOOL SETTINGS
Below is the Admin-only “My School Settings” menu. These menu options provide Admins access to set up, customize, and manage the Flex system. Initially, much of this will be done during the system implementation. Once the initial setup is complete, there may be additional functionality to turn on, edits to settings that need to be made, or ongoing system management that will be done from this menu. The following sections of this guide review details about each of these menu options.
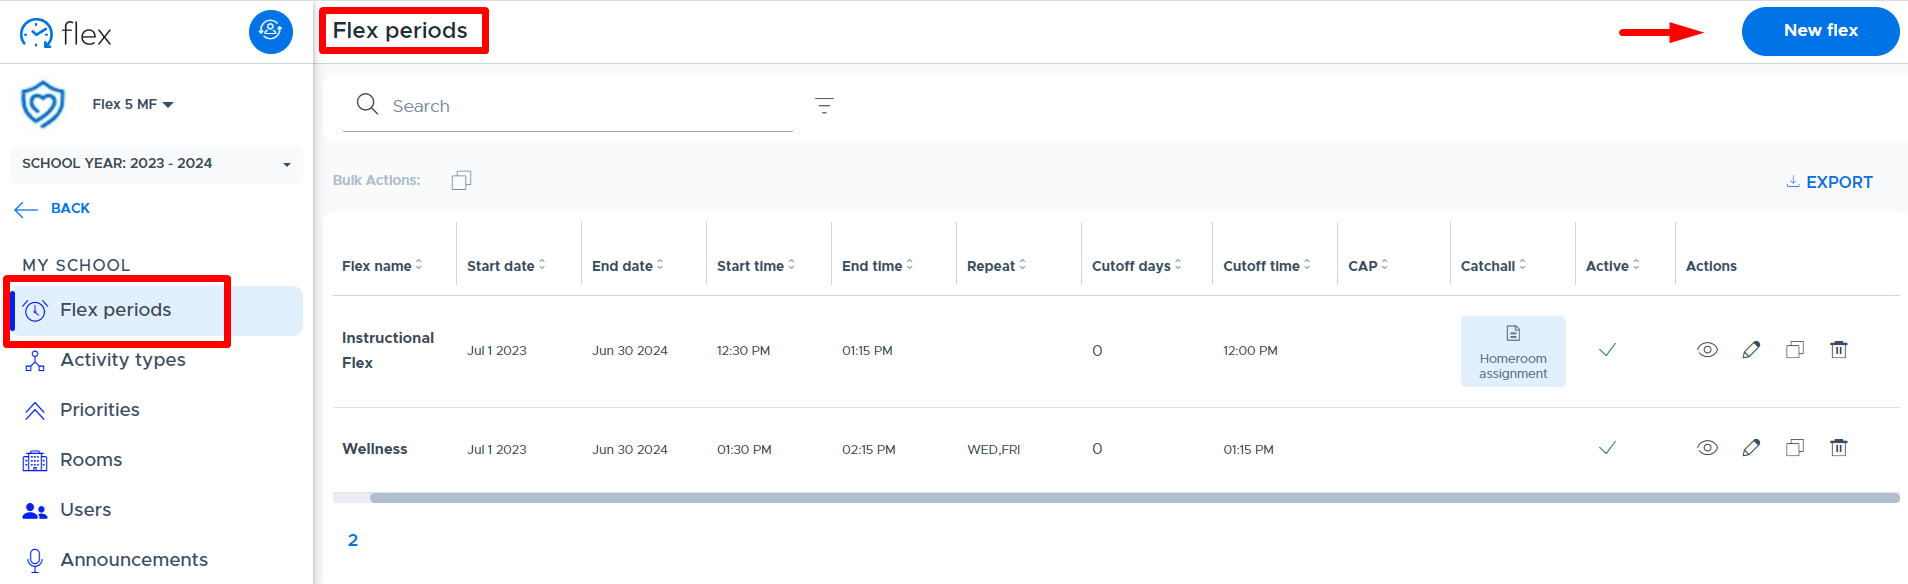
FLEX PERIODS
The Flex Periods screen is where the core settings of the system are defined. Primarily this has to do with setting up the Flex period(s) that will be run and the related details. It is possible to set up multiple Flex periods in your system, but it works best when the flex periods do not overlap in time on the same day.
Here is a video that reviews the Flex Period Settings screen and options. Below are additional instructions and details.
Adding a New Flex Period
To add a new Flex period to the system, do the following:
- Click “New Flex”
- Complete the screen as follows
- Name: Enter the desired name for the Flex period (Ex: Flex 1 or Wildcat Time)
- Start Date/End Date: Enter the appropriate start and end dates. (Teachers will have access to schedule activities for this period of time.)
- Start Time/End Time: Enter the appropriate start and end times.
- NOTE: When multiple flex period times overlap (by a few minutes or the whole period), please keep in mind that the system treats these flex periods as completely separate from one another. In other words, there are no system checks to prevent students, who have access to the flex periods, from registering in both/all periods. The system is NOT looking and comparing registrations across overlapping or simultaneous flex periods
- Controlled Access Period (CAP) functionality can be used to limit student access to certain flex periods.
- Recurring: Select Daily (default) or Weekly
- Daily - Flex will run everyday, Monday through Friday
- Weekly - desired days of the week can be selected (Mon-Fri) - this should be used when there is a specific pattern, not for rotating or random schedules.
- NOTE: It’s very important that you do not come back and remove days from the schedule or change from “Daily” to “Weekly”. Changing the recurrence and removing days can cause a loss of historical data.
- If days need to be removed, the Flex period should be ended and a new one created to avoid loss of historical data.
- If “Weekly” is set, you can add days without causing a problem.
- Cutoff Days: Number of days the system will use as a ‘set-off’ to apply the Cutoff Time.
- Example: If Cutoff Days = 0 it applies to the same day the Flex period runs. If cutoff days = 1, it will apply 1 day prior to the day the Flex period runs. If Cutoff Days = 2, it will apply 2 days prior, etc.
- Count weekends: Toggle this to the right to include Saturday and Sunday in the Cutoff Days calculation. Weekends will not be included if this is not turned on.
- Cutoff Time: Enter the desired time to “lock down” the Flex period offerings and registrations.This means teachers can no longer make changes to what they’re offering and students cannot make changes to their choice registrations. The one exception is teachers can still use the Plus Add function.
- Active (toggle): Default is on/active. Toggle to the left to make Flex period inactive. (Inactive Flex periods are not shown in the main list but can be accessed from the filter option. See more details below.)
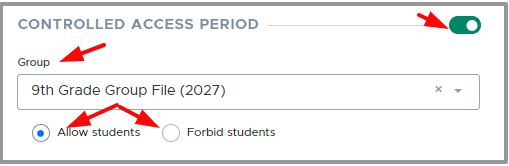
- Controlled Access Period (CAP): Toggle this option to the right to turn on and access additional settings. Once enabled, select the desired group and whether to “allow or forbid” students to access this Flex period. (Please see more details in the “CAP” section of this guide.)
- Catchall: Toggle this option to the right to turn on and access additional settings. Once enabled, enter a “Catchall Title” and select the “Type” of catchall. (Please see more details in the “Catchall” section of this guide.)
- Click “Add” to add the new Flex period.
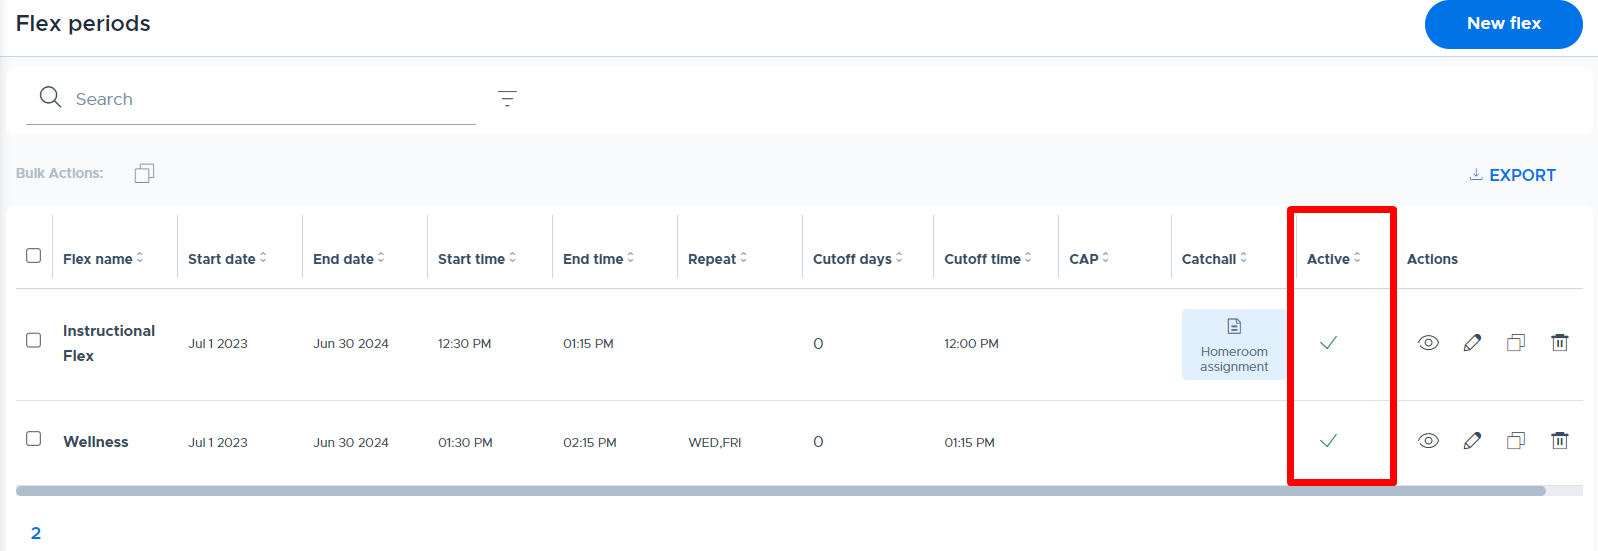
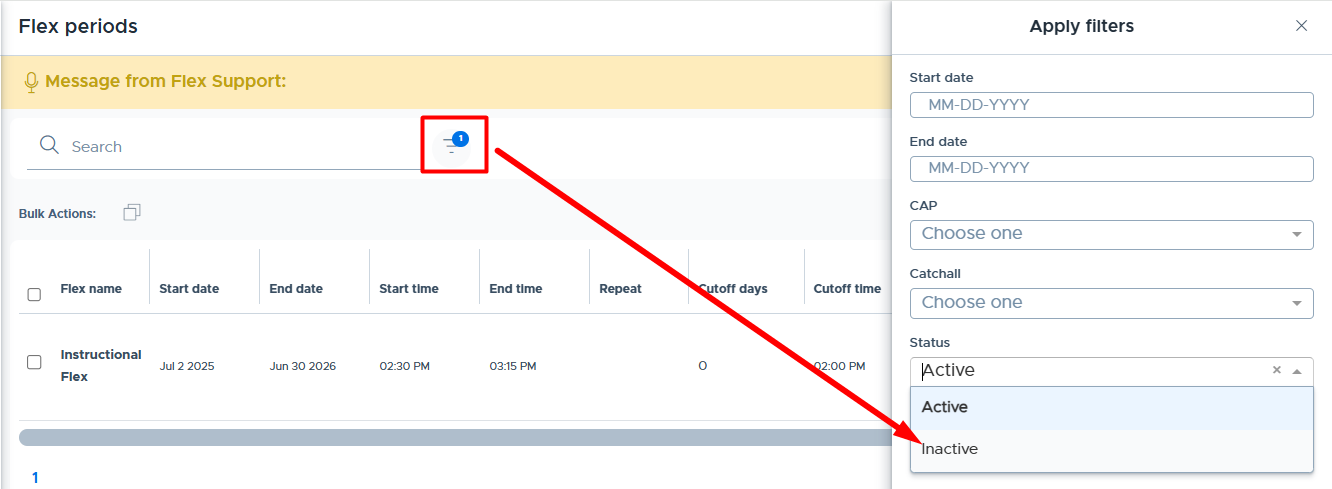
Making a Flex Period “Inactive”
If there is a flex period that you are no longer running, it can be made “inactive” by clicking the checkmark in the “Active” column. By making a flex period “inactive”, this will hide/remove the flex period from the main screen and reports. When making a flex period inactive, we recommend that the “end date” of the flex period is updated. This will ensure that registration data associated with the inactive flex period will be displayed correctly on the Student Search screen.
Do NOT delete/archive a Flex period if there is registration data associated with the flex period. Using the trash can icon in the “Actions” column, will delete/archive your Flex period and registration data will be permanently lost.
To see “Inactive” flex periods, simply use the filter option and select “Inactive” in the Status field. When a flex period is made inactive, the data associated with that flex period is retained, but you will not see the flex period listed in report drop-downs throughout the system. (Flex periods can be made active again if necessary.)
Flex Periods “Actions” (Preview, Edit, Copy, and Delete/Archive)
For each flex period, there are “Action” icons available. Please see the screenshot below and the explanation of each icon.
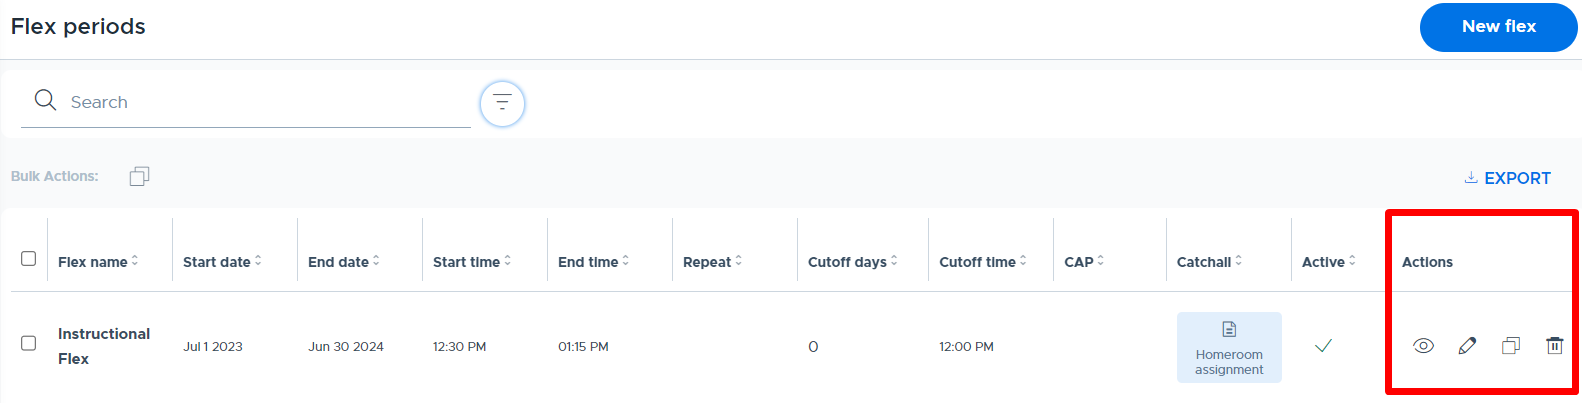
- Preview: Provides an overview of the flex period details, access to edit the flex details, access to the catchall settings, and displays a list of the related “Scheduled Activities” and “Cancellations” for the flex period.
- Edit: Opens the main flex period screen so edits can be made to the details and saved.
- Copy: Copies the existing flex period and settings to create a new flex period. Details can then be edited as desired.
- Delete/Archive: Permanently DELETES the Flex period and associated data. DO NOT USE if there is historical registration data associated with the flex period. Archived flex period data will be lost and cannot be retrieved! Only use this option if you’re sure that any data associated with the flex period is not needed. (To keep historical data but hide the flex period, adjust the end date and make it “inactive”.)
- It is also possible to edit/change the end date of a flex period and start a new one, which may help in certain circumstances.
- If you have any questions about whether or not to archive a flex period, PLEASE contact the Flex Help Desk for assistance.
Cutoff Time Details
It will be necessary to determine what the cutoff time should be for each flex period. At the cutoff time, the Flex system will “lock down” and students and teachers can no longer make changes to existing registrations or scheduled activities. However, teachers can Plus Add students after the cutoff time.
- The cutoff time applies each day the flex period is active. Schools often set this for a time shortly before the flex period begins.
- It can be set for a designated number of days prior to the flex period. (For example, it could be set for “1” day prior at 9:00 AM. In this case the cutoff would be at 9:00 AM on Monday for Tuesday’s flex period; 9:00 AM on Tuesday for Wednesday’s flex, etc.)
- NOTE: If your cutoff is set for a prior day (not = 0) then the Substitute features in the system will not work.
- It is not possible to designate a specific day of the week or date for the cutoff to be set or run. (For example, it is not possible to set a cutoff time for every Friday at 3:00 to apply for all days the following week.)
- Here is a video geared toward students that reviews Cutoff time: Cutoff Time & Activity Registrations
Catchall Options
Please consider whether or not to enable one of the Catchall options for your school. Catchall is an automated process for students who are not registered for an activity to be sent to a specific room or teacher for the flex period. If Catchall is set up at your school, it will be the default “registration” showing on the student calendar until the student is registered for an activity session. There are 4 different options for Catchall described below.
- Catchall by Room - The system will assign non-registered students to one room that has been set up by an Admin in the Flex system. For example, an auditorium or large group study hall room. Schools often position this as an unfavorable option in an effort to encourage students to register for activities. (Multiple adults can be given access to take attendance for Catchall by Room.)
- Autoassign w/Catchall by Room - This option will provide a way to intelligently assign (register) students to activities with minimal effort. This is done by matching students to activities with teachers they know or based on groups they are in. The goal is to balance class size and room maximums while ensuring all students are placed in suitable activities. If there are not enough ‘available’ seats for students to be assigned to they will default to the designated “Catchall Room”. (Please see more details in the Autoassign section of this guide.)
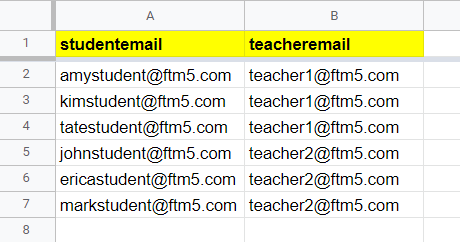
- Homeroom Assignment - The system will assign non-registered students to a designated teacher based on a file created and maintained by the school. The teacher will see this as an activity on their calendar. As these students register for other activities, the teacher will see the number of students registered for their “Homeroom Catchall” activity decrease. (“Homeroom” is just the default name, as this does not have to actually be the student’s homeroom.) This is set up in Flex by uploading a CSV file of student emails and the corresponding teacher email, to whom the student should be assigned.
- Homeroom by Schedule - This is very similar to Homeroom Assignment functionality. The system will assign non-registered students to a designated teacher, depending on the schedule for that day. In this case, multiple CSV files created and maintained by the school (assigning students to the corresponding teacher) are set up in the system and linked to specific dates. For example, if there are “A” and “B” days - a student can be assigned to a different teacher depending on which day it is. Flex Admins must specify in the Flex period settings which file to run/load on which date.
- Below is a screenshot of the required format (column headers) to create a catchall file for Homeroom Assignment & Homeroom by Schedule catchall. Files must be in CSV format to upload into Flex:
- Please see the videos listed below for more details.
Autoassign with Catchall by Room
Autoassign is a “catchall” option in Flex that automatically assigns unassigned students to choice activities with available seats. If not enough seats are available in the choice activities for automatic assignments, the remaining students will be assigned to a designated “catchall room”.
The Autoassign function automatically runs between 12-1 AM but it’s also possible for admins to manually trigger the Autoassign process. System logic has been developed to “intelligently” assign students to available activities.
The Autoassign logic includes the following considerations:
- Preferential placement in activities for which the student is included in an associated group.
- Preferential placement in activities owned by teachers the student has on their schedule.
- This is defined by uploading a “Preference List” CSV file. (Please see details below.)
- The number of students autoassigned to activities will be limited by the Activity Cap and Room Cap.
- The system balances the number of students autoassigned to each classroom, as possible. (This logic will continually be enhanced.)
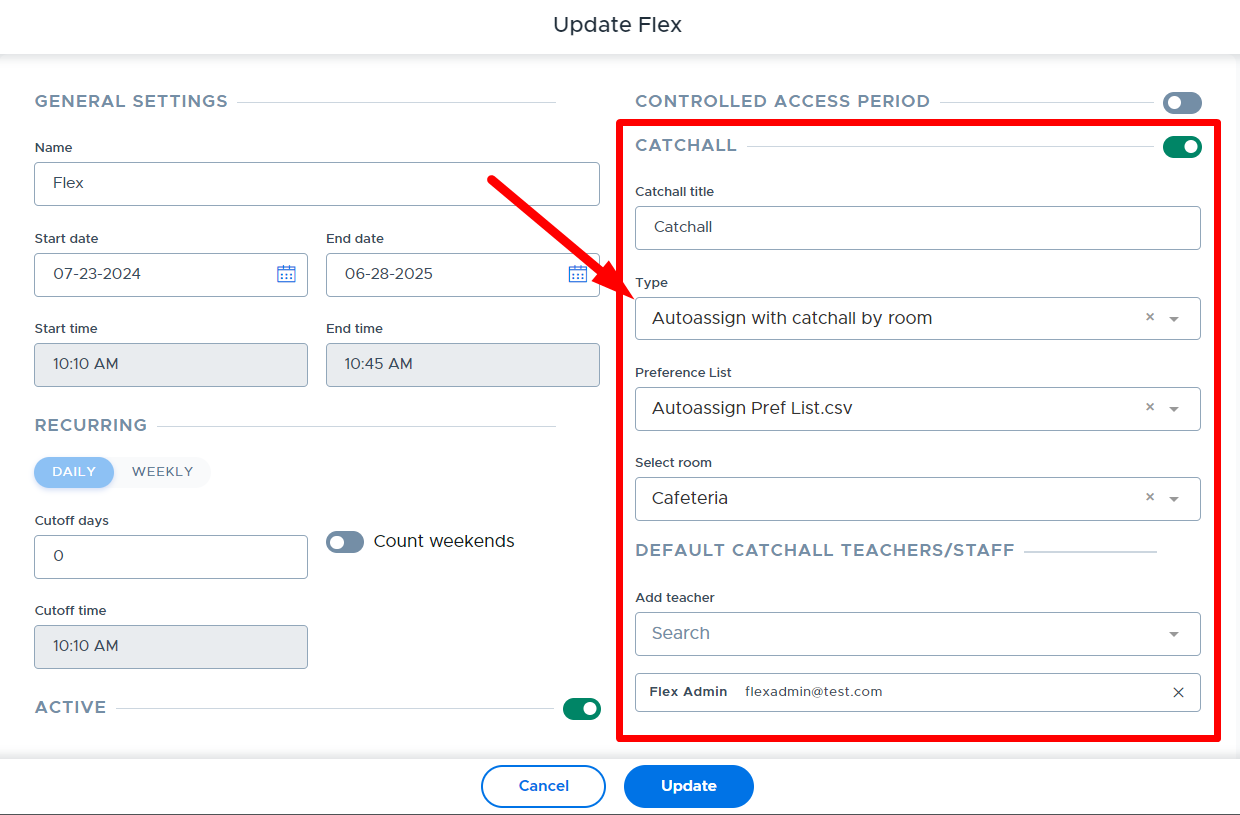
Enabling Autoassign
Flex admins enable the Autoassign feature within the “Flex Periods” settings screen, shown below. This can be done when setting up a new flex period or by editing an existing flex period. When setting this up, a “Preference List” CSV file needs to be linked, which identifies teachers who a student should be placed with when the Autoassign algorithm runs. (Please see the “Creating a Preference List” section below for more details.)
In addition, a catchall room needs to be designated when setting up the Autoassign catchall. This room is used as a ‘last resort’ to assign students to when there are not enough “available seats” in the choice activities. Keep in mind that Flex admins can view Autoassign details on the Dashboard ahead of time to proactively create enough seats in choice activities. It will also be possible for admins to “rerun” the Autoassign process to assign students out of the catchall room. Please keep reading for more information on these topics.
Creating a Preference List CSV File
A “Preference List” file will need to be created in CSV format and uploaded to Flex. This file will identify the teachers a student could be assigned to when the Autoassign algorithm runs. Changes or additions to the Preference List can be made by uploading a new file or directly on the “Preference List” user interface screen in Flex. The Preference List can be sent via SFTP or uploaded manually into the Flex system by an Admin.
Without a preference file, Autoassign can still be used but will consider all teachers equally available (or a “good fit”) when autoassigning students, meaning students might be autoassigned to teachers they do not know or have on their regular schedule.
Please see the linked document for additional details: “Instructions for Creating a Preference List”.
Managing Autoassign from the Admin Dashboard
The screenshot below shows the Autoassign section of the admin “Dashboard” in Flex that displays the statistics for Autoassign for the selected date. It is possible to look at a future date and make necessary adjustments to ensure enough “available seats” exist in choice activities. See below for explanations of the details displayed on the Dashboard.
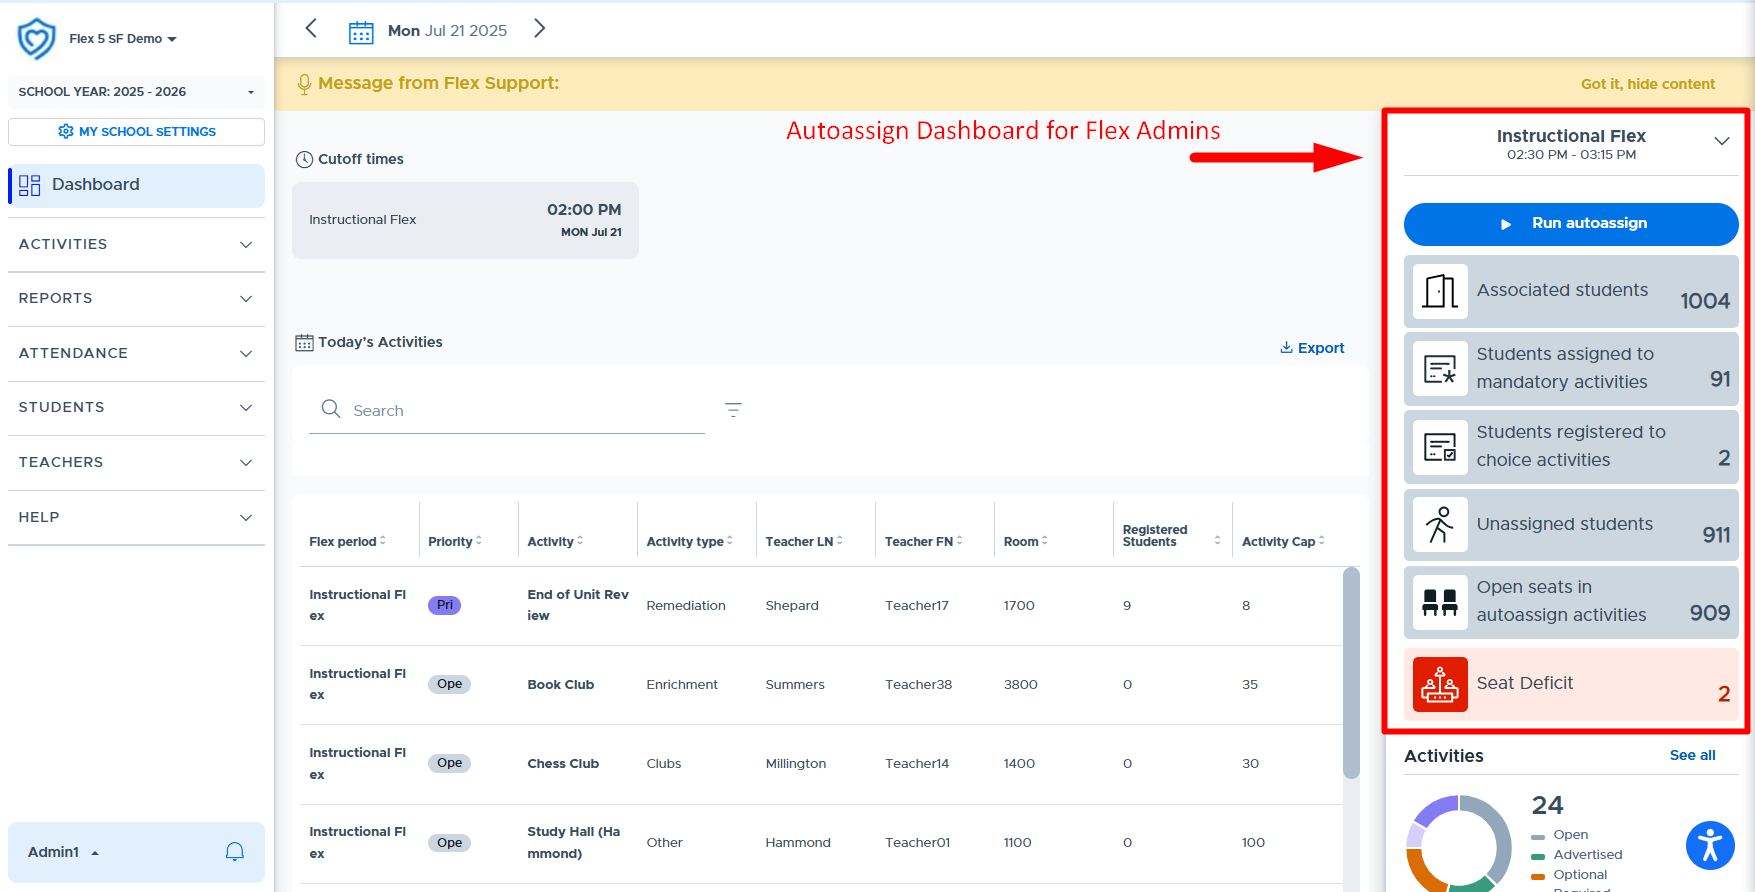
- Run Autoassign allows a Flex admin to manually trigger or run the Autoassign process for the selected date ahead of time or after the fact if changes have been made. However, this will automatically happen between 12-1 AM for the current day’s flex period(s).
- Associated students is the total number of students associated with the flex period. (This does not include Excluded Students or those who don’t have access to a Controlled Access Period.)
- Students assigned to mandatory activities are those in a Required, Priority, or Admin Required activity or have been Plus Added.
- Students registered to choice activities are those who have signed up for an Open, Advertised, or Optional activity.
- Unassigned students are those who have not signed up for an activity or have not been assigned to a mandatory activity.
- Open seats in Autoassign activities are the number of seats available in “choice” activities enabled for Autoassign.
- Seat Deficit shows the number of students who will be assigned to the catchall room because there are not enough “Autoassign” seats available in choice activities.
Additional Autoassign Information
- Autoassign will run between 12-1 AM when enabled for an active flex period that day. It will only assign students who are not currently assigned at that time. If an admin ran it earlier and there were no changes (like new students or removed activities), then the midnight “run” would essentially do nothing.
- Note: The Autoassign process takes a few seconds to a few minutes to run depending on the size of your school and other variables. Larger schools may need to “refresh” their screen after a few minutes to see that Autoassign has run successfully.
- We generally do not recommend running the process ahead of time to avoid blocking student choice in activities where auto assignments may have filled the activity, but we recognize there are times when schools may choose to do this for various reasons. There is more on this topic below in the “Running Autoassign Manually” section.
- Once Autoassign is run for a particular date it cannot be “undone” or reset. This applies when it’s run manually by an admin or automatically at midnight. Individual changes can still be made based on timing (before/after cutoff time), seat availability in choice activities, and the priority hierarchy.
- The flex period “Cutoff Time” still applies.
- If the cutoff time is before the midnight process, adults will not be able to make changes to their Flex schedule the next morning, except for plus adding ‘available’ students to existing scheduled activities. (Plus add rules do not change in Flex when Autoassign is enabled.)
- If the cutoff time is after the midnight process, for example, set at 8:30 AM, then adults and students can make changes to their Flex schedule for the day, including changing the Autoassign placement. (This assumes there are activities with available seats for a student to select, as students’ autoassignments will have taken up available choice seats, limiting the choices for students to make changes.)
- Flex admins may want to consider whether or not to adjust the school’s cutoff time when turning on the Autoassign catchall feature.
- “Optional” level activities & Autoassign:
- The system will only fill available seats in “Optional” level activities with unassigned students who are in the associated group.
- The system doesn't count open/available seats in optional activities if there are no unassigned students to fill them. For example: If there were an optional activity with 20 open/available seats, but only 2 students in the group were currently unassigned, only 2 (of the 20) seats in that activity would be counted as an "Open seat in Autoassign activities".
- The Autoassign algorithm is designed to respect the following settings: Excluded Students, Student Restrictions, Contact Control, and Controlled Access Periods.
- The “midnight” Autoassign process is designed to run before student agenda emails are sent.
- If new students are added or a student’s schedule changes and you wish to update the Preference List, updates can be made by updating and reloading the file into the system. It is also possible to make changes directly on the “Preference List” user interface in Flex. (See the “Preference List” user interface section of this guide for more details.)
Running Autoassign Manually
Flex admins can manually trigger the Autoassign algorithm for the current day (until the start of flex) or future days. This might be helpful when activities have to be canceled or additional activities are added after the algorithm has run. Once this has been done for a particular day it cannot be undone or reset, meaning student assignments cannot be “unassigned” or reset. Individual changes can still be made based on timing (before/after cutoff time), seat availability in choice activities, and the priority hierarchy.
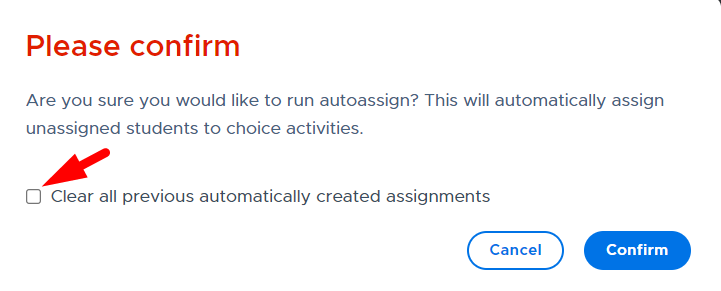
To run the Autoassign algorithm “manually” an admin should navigate to the desired date on the Dashboard screen and click “Run Autoassign” (see below).

The following message will appear asking for a confirmation. Clicking “Confirm” will run the algorithm to place unassigned students into available seats in choice activities. There is also the option to “clear all previous automatically created assignments” (if the algorithm has already run) and you want to rerun/reshuffle the algorithm for all students who were unassigned originally.
Autoassign can be run or rerun after the cutoff time but only until the start of the Flex period. Be sure to consider how users will know about possible schedule changes. It’s recommended that students and teachers log into Flex to view the most updated schedule shortly before the start of the Flex period. If you make an unusual change or one that potentially impacts many students, you might want to announce it outside of Flex to prompt students and staff to look for updates they wouldn’t typically expect.
Enabling a Choice Activity for Autoassign
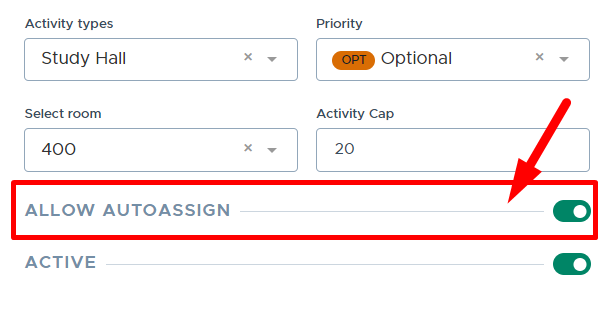
When a school has enabled Autoassign, adults will see an “Allow Autoassign” toggle when creating or updating “choice” level activities (open, advertised, and optional). This toggle will default to “on” but the adult can turn this “off” if necessary. (Please see the sample screenshot below.)
Note: When Autoassign is enabled for an existing flex period, previously scheduled “choice” activities will default to “Allow Autoassign”.
When the toggle is “on” for a choice activity, the system can place unassigned students in the available seats when the algorithm is run. Assignments will be based on the Autoassign logic described at the beginning of this document. The algorithm attempts to balance class sizes, so there is no guarantee that all available seats in a specific activity will be filled. When the toggle is “off” seats will not be filled when the autoassign algorithm runs.
Open Activities - Linking a Group for Autoassign
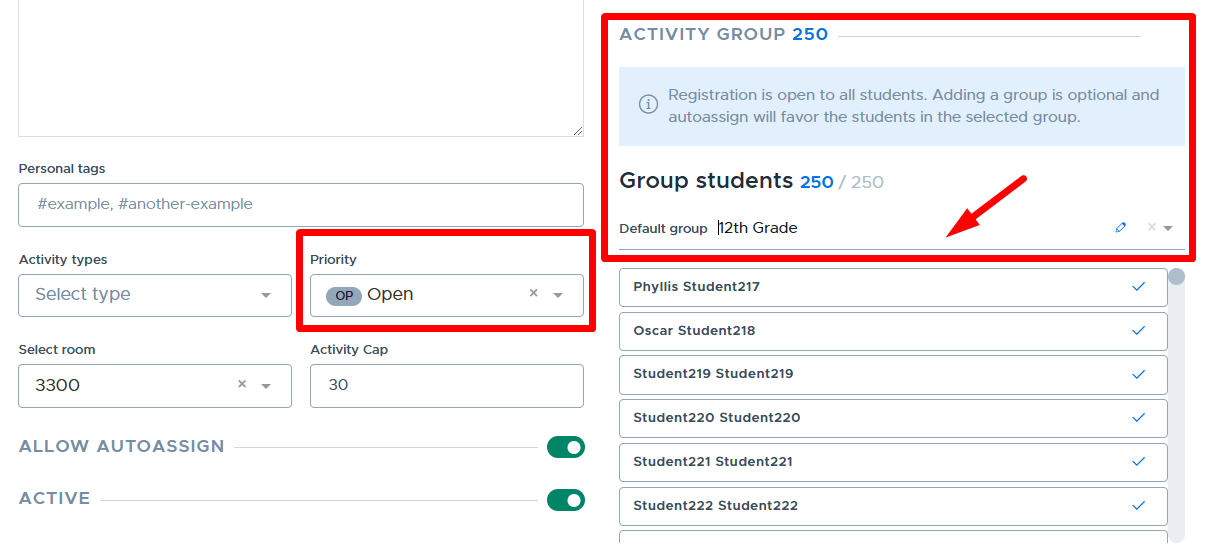
The Autoassign logic will preferentially place students in activities when they are included in a group that is associated with the activity. Since optional and advertised level activities have a group linked to the activity, the students in this group will be preferentially placed in the available seats when Autoassign runs.
Open-level choice activities do not require a linked group of students since these activities are “open” to all students. For schools using Autoassign, adults will have the option to link a group to an open-level activity but this will only be used for the Autoassign process. Adding a group in this manner is the equivalent of including the student and teacher on the Preference List file. Also, it does not change how an “open” activity works in Flex.
Below is an example of an “open” activity screen and the section where a group can be selected for preference when Autoassign runs.
Enforce Room Size (with Homeroom Catchall)
The “Enforce Room Size” feature is only available to schools using Homeroom Assignment or Homeroom by Schedule catchall. When this feature is enabled, as students are registered out of the teacher’s homeroom catchall, the number of available seats in the teacher’s scheduled “choice” activities will increase. (This feature can be turned on from the “Flex Periods” screen shown below.)

The total available seats for catchall plus scheduled “choice” activities will not go above the set room size. (This is the “Room Size” set by an admin when the room was added to the Flex system.) Teachers can go above the room size by scheduling mandatory activities and plus adding students. Below is where an admin sets up the room size in Flex.
It’s also important to note that the teacher/adult must have their room set up in their “My Profile” screen. This room is automatically used for the homeroom catchall. In order for the “Enforce Room Size” feature to work, the teacher must use the same room for any scheduled choice activities.
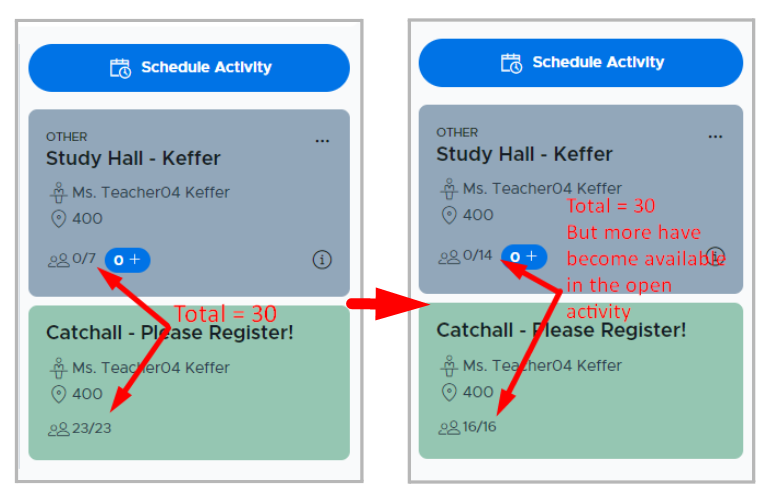
Below are some example scenarios to show how “Enforce Room Size” works in Flex. The teacher we are using is in Room 400, which has a capacity of 30.
Scenario #1: The teacher has a homeroom catchall with 23 students in it and therefore only has 7 available seats in the open “Study Hall” activity. (Even though the Study Hall activity was set up with “20” as the Activity Cap.) The second screenshot shows what happens after 7 students register out of the catchall. The teacher now has 14 available seats in the open activity and 16 students still in catchall.
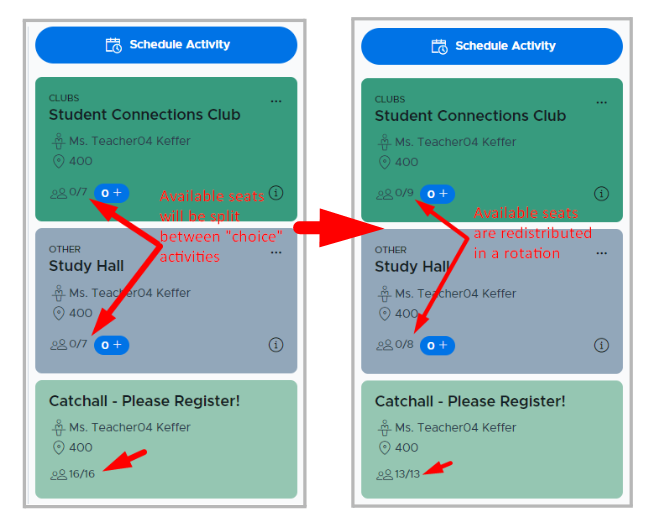
Scenario #2: When the teacher has more than one choice activity scheduled, in addition to their catchall, the available seats will be split or distributed between all “choice” activities. As more students register out of catchall, the available seats are redistributed to the choice activities in a rotating fashion.
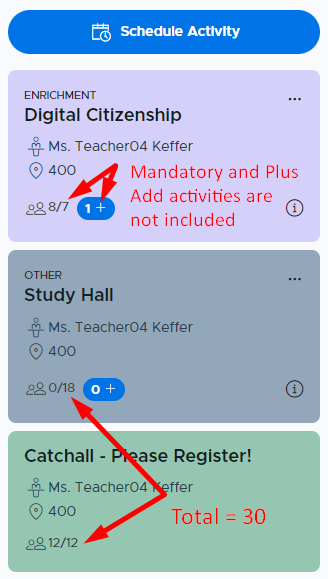
Scenario #3: When teachers schedule mandatory activities and/or plus add students, the student counts will not be included in the “Enforce Room Size” total. This provides teachers with some flexibility to exceed the room size if necessary. Below is an example of this scenario.
Additional Notes for using “Enforce Room Size”:
- This feature starts functioning, with the homeroom catchall, as soon as the admin enables it and saves the settings.
- The system adjusts the available seats in choice activities as soon as the teacher schedules additional choice activities and as students register out of catchall.
- Admins can adjust the room size in the “Rooms” settings menu as necessary.
- Teachers may see additional seats become available in their choice activities AFTER cutoff due to students being plus added out of homeroom catchall. Students will not be able to register for these open seats when it is AFTER cutoff time.
- A key driver to how Enforce Room Size works is to get the catchall students to register out which then opens up seats in choice activities. Students may report not being able to sign up for a choice activity and not know to come back later and try again.
- When there are multiple activities being run in the same room during a flex period, the system suggests a “Room Cap” value. This feature does not include the catchall assignments or the Enforce Room Size functionality. The adult(s) in the room will need to be aware of any students being assigned to them for catchall purposes and make the necessary adjustments to their “Room Cap” and/or scheduled activities.
Controlled Access Periods (CAP)
Controlled Access Periods provide schools with multiple flex periods the ability to limit which students participate in each flex period. An example of when CAP might be useful is: a school has two grades (7th and 8th) using Flex and they offer two different flex periods. They want 7th graders to only access their flex period and the 8th graders to access a separate flex period. Teachers will have access to all Flex periods, so they run sessions for both groups of students.
- CAP is set up by doing the following:
- Create a “group” in Flex of the students that should or should not be allowed to access the flex period. (See below for more details about creating “Groups” in Flex.)
- Once the group is created, go to the Flex Period settings screen and enable CAP.
- Select the group that was previously created.
- Select whether to “Allow Students” or “Forbid Students” in the group to access this flex period.
- If the Group needed for CAP is a “grade-level” group, these can be created automatically by turning on “Auto sync” groups. Please see the Auto Sync Group section of this guide for more information and instructions.
- Please see the following training videos for more details on CAP and Groups:
- Controlled Access Periods (CAP) - (video references “rosters” which is now “groups”)
- Creating Manual Groups (formerly Rosters)
- Creating a Manual Group via CSV File Upload
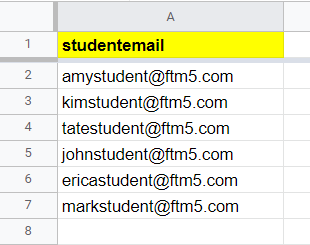
- Below is a screenshot of the required file format (column header) to create a group for CAP using a CSV file:
- Creating a Group of Groups
- Group File via Server Upload
ACTIVITY TYPES
Activity Types are categories used in the system to group the activities created and run by adults. When adding a new activity, teachers select the appropriate “Activity Type” category from a drop-down list. Here on the “Activity Types” screen is where an admin sets up and manages this list. The Activity Types are used in other areas of the system for sorting and filtering, such as on the admin Dashboard and reports. Here is a video that reviews the details: Managing Activity Types
Below is an example list of Activity Types:
Activity Type Examples: |
|---|
Academic Remediation Enrichment Athletic Clubs Other |
- Activity Types are set up by doing the following:
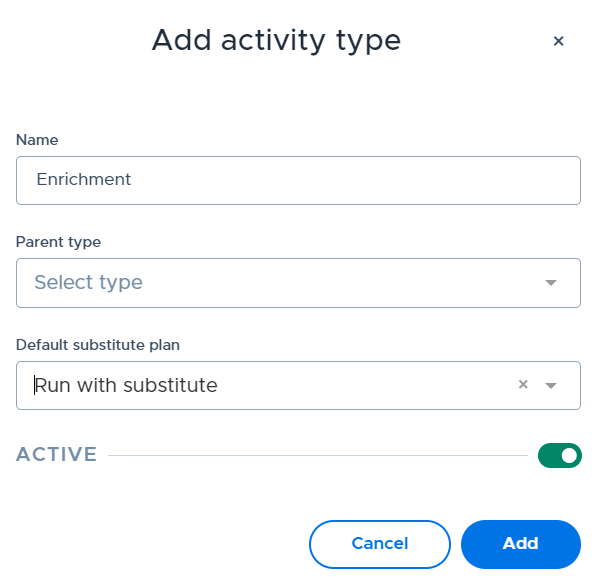
- From the Activity Types menu/screen, click on “Add Type”.
- Complete the screen as follows:
- Name: Enter the desired name for the activity type.
- Parent Type: Leave this field blank to designate the activity type as a “parent” category. (This is the recommended action based on how the system currently displays the Activity Types.)
- Default Substitute Plan: Select the desired option. This will determine the default “substitute plan” for activities assigned to this activity type. The admin or staff user can change the default plan when deciding whether or not to run an activity with a substitute for an absent teacher. (Please see the substitute functionality training videos for more details.)
- Run with Substitute - Default plan will be to run the activity with a substitute. (This is the recommended selection.)
- Cancel with Substitute - Default plan will be to cancel the activity when the teacher is absent.
- Active: Toggle defaults to “on” but can be moved to make the activity type “inactive”.
- Click “Add” to add the Activity Type to the master list.
- From the main “Activity Types” screen (shown below), it is possible to deactivate, edit, and delete activity types. Below are more details about each option.
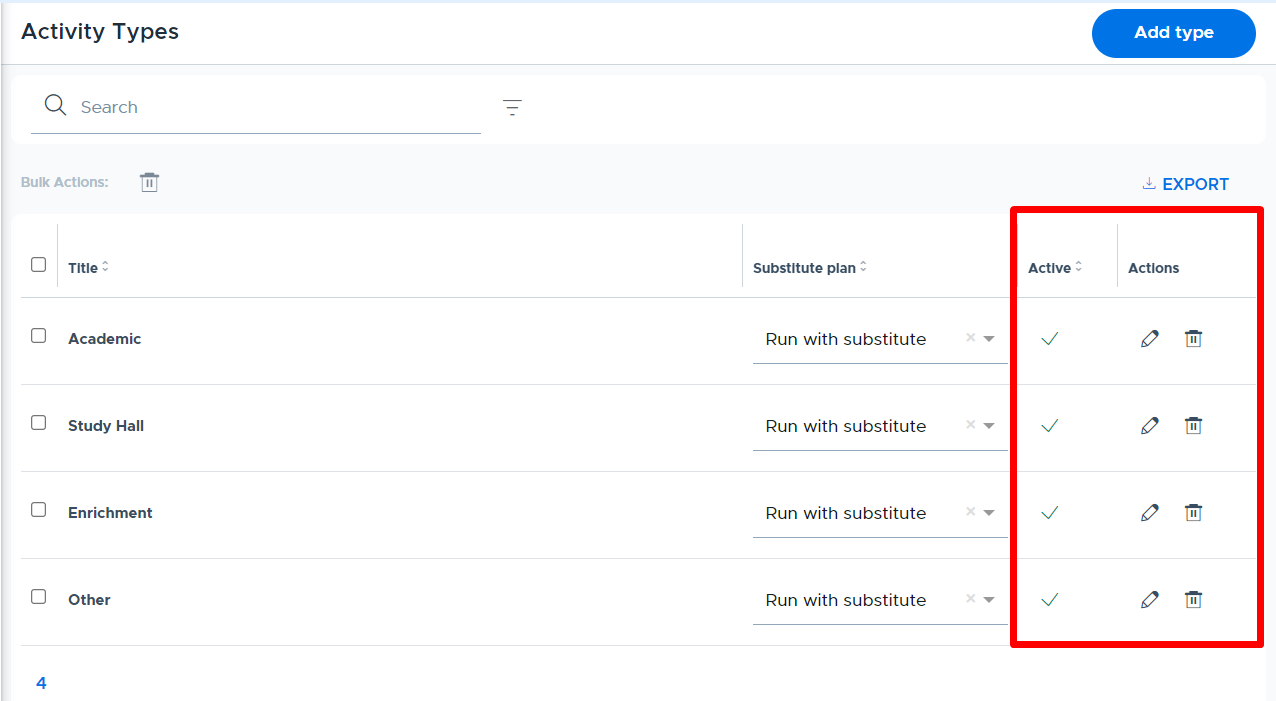
- Deactivate: To deactivate an Activity Type, click the check mark in the “Active” column and confirm. (Or select edit and toggle to deactivate.) Deactivating an activity type will remove it from the main list and make it unavailable to select when adults create a new activity. It will remain on any scheduled or previously run activity.
- Edit: Click the pencil icon to edit the activity type details. If the name of the activity type is changed, all updates will show on past, present, and future activities.
- Delete: Click the trash can icon to delete the activity type. The system will not allow an admin to delete an activity type that is being used. The red message shown below will appear:

- Activity Types are used by the following user roles in the system:
- Admins/Staff users:
- Dashboard (Admins Only)
- Full Attendance Report
- Teachers:
- New Activity - “Activity Types” drop-down list
- Activities Directory
- Students:
- Join Activity - “Activity Types” drop-down (for searching activities)
- Activities Directory
- It is often recommended to keep the number of activity types low as it will be easier to add to or refine this list when necessary. This also helps teachers ‘categorize’ their activities with more fidelity since the list of options will be less confusing.
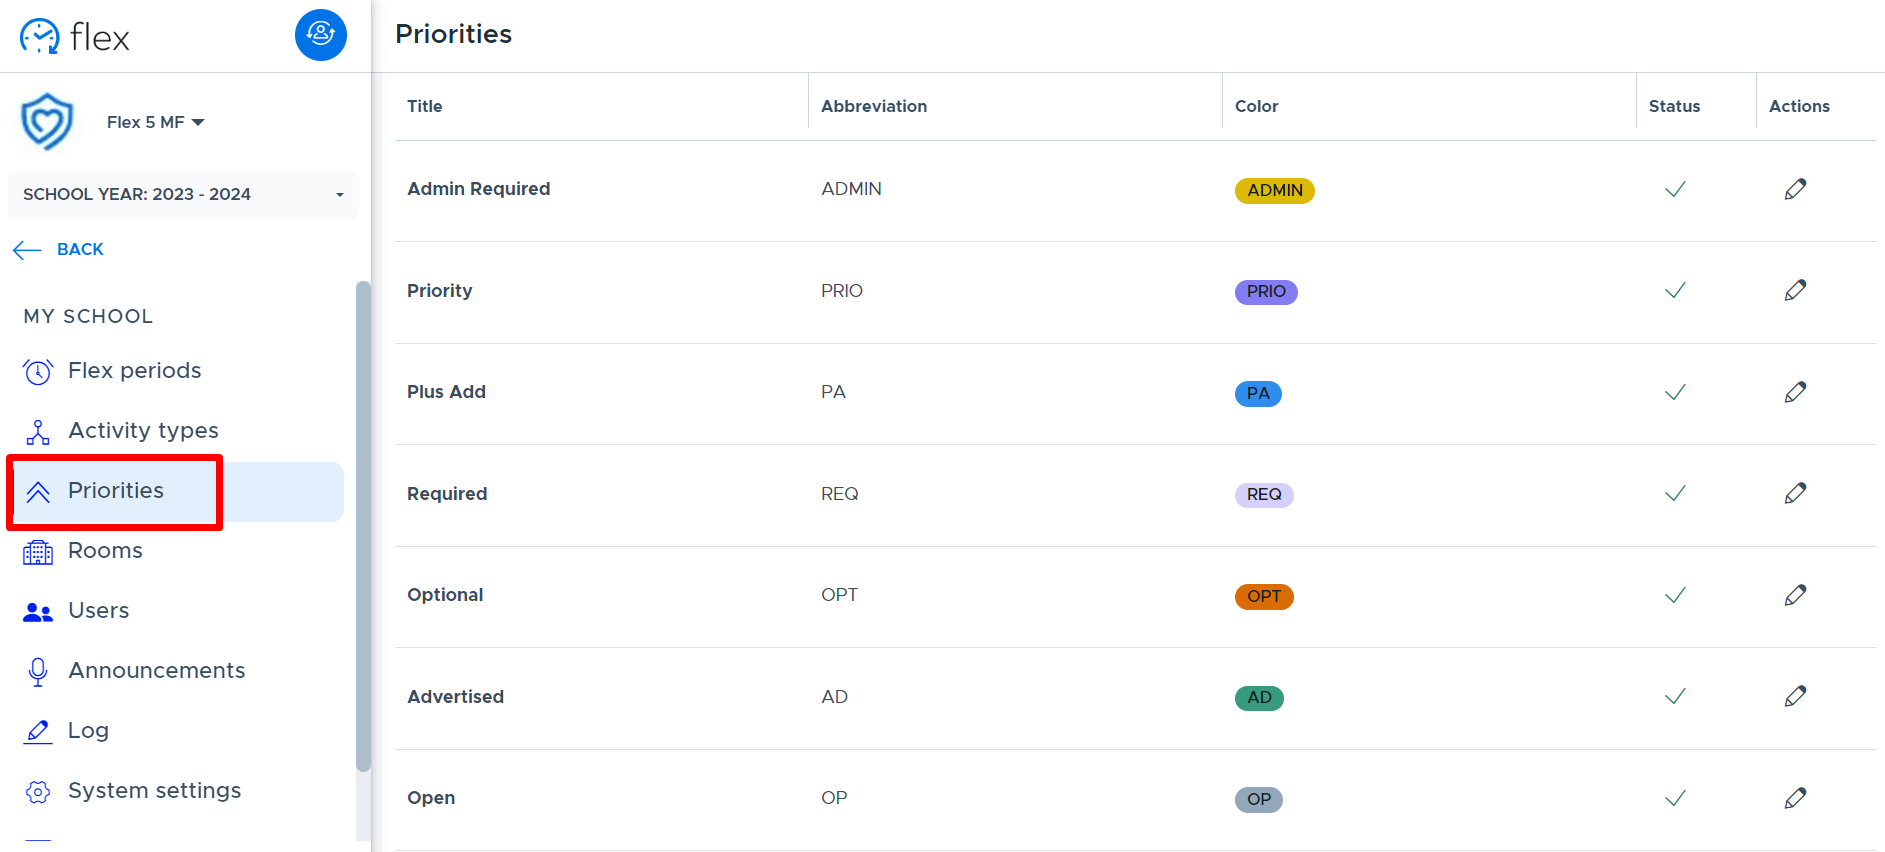
PRIORITIES
There is a hierarchy of priority levels in the Flex system that are used by adults when creating an activity. The priority levels determine if the activity is a student-choice or teacher-mandated activity. Higher priority levels will override lower priority levels when it comes to activities scheduled on the student’s calendar. Here is our Priority Level Guide that explains the priority levels in detail.
Below is the “Priorities” screen where a system admin can edit and hide priority levels. All priority types, other than “Plus Add”, can be hidden or deactivated. Priority level titles and abbreviations can be changed if desired, but the color and functionality will remain the same. Please see below for more information.
- Please see the following two videos for more information:
- Managing Priority Levels (for admins)
- Taking a Deep Dive into Priority Levels (for all adults)
- In order to customize the priorities in your Flex system, the following can be done.
- To hide or deactivate a priority level, click the check mark in the “Status” column and confirm. The priority level will stay in the list but have an “X” in the status column. (This can also be done through the edit icon.)
- It is best to do this prior to having your teachers create activities and use a priority level you wish to hide.
- It is possible to deactivate a priority level that has been used on a scheduled activity. It will remain on already-created activities but is not available when new activities are created.
- Deactivated priority levels will disappear from the Priority Legend on the My Schedule screen.

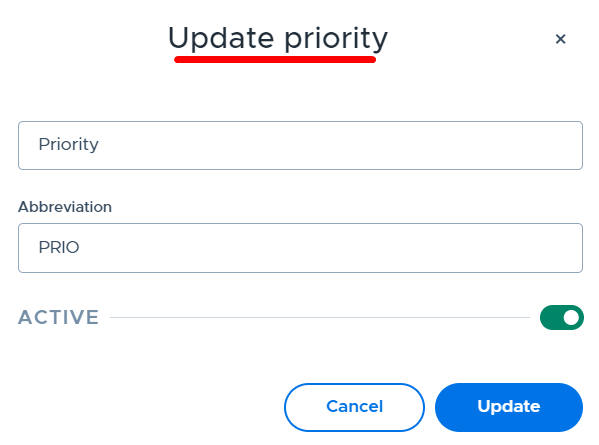
- To edit the title and/or abbreviation, click on the pencil icon in the “Actions” column for the desired priority level. Make the desired changes on the screen shown below and click “Update”. (Notice that you can also deactivate the priority level here by using the toggle button.)
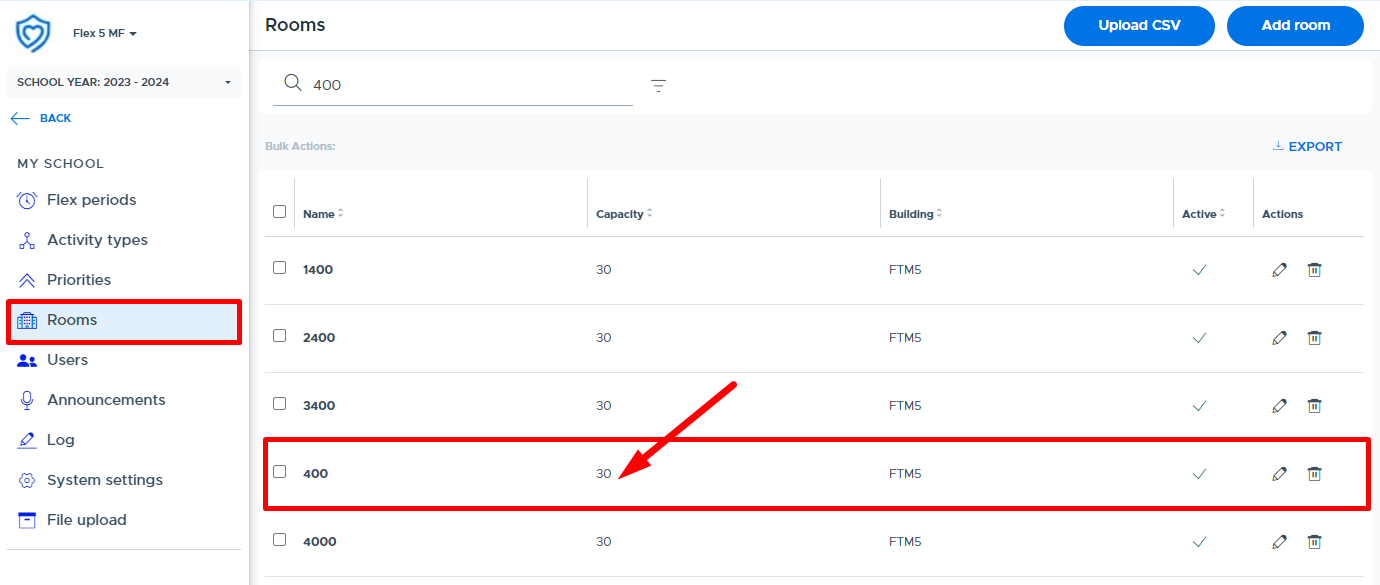
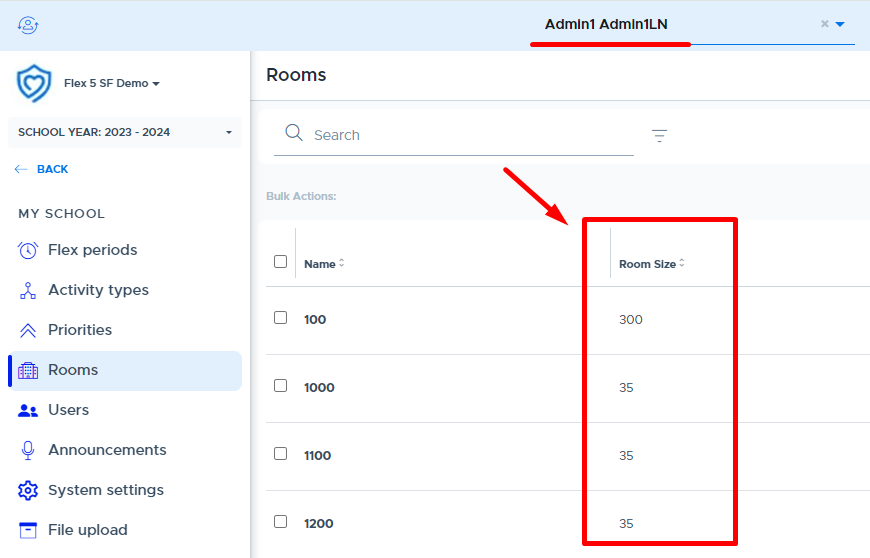
ROOMS
It will be necessary to set up rooms in the Flex system. These are rooms used by adults to run activities during Flex. It’s recommended that teacher/staff member’s names are not entered as “room names”, as this may create more work in managing rooms when things change. Once rooms are entered in the system, adults should associate themselves with their default room in their profile, which will then prefill on activities they create.
The system requires a capacity/room size for each room. This should be the maximum number of students that could be in the room (aka - fire marshall capacity). Please keep in mind that the teacher will designate the maximum number of attendees for each activity (activity cap) separately from the room capacity/size.
Currently, the system only uses room capacity/size for “Enforce Room Size” functionality and when there are multiple activities being run in the same room (see “Room Cap” feature). In addition, Admins can see which rooms have activities scheduled in them and the room size by using the “Room use” report.
Here is a video that shows you how to add and manage rooms in Flex: Adding & Managing Rooms
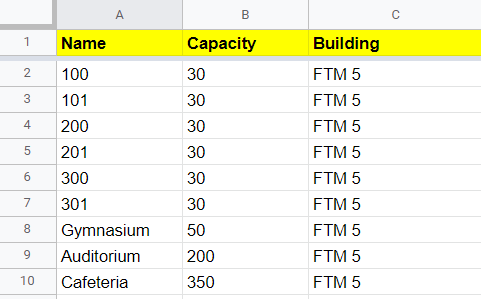
Adding Rooms via CSV File Upload
Below is an example list of rooms and capacities. If a list is created in the following format and saved as a CSV file, it can be uploaded into Flex in order to create the list of rooms. (NOTE: The “Building” field will be added by the CPM or it can be found on the “Add Room” screen shown below.)
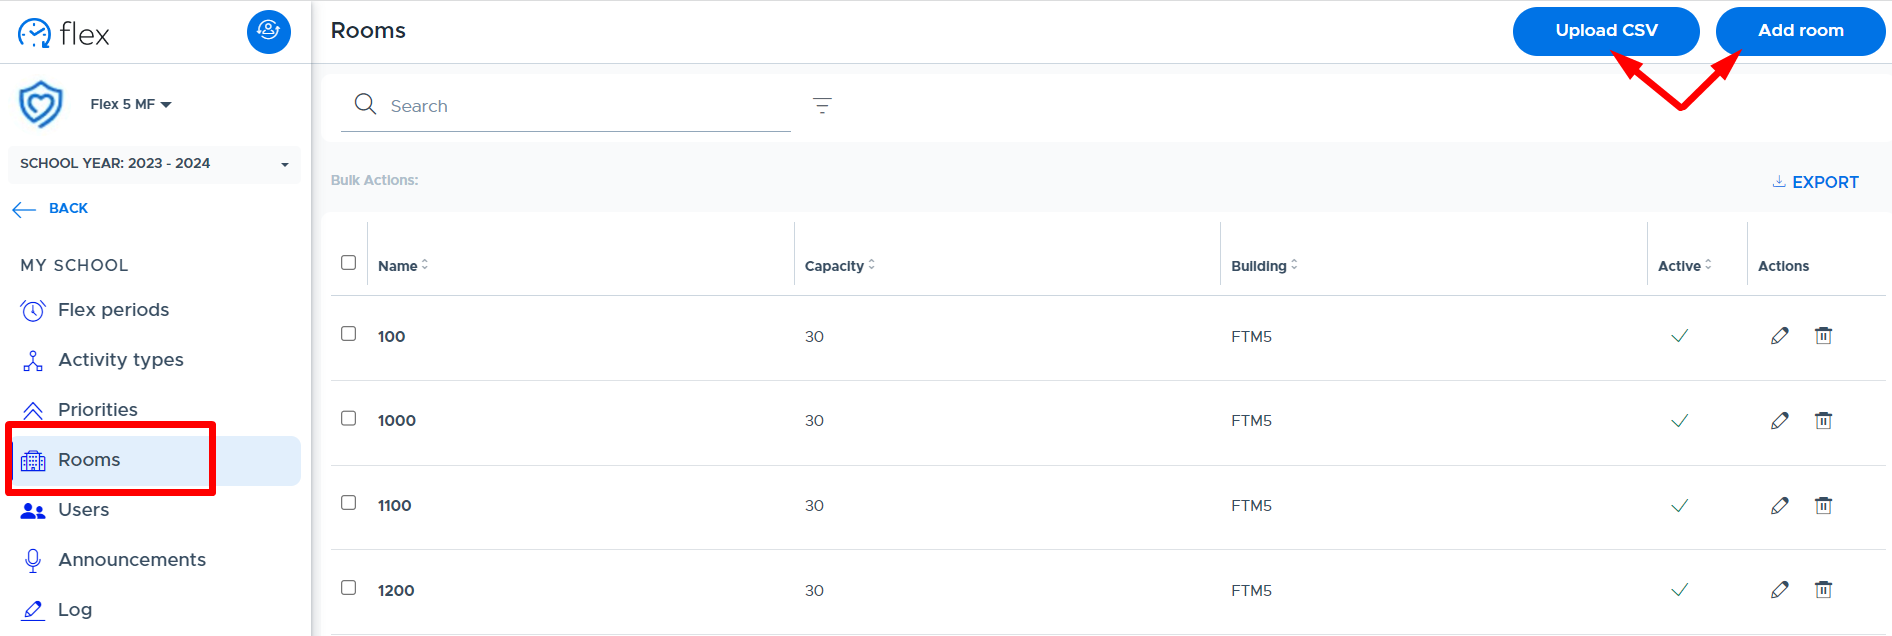
- To upload a CSV file of rooms in the above format, do the following:
- Go to the “Rooms” screen in Flex and click on the “Upload CSV” button shown below.
- Select the file on the “Upload a file” screen.
- Click “Add” and the rooms will be added to the Flex system.
Adding Rooms Individually
The other way to add rooms to the system is to add them individually by doing the following:
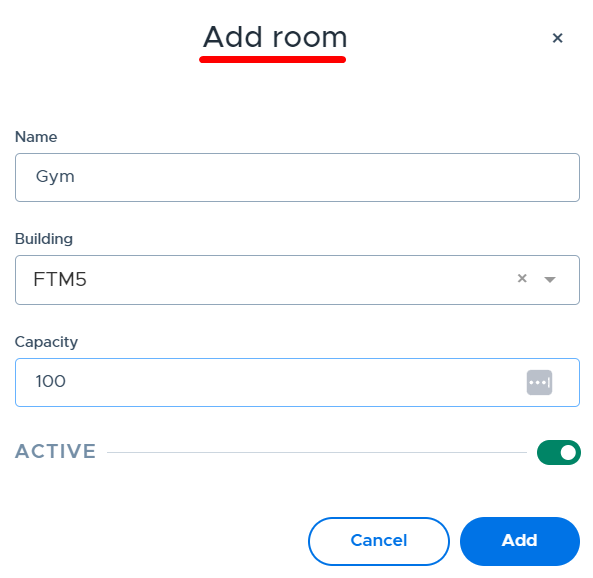
- From the “Rooms” screen, click “Add Room”.
- Complete the screen as follows:
- Name: Enter the desired room name or number
- Building: Select the building in the drop-down. (There is only one to select.)
- Capacity: Enter the maximum number of students that could be in the room. (This is also referred to as “Room Size” in Flex.)
- Active: Toggle defaults to being “on” but can be moved to deactivate the room.
- Click “Add” to add the room to the main list.
Deactivating, Editing, and Deleting/Archiving Rooms
- From the main “Rooms” screen (shown below), it is possible to deactivate, edit, and archive rooms. Below are more details about each option.
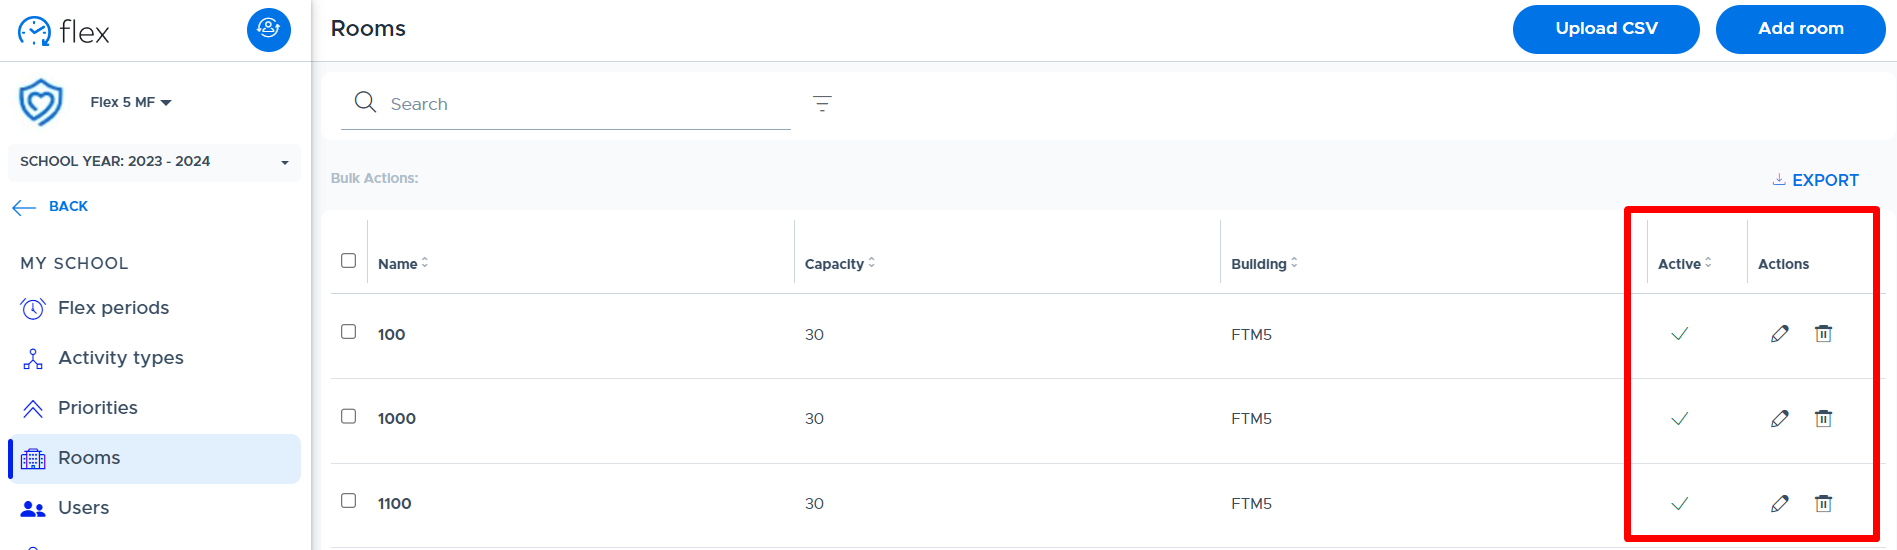
- Deactivate: To deactivate a room, click the check mark in the “Active” column and confirm. (Or select edit and toggle to deactivate.) You will not be able to deactivate a room if it’s being used.
- Edit: Click the pencil icon to edit the room details. If the name of the room is changed, updates will show on past, present, and future activities.
- Delete/Archive: Click the trash can icon to “archive” (delete) the room. The system will not allow an admin to delete/archive a room that is being used. The red message shown below will appear:

Room Cap (Shared Room) Functionality
The “Room Cap” feature only comes into play when more than one activity is scheduled in the same room for the same flex period. In other words, when teachers are sharing rooms or a teacher is running more than one activity during the same flex in the same room. It provides the ability to “cap” the number of students added to all activities scheduled in the same room for the same flex period and date.
The benefit of this new functionality is for “choice” activities (vs. mandatory) and controlling the number of available seats when multiple activities are scheduled in the same room. The system will provide a calculated suggested “Room Cap” when multiple activities are run in the same room. This total (or “Room Cap”) could be different than just adding the Activity Cap numbers together for the activities in the room.
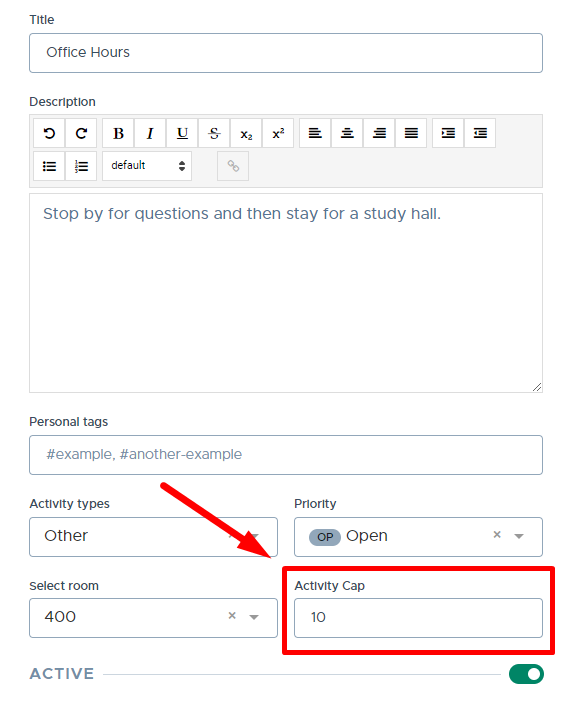
For example, a teacher schedules a mandatory activity for 8 students they need to see for remediation. The teacher also wants to provide a choice activity for students to come and ask questions for an upcoming test. The teacher sets the “Activity Cap” on the choice activity at 15 students. If the teacher sets the “Room Cap” at 20, so that no more than 20 students are in the room during flex, the system will subtract the 8 mandatory students and offer 12 open seats to students for the choice activity.
Note: The “Room Cap” functionality will never prevent an adult from adding a student to a mandatory level activity (via Plus Add or additional students) or from adding a student to a choice activity via Plus Add.
KEY TERMS
- Activity Cap:
- How many students can attend a specific activity.
- Adults set the Activity Cap when creating or editing their choice activities.
- The Activity Cap for mandatory activities is automatically set based on the number of students in the linked Group plus any Additional Students.
- Room Cap:
- How many students can be in a room at the same time and flex period.
- Think of this as the number of available seats. It’s designed to identify how many students can sign up for choice-level activities based on everything else happening in the room at the same time.
- This is a calculated suggestion that can be overwritten by an adult who owns an activity scheduled in the room.
- The Room Cap default value will be the GREATER of the “Room Size” OR the largest “Activity Cap” from the activities scheduled in the room.
- The Room Cap minimum value can never be less than the maximum of any of the following:
- Total distinct students rostered in all activities at a mandatory priority level
- Total of all students currently assigned to all activities in the room
- Largest “Activity Cap” value of the choice activities in the room
- How many students can be in a room at the same time and flex period.
- Room Size:
- How many students fit in a room. The Room Size (fire marshall capacity) is set by an Admin in Flex > My School Settings > Rooms.
Example Scenarios & Key Information
- Multiple “Choice” Activities by the Same or Different Teachers
- When two or more choice activities are scheduled in the same room for the same flex period, the following window will appear to the adult scheduling the second activity (and subsequent activities).
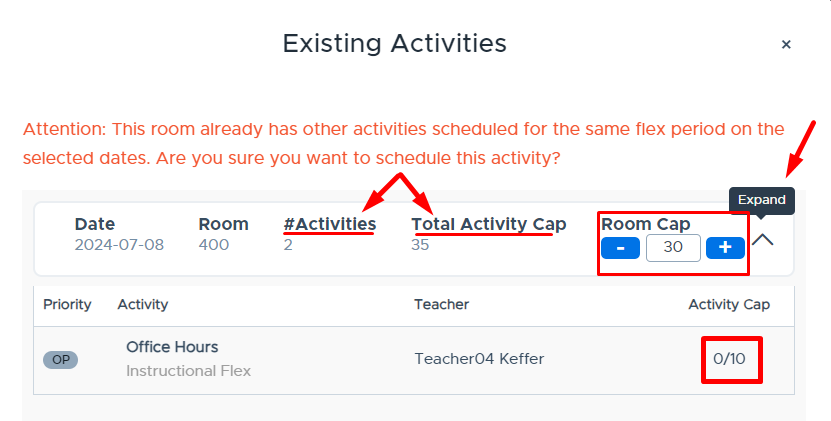
- This window shows the number of activities (#Activities) being scheduled in the room. This number includes the new activity being scheduled.
- The Total Activity Cap is the combined total of all Activity Caps, including the activity being scheduled.
- If the Expand button is clicked, a list of the activities already scheduled in the room will be displayed.
- The Room Cap default value will be the GREATER of the Room Size or the largest Activity Cap from the activities scheduled in the room. It can be adjusted as desired by adults who own the activities in the room.
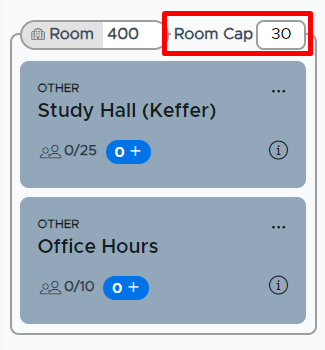
- Once the second or subsequent choice activities are scheduled in the same room, the “My Schedule” screen will look similar to the left screenshot below.
- Here the default Room Cap is the Room Size - because it was larger than all the Activity Cap values.
- If the Room Cap is changed and set below the total of all Activity Caps, the system will only allow the number of students registering across all choice activities to be equal to the Room Cap.
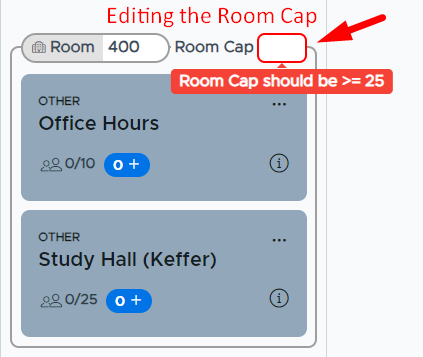
- The Room Cap can be edited from this screen by placing your cursor in the field and entering the desired Room Cap number. (See the screenshot below on the right.)
- The system will tell you the Room Cap's minimum number.
- In the example below, the minimum Room Cap is equal to the greatest Activity Cap.
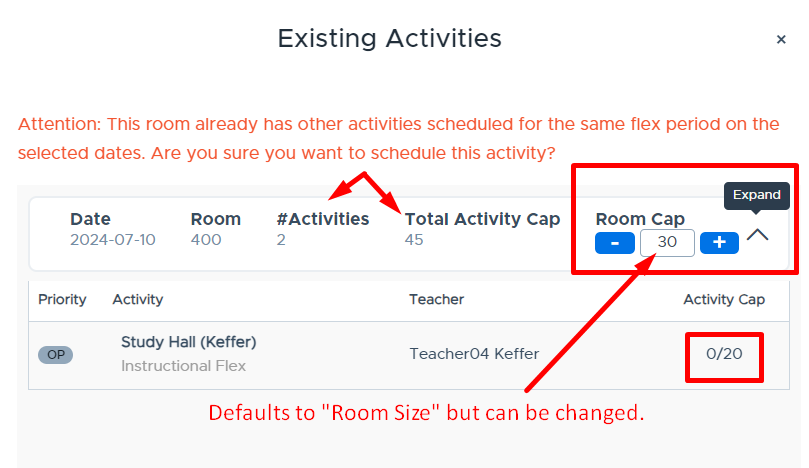
- Combination of “Choice” and “Mandatory” Activities by the Same or Different Teachers
- When two or more combined choice and mandatory activities are scheduled in the same room for the same flex period, the following window will appear to the adult scheduling the second activity (and subsequent activities).
- In the example below, the mandatory activity being scheduled has an Activity Cap of 25, while the Activity Cap of the already scheduled choice activity is 20.
- This makes the Total Activity Cap = 45 but the Room Cap defaults to 30, which is the Room Size.
- This can be edited here or on the “My Schedule” screen.
- The system will guarantee seats for the mandatory activity/activities (25 in this example). The number of seats available for the choice activity/activities is based on the difference up to the set Room Cap (5 in this example).
- If an adult adjusts the Room Cap, then additional seats will be made available for the choice activity/activities. Students will see this when they go to register for an activity.
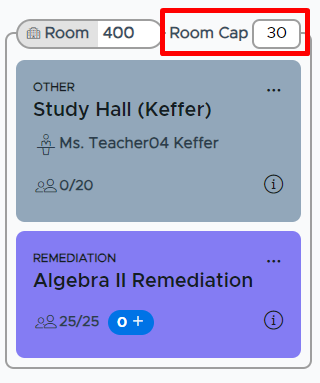
- When two or more combined choice and mandatory activities are scheduled in the same room for the same flex period, the following window will appear to the adult scheduling the second activity (and subsequent activities).
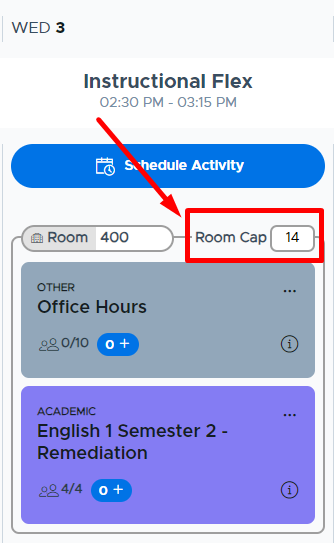
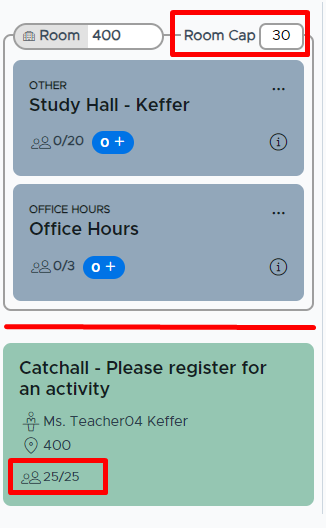
- Below is what this looks like on the adult’s “My Schedule” screen:
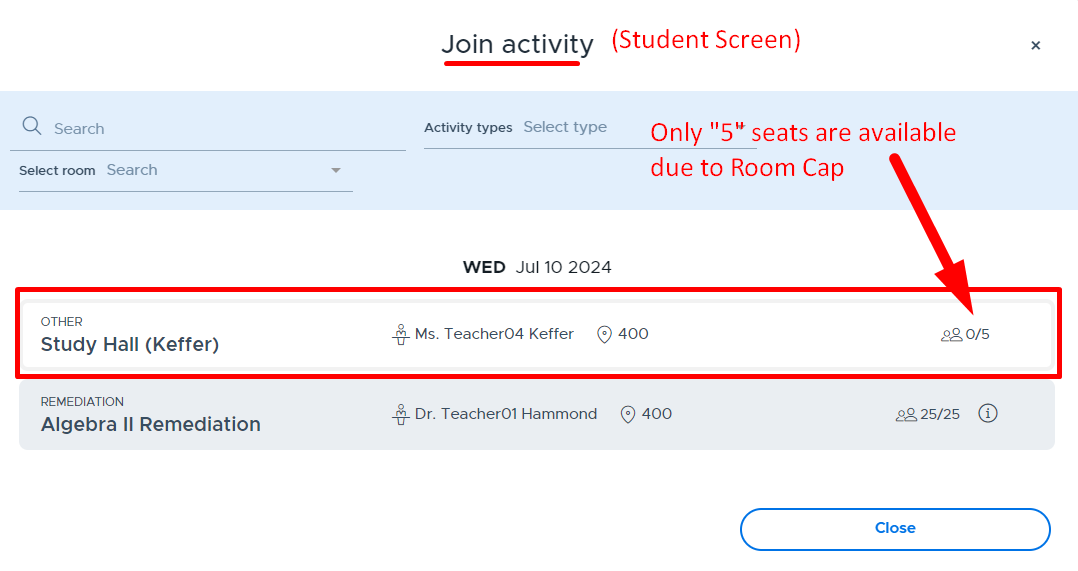
- The screenshot below shows the student’s “Join Activity” screen and the available seats in the above choice activity (Study Hall) due to the Room Cap = 30.
- Note: If an adult increases (or decreases) the Room Cap, the available seats for the choice activity will adjust accordingly.
- The screenshot below shows the student’s “Join Activity” screen and the available seats in the above choice activity (Study Hall) due to the Room Cap = 30.
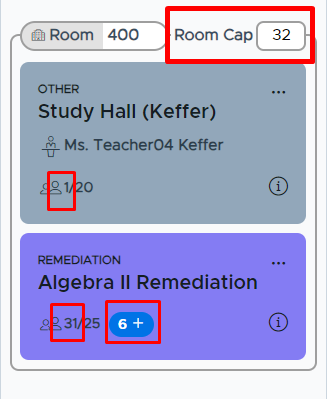
- Adding Students via Plus Add or Additional Students (mandatory activities only)
- Students can be added to any activity via Plus Add and be guaranteed a seat.
- Students can be added to a mandatory activity via “Additional Students” and be guaranteed a seat.
- Once the Room Cap limit is reached, the system will automatically adjust the Room Cap number to account for students being added via one of these above methods.
- If there is a combination of mandatory and choice activities in the same room, added students (to either activity) are first given “open” seats until the Room Cap limit is reached. After this is reached, the Room Cap will auto-adjust (increase) as students are added.
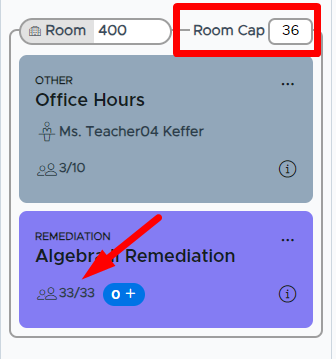
- In the example below, students were plus added to both the choice and mandatory activity and the system increased the Room Cap = 32 because of this.
- There are no open seats available for the choice activity (Study Hall) because the Room Cap limit has been reached.
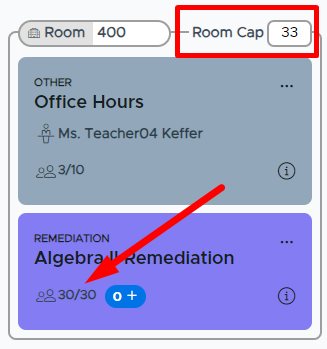
- In the example below, students were added to the mandatory activity via “Additional Students” which changed the Room Cap from 30 to 33.
- Multiple “Mandatory” Activities by the Same or Different Teachers
- When multiple mandatory activities are scheduled in the same room, the “Room Cap” will automatically default to how many total students are in the activities.
- Rarely, will there be a need to adjust the “Room Cap” in these situations. If you plus add or add additional students to a mandatory activity, the Room Cap will auto-adjust.
- The “Room Cap” can be adjusted if/when a choice activity is being added to the same room.
- If a student happens to be on the attendance roster for multiple mandatory activities, in the same room and on the same day, the system will ensure that the student is guaranteed a seat in the selected activity.
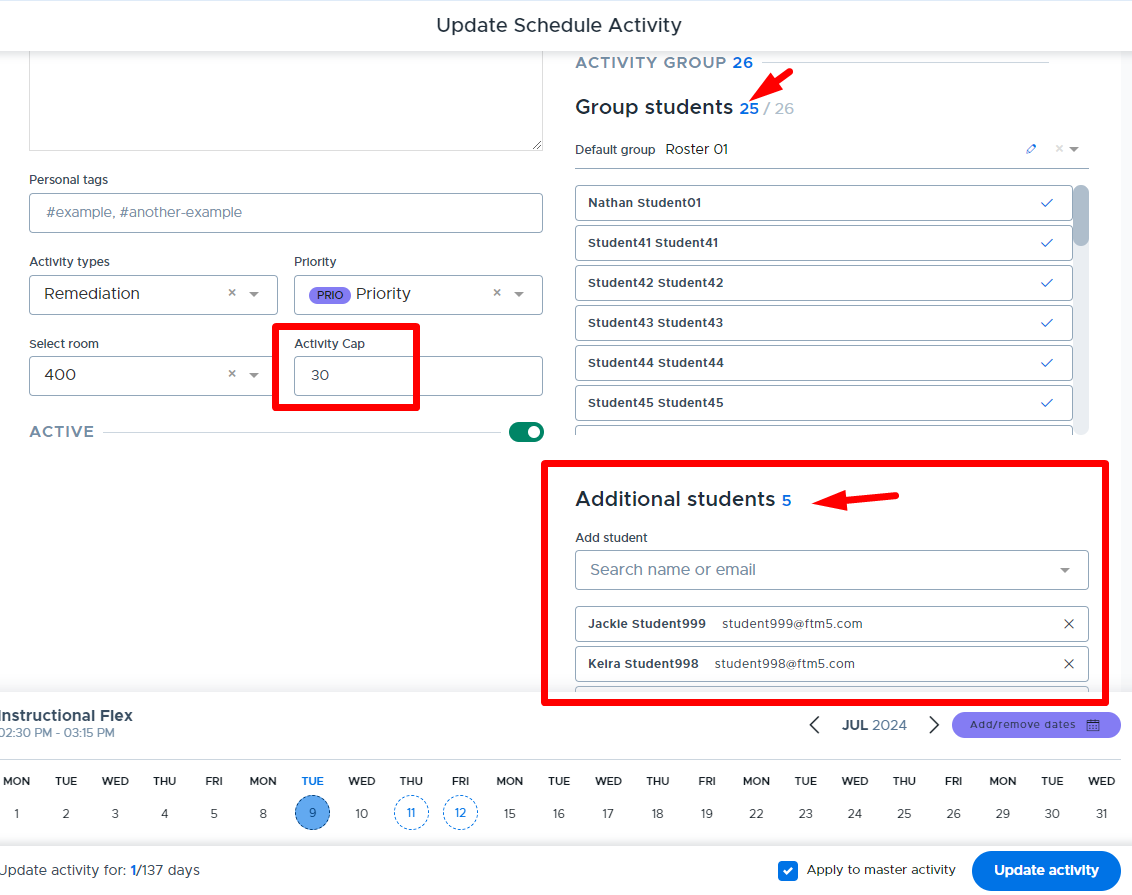
- Room Cap and Group Updates
- When a Group is updated and it’s linked to a mandatory activity in a shared room, the Room Cap will automatically update based on students being added to or removed from the Group.
- In the example shown below, the linked Group for the “Algebra 1 Remediation” activity was updated by adding 3 students. Both the Activity Cap and the Room Cap are updated by 3 more students.
- Room Cap and Catchall
- If your school uses Homeroom Assignment or Homeroom by Schedule Catchall, the current “Room Cap” functionality does not include these Catchall assignments.
- The adult(s) in the room will need to be aware of any students being assigned to them for catchall purposes and make the necessary adjustments to their “Room Cap” and/or scheduled activities.
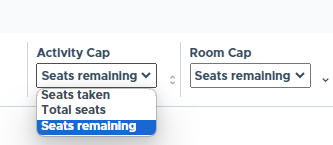
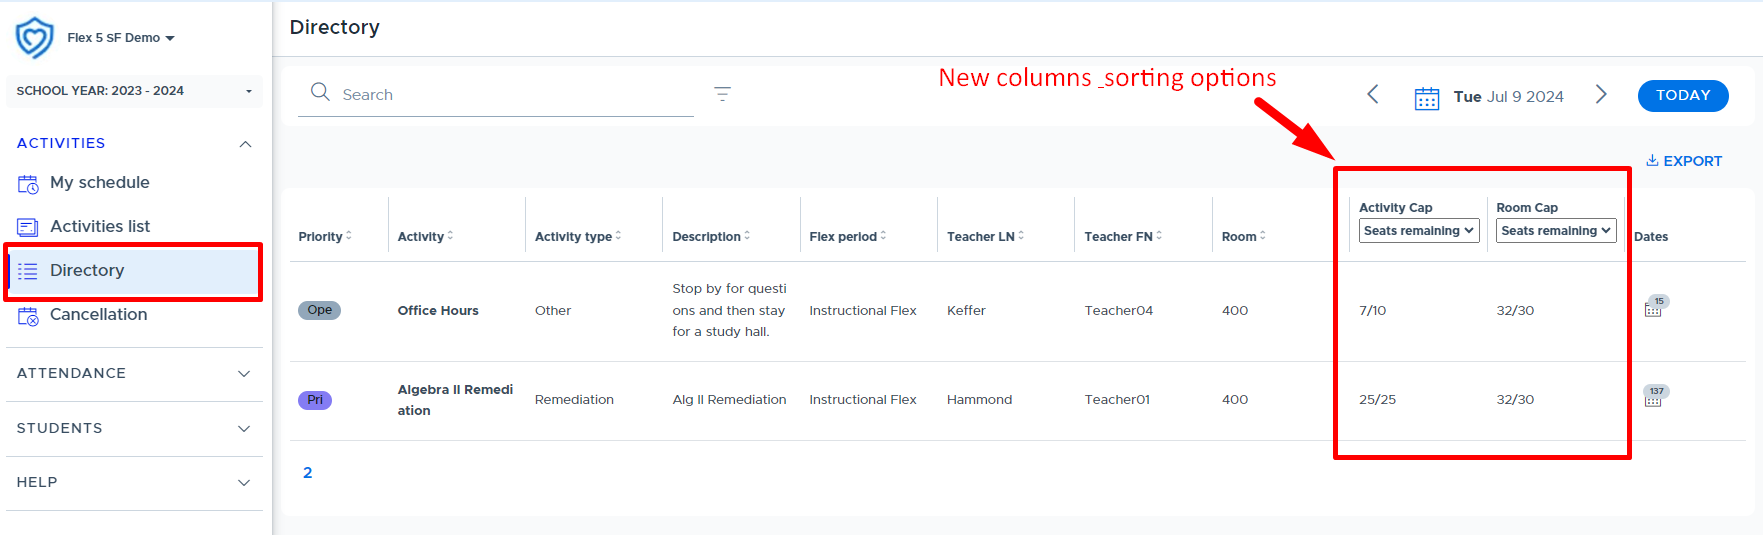
- Activity Directory
- This screen displays the following information: Activity Cap and Room Cap
- It’s possible to sort each of these columns by Seats taken, Total seats, or Seats remaining
USERS (User Management)
Third-party Sources (Securly Sync, ClassLink, Clever, etc.)
Manually Adding Users (Individually)
Password Guidelines
Instructional Steps
Maintaining Users (Editing/Archiving)
Editing Users
Archiving (Removing) Users
Prevent From Archiving (PFA)
Auto-Archiving Users
Manually Archiving Users
“Unarchiving”Users (Adding Users Back to Flex)
Understanding User Roles
There are four user roles in Flex: Admin, Staff, Teacher, and Student. Below is a table that outlines the access for each “adult” role (admin, staff, and teacher):
Feature / Functionality | Admin | Staff | Teacher |
|---|---|---|---|
Access to Create Groups & Activities, Schedule & Run Activities, Take & Share Attendance, Directory, Cancellations (view only), Student Search - Individual & Overview, Preference List (for autoassign schools) | X | X | X |
Access to Reports: Cut List, Full Attendance, Excluded Students, Attendance Activity, & Room Use Access to Teacher Attendance & Substitute Workflow | X | X | |
Access to “My School Settings”: Flex Periods, Activity Types, Priorities, Rooms, Users, Announcements, System Settings, File Upload Access to: Dashboard, Default Activity Lists, Flex Cancellation & Contact Control | X |
Rostering (Adding) Users
Third-party Sources (Securly Sync, ClassLink, Clever, etc.)
The primary method for rostering users is through our solution called “Securly Sync”. This solution can connect to various student information systems using a OneRoster API, PowerSchool Plug-in - or we can obtain the information with CSV files via SFTP. Please read this document for more details about Securly Sync. When rostering via Securly Sync, a member of our “Integrations” team will coordinate with school technical contacts provided.
While the preferred method of rostering users is via Securly Sync, clients who are using other methods to roster users, such as via ClassLink, Clever, User CSV File, or manually - will be able to use these methods for the foreseeable future. Once users are rostered via Securly Sync, additional data-sharing options or syncs will be available.
The resources below are provided for clients who need to connect via ClassLInk or Clever:
Additional Third-party Information
Once the connection with the third party has been set up and the sync has taken place, please review the list of users that have been imported to confirm that all users have been added to the system. This can be done on the Flex “Users” screen. Please see the items below for more detail:
- It can take up to 24 hours or overnight to see new users sync into your system.
- If there are a few users missing, such as school Administrators, non-classroom Teachers, etc, we recommend that you check with your technical support area to see if they can be added to the users being synced and shared via your third-party provider. If this cannot be done, the users can be added using one of the other methods outlined in this document.
- If users are being provisioned via ClassLink or Clever they can log into Flex with their corresponding ClassLink/Clever credentials (or via the dashboard/portal/LaunchPad) and/or with Google or O365 credentials.
- If you have questions or concerns about missing users, please contact the Help Desk and/or ask your internal technical contact.
- Note: The only student data that is collected from ClassLink/Clever when users are rostered includes the following: first name, last name, email address, role, grad year, and ID number.
User CSV File
If your school is not connecting through a third-party source to roster users or has a large number of users to add to the system who are not included in the third-party sync, they can be added using a CSV file upload. Please see the following resources for creating and uploading this file.
Manually Adding Users (Individually)
Users can be added to the system individually from the “Users” screen in Flex. When adding users individually, the user will be able to log into Flex by using an assigned “manual” password or through Google or O365 single sign-on (SSO).
There is a security feature in Flex that requires users to utilize a valid email address when logging in. You can read more here. Users will be required to validate their email address when logging into the system “manually” using a password assigned in Flex. (This does not apply to those using a single sign-on method such as Google, O365, ClassLink, or Clever.)
Password Guidelines
The following guidelines apply when designating a Flex password for a manually-authenticated user.
|
|---|
Steps to Add an Individual User
In order to add a user individually, please navigate to “My School Settings” > “Users” and do the following:
- Click “Add User”.
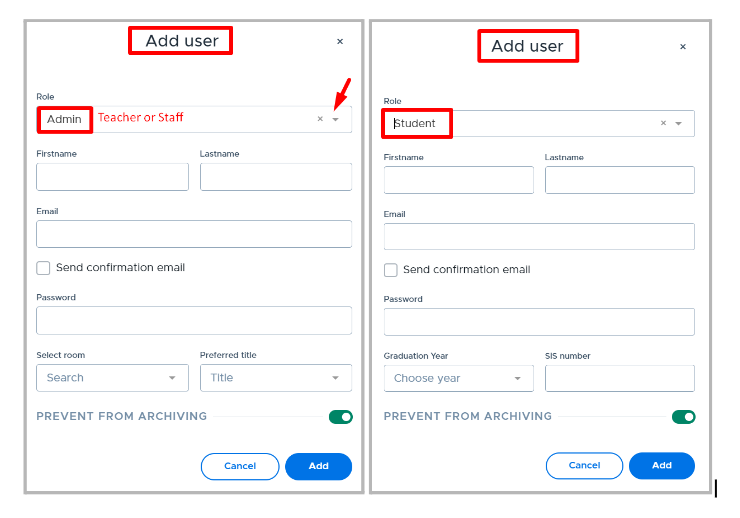
- Complete the fields as follows (screenshots are shown below):
- Role: Select desired user role as Admin, Staff, Student, or Teacher.
- Firstname: Enter user’s first name.
- Lastname: Enter user’s last name.
- Email: Enter the user’s email address, which must be a valid email.
- If you are adding a user who does not have the school email domain, reach out to the help desk to have their domain added to the school. This is often used for contract employees.
- Personal email domains can be requested and added via the help desk, if approved by a school Flex admin.
- Send Confirmation Email (box): Check this box if you wish for the user to receive a confirmation email.
- Password: Enter a password here if the user will be “manually” authenticated.
- In other words, they will not be logging in using Google/O365 credentials and the account password will be managed within Flex.
- Please refer to the above “Password Guidelines”.
- Adult Only Fields: (These are not required to be entered here and can be completed in the adult profile by the user.)
- Select Room: Select default room, if desired.
- Preferred Title: Select title, if desired.
- Student Only Fields:
- Graduation Year: Enter graduation year.
- SIS Number: Enter student ID number.
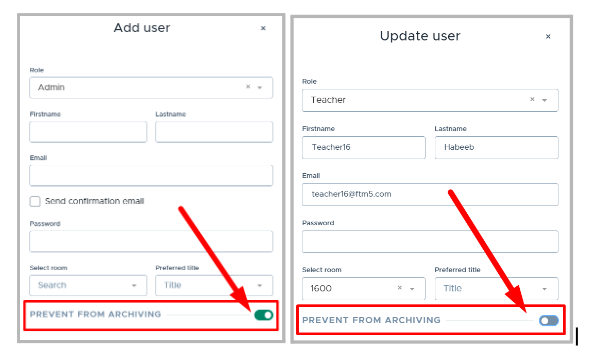
- Prevent From Archiving (toggle): This button is an ‘override’ button so that the user does not get “auto-archived” if you are also syncing with a 3rd party source or uploading user CSV files. (Please see the “Prevent From Archiving (PFA)” section for more details.)
- Keep the toggle “on” if you do not want the user to be archived if/when they are not included in a 3rd party sync or a user file upload.
- Toggle to “off” if the user will be included in future 3rd party syncs or a user file upload. (This will allow them to be auto-archived through that source in the future.)
- Click “Add”.
Maintaining Users (Editing/Archiving)
Flex will allow admins to edit a user’s record directly in the system, but if the user is rostered from a sync with a 3rd party source or via User CSV File upload, then the data will revert back upon the next sync/upload if the data is not changed at the source. (There is one exception to this which is the “Role” field. If this is updated for an adult directly in the system it will not revert back.)
- Keep in mind that the source of data for most schools, who roster users into Flex from a 3rd party source, is the school’s Student Information System or “SIS”. In these cases, it’s probably necessary to contact your IT professional who manages the SIS in order to edit a user’s information in the SIS. Once the edit is made, this will be updated in the 3rd party system and subsequently in Flex as the system syncs.
- For schools that roster users via user CSV file, it is possible to make an edit to most of the user data fields directly on the file and reload this into the system. Please see the Create & Manage CSV User Files document about editing via the user file.
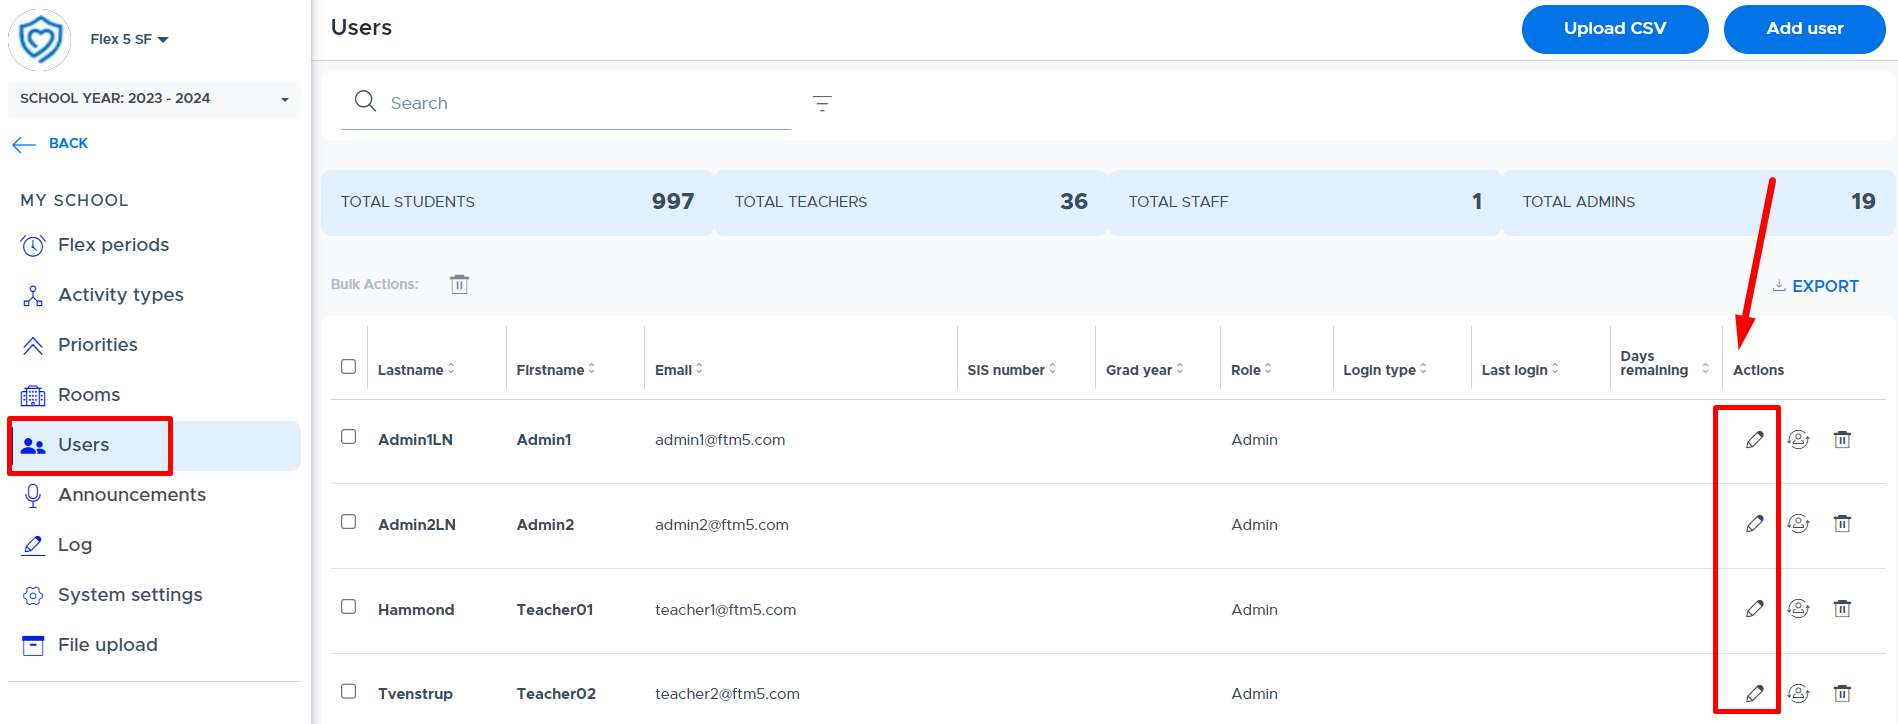
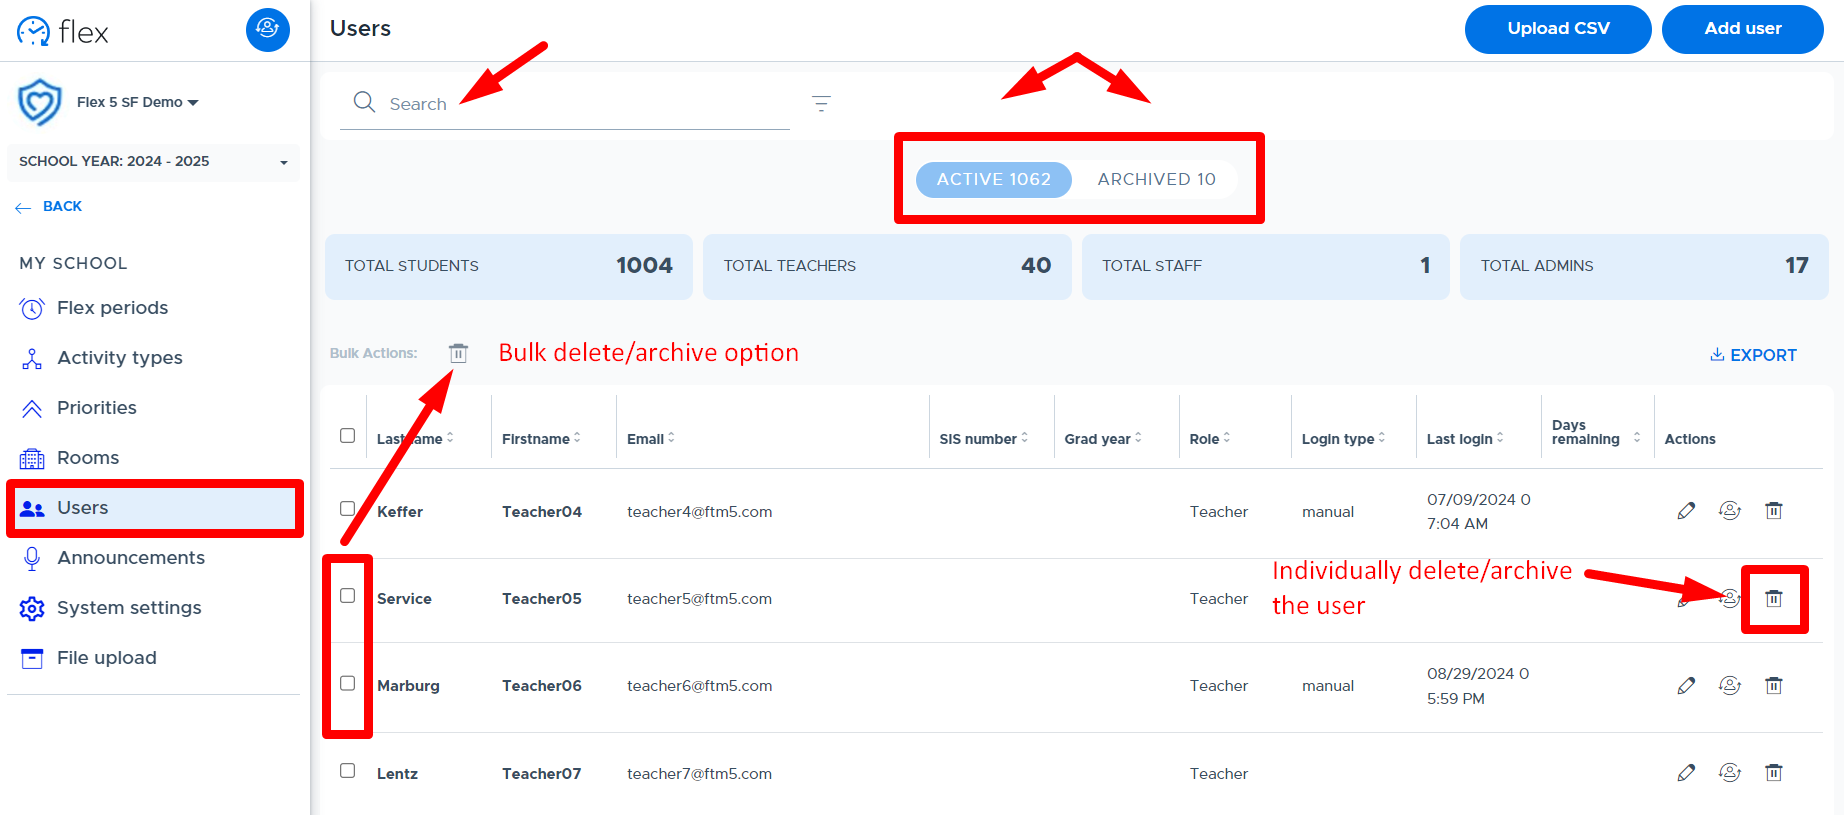
Below is the Flex “Users” screen where edits can be made. From this screen, click the pencil icon in the “Actions” column for the desired user. At the “Update User” screen, make the necessary changes and click “Update”.
Archiving (Removing) Users
“Archiving” users refers to removing them from the system so they no longer have access and do not appear throughout the system on future dates. Historical data is retained with the user record and displayed in the system for dates the user was active. In addition, if the user record is returned (or “unarchived”), the historical data will be reinstated in the system.
There are two ways that users can be archived in Flex: auto-archiving and manual archiving. Each is described below in more detail. It is also important to understand more about the “Prevent From Archiving” (PFA) option on a user’s record in Flex. Please see the details below.
Prevent From Archiving (PFA) This button, which is located on the “Add/Update User” window (shown below), is an ‘override’ button that can be used to prevent users from being “auto-archived” when your school is using multiple provisioning methods to add users to Flex. Toggle “on” - If you do not want the user to be archived when they are not included in a 3rd party sync or a user file upload. (ie - If you don't want Admins/Staff, who are not being shared, to be archived when the 3rd party sync happens.) Toggle “off” - If the user will be included in future 3rd party syncs or a user file upload. This will allow them to be auto-archived through that source in the future. (ie - Adding a student to Flex before they’ve been added to the 3rd party source.) IMPORTANT NOTES
|
|---|
Auto-Archiving Users
When a user no longer needs access to the system, the process to remove or “archive” them will largely depend on how they were “originally” added and whether or not the “Prevent From Archiving” (PFA) toggle is on/off. The ideal process is for the system to “auto-archive” most, if not all, users who no longer need access, therefore streamlining the user management process for administrators.
The system can “auto-archive” both students and adults who have been rostered (added) to Flex from a 3rd party source or via a user CSV file. When a user is removed from the 3rd party source or the user CSV file and the next sync/upload takes place, the system will automatically archive the user(s). (NOTE: If the PFA toggle has been turned on for a user, they will not be auto-archived when removed from the sync/file.)
Manually Archiving Users
Flex system Admins have the ability to manually archive all users in the system, regardless of whether the “Prevent from Archiving” toggle is on. This includes users who were rostered via user CSV file, 3rd party sync, or who have been manually added directly to the system.
IMPORTANT NOTE: If an Admin manually archives a user that was originally added via user CSV file or 3rd party sync and that user is not removed from the file or 3rd party sync, they will be returned as an active user (“unarchived”) in Flex upon the next file upload or sync. |
|---|
To manually archive a user, complete the following steps in Flex:
- Navigate to “My School Settings” > “Users”.
- To archive an individual user, search for the user and click the trash can icon in the “Actions” column to the right.
- To archive multiple users at the same time, click the checkbox to the left of their names and then click the trash can icon in the “Bulk Actions” area, as shown below.
- Click “Archive or Confirm” at the confirmation message that appears to complete the process.
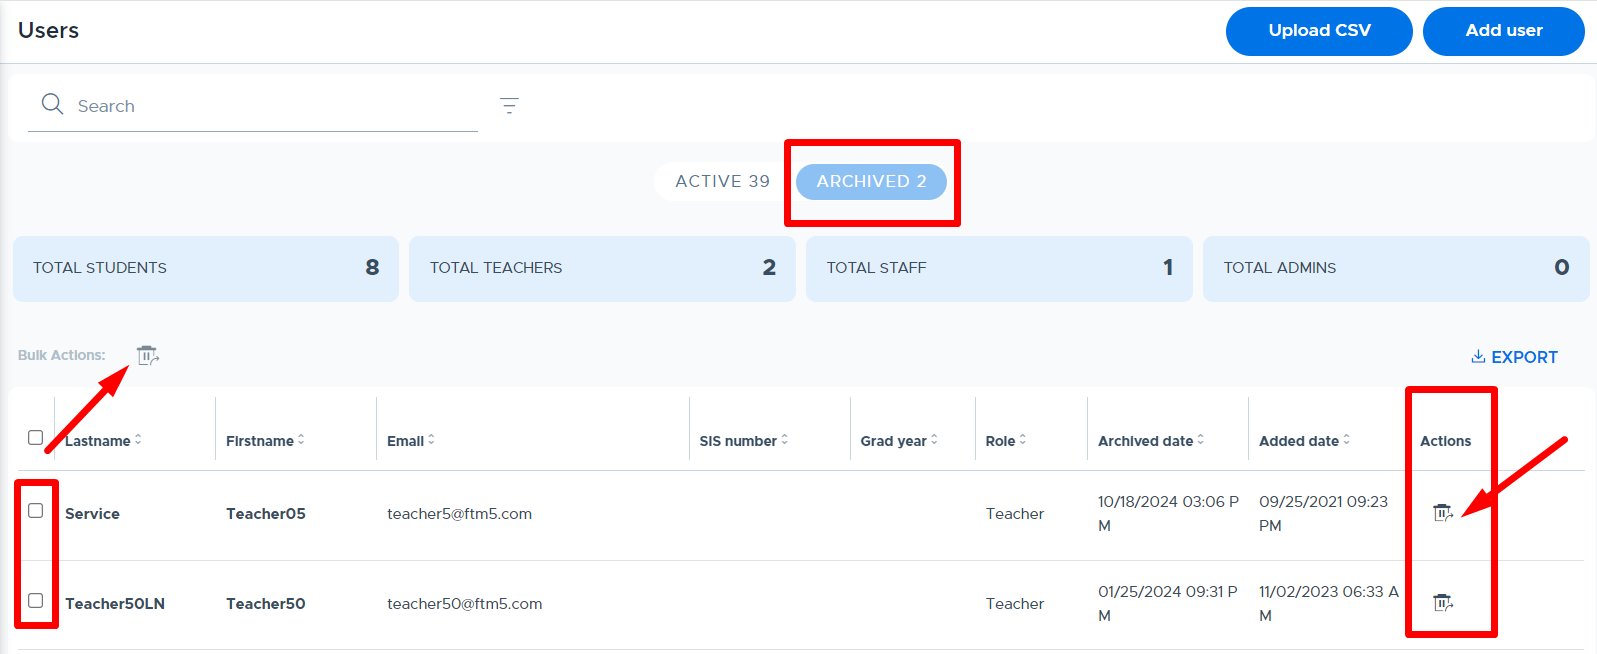
- Archived users can be found on the “Archived” tab on the screen shown below.
“Unarchiving” Users (Adding Users Back to Flex)
Archived users can be seen on the Flex “Users” screen by clicking on the “Archived” tab, shown below. An admin can click the “unarchive” button in the “Actions” column to make a user active again or select multiple users in the far left column and “bulk unarchive” them. (Keep in mind that the user may be auto-archived again if they are not added back to the original source of rostering or the “prevent from archiving” toggle is not enabled on their user record in Flex.)
Archived users can also be added back to the system again via 3rd party sync, user CSV file upload, or manually in the system interface. As long as the same email address is used when the user is added back, their same user record will be made “active” again in the system.
When an adult (teacher, staff, admin) is “unarchived” and made active again during the same school year, the adult’s activity schedule will be returned.
- Student “choice” registrations may be returned, but typically the system will keep the student in their most recent “choice” activity.
- Mandatory activities will be returned for students unless a higher priority activity was scheduled for the student while the teacher was archived.
When a student is “unarchived” and made active again during the same school year, the system will return as much of the student’s original flex schedule as possible. The student will be added back to rosters and mandatory activities. If choice activities have filled up while the student was archived, the system will not be able to return the student to these activities. The student will need to make new registration selections for those dates.
ANNOUNCEMENTS
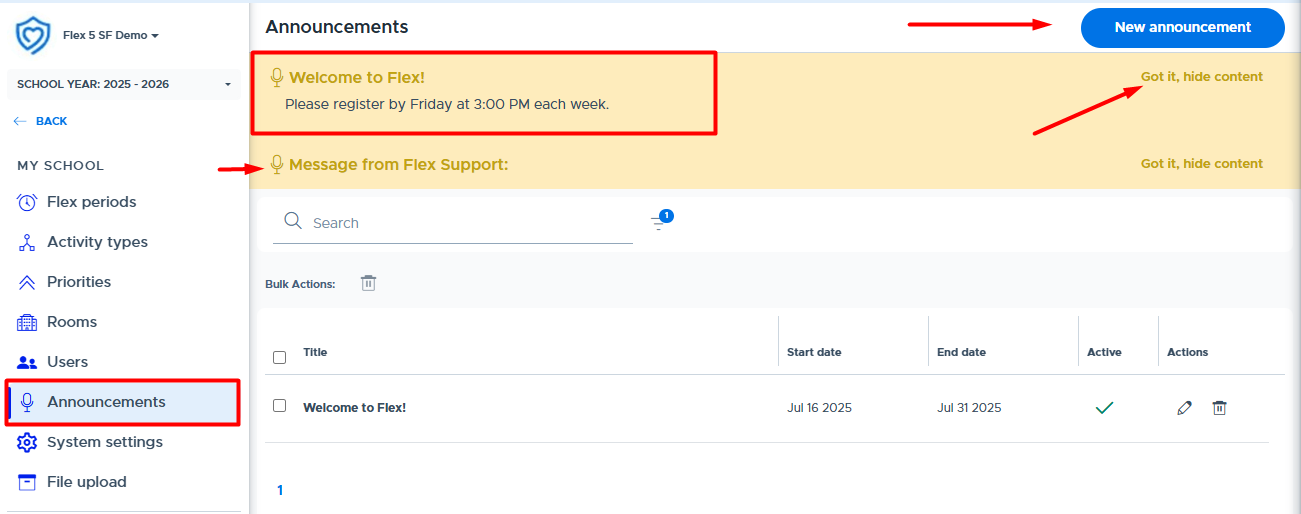
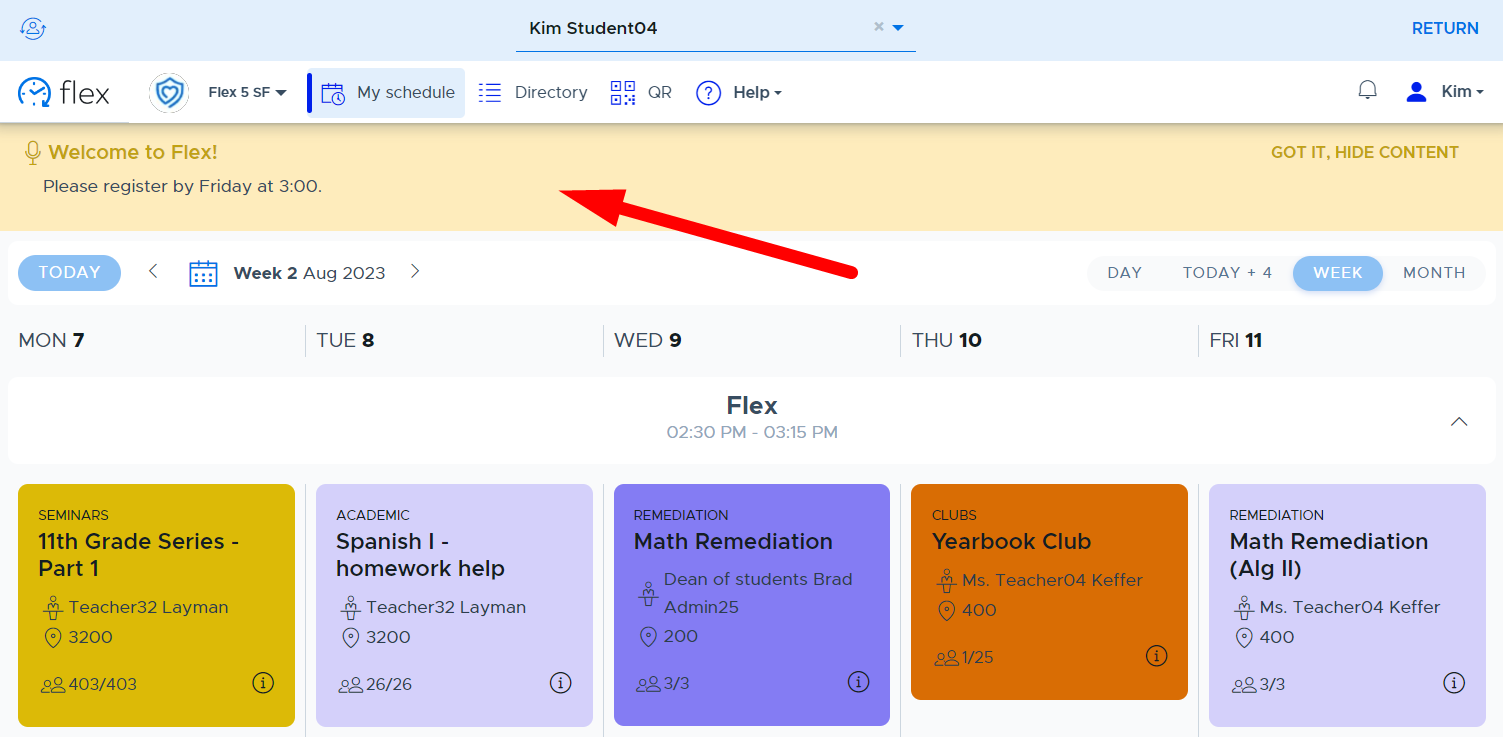
Admins can use this feature in Flex to create an “announcement” to all Flex users in their school. This announcement will show across the top of the Flex screen and can be collapsed or expanded as needed. Admins often use this feature to let their staff and students know about important information related to Flex, schedule reminders, reminders to students to register, and to let everyone know when a Flex period is canceled. Here is a video about Managing Announcements.
Note: The Flex Support team will also use system announcements to communicate important information about system updates to Flex Admins.
In order to create an announcement, do the following:
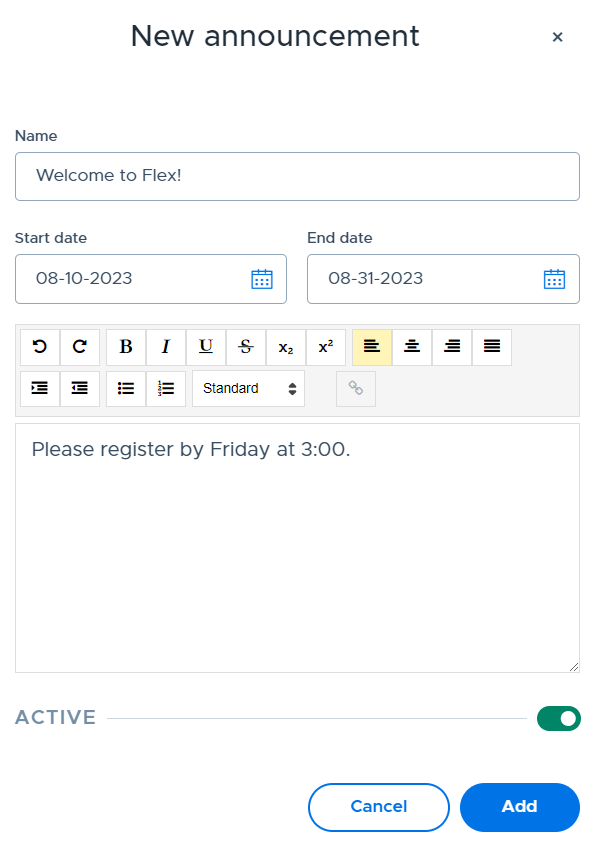
- From the “Announcements” screen in Flex, click “New Announcement”.
- Complete the screen as follows:
- Name: Enter a name or title for the announcement.
- Start/End Date: Enter the start and end date of the announcement.
- Message Box: Enter and format the details of the information you wish to share in the announcement. (Hyperlinks to websites, Google forms, etc. can be added here.)
- Active: Toggle defaults to being “on” but can be moved to deactivate the announcement.
- Click “Add” to add the announcement to the main list.
Example Announcement on Student Flex Screen:
Additional information about Flex Announcements:
- Multiple announcements can be active at the same time.
- It is possible to create announcements ahead of time. They will not show up in Flex until the “start” date entered on the announcement.
- Announcements can be made “Inactive” by clicking the check mark in the “Active” column. (These can be found and reactivated by using the filter search.)
- Announcements can be edited or deleted (permanently) by using the icons in the “Actions” column.
SYSTEM SETTINGS
The System Settings screen provides a number of different system features that a Flex Admin can enable or customize depending on the needs at their school. Please see the details below regarding each option.
Group Auto Sync Settings
Group Auto Sync allows admins to create automatic “grade-level” groups in Flex, which stay updated based on student users being added to or removed from the Flex system. In addition, for schools using Securly Sync to provision (add) users to Flex and who share their “class” data, admins can turn on automated syncs to bring in Course and Class rosters from the Student Information System (SIS). Both of these “auto sync” options can save users set-up time and manual maintenance.
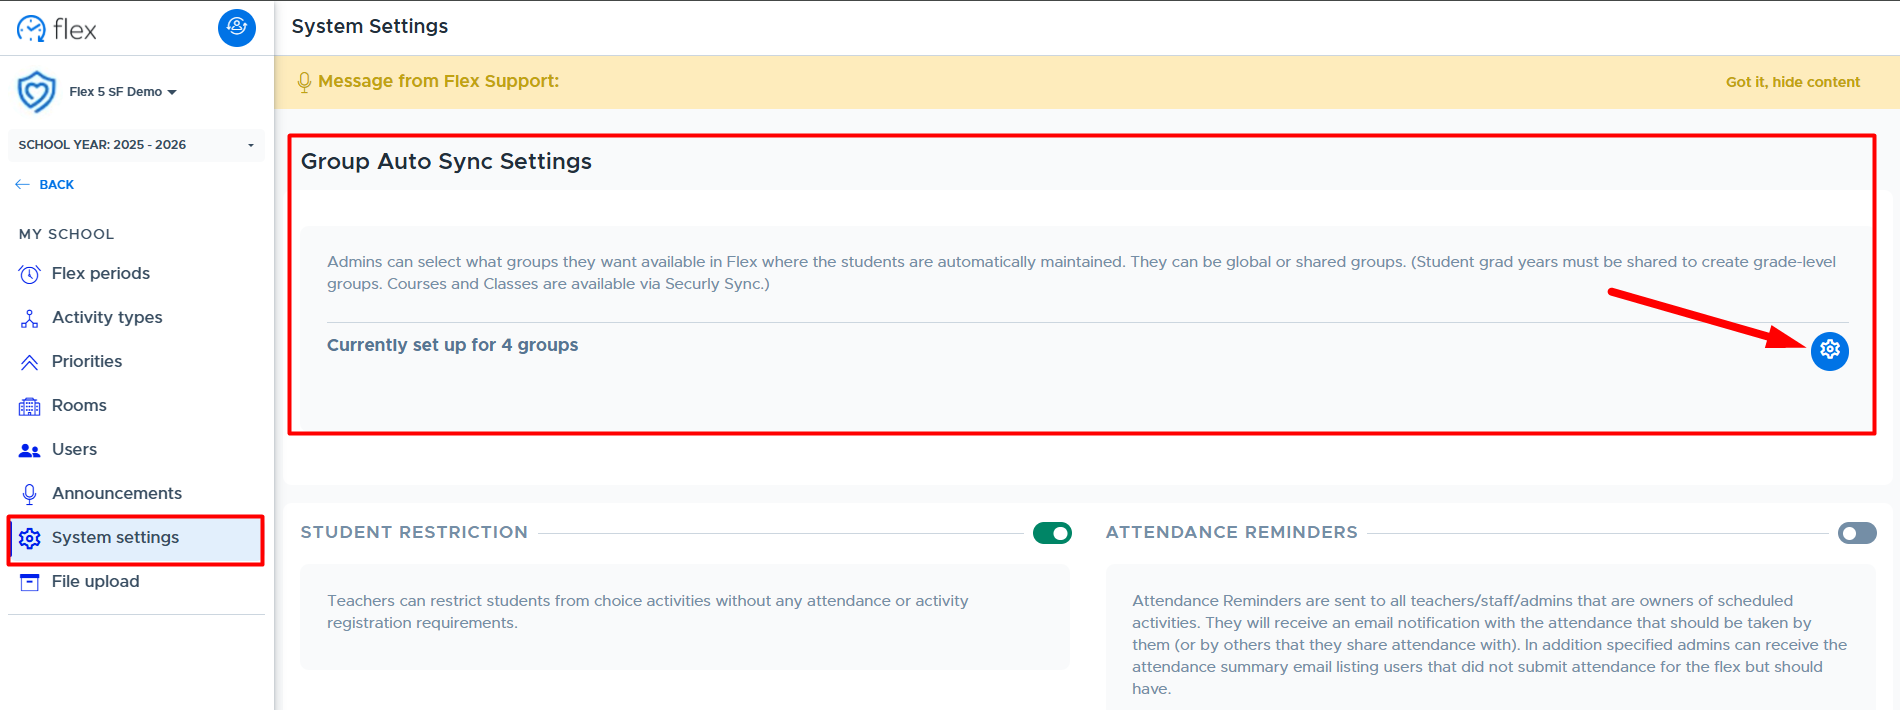
Enabling Group Auto Sync
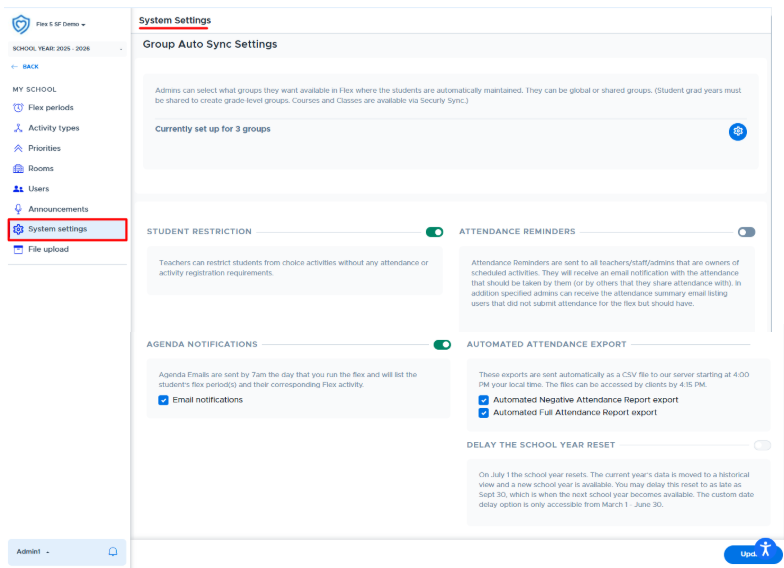
To access and turn on “Auto Sync” settings, navigate to My School Settings > System Settings and then click the blue settings icon shown below.
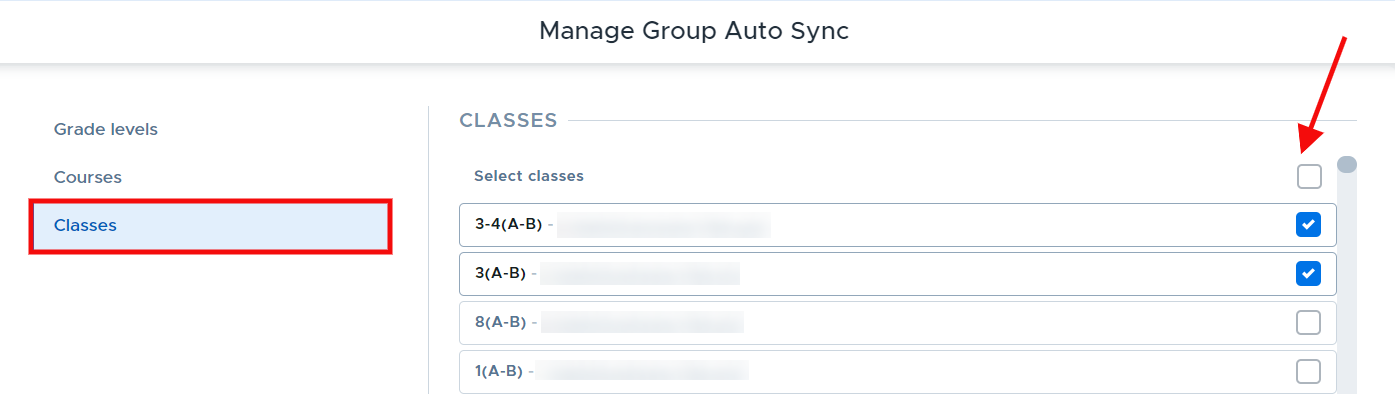
The Manage Group Auto Sync screen will appear with options to select Grade Levels, Courses, or Classes. All schools providing “Grad Years” with their student data (no matter the provisioning source) can enable auto “grade-level” groups. Only schools that provision users via Securly Sync and share the “course & class” data have the option to create and sync Courses or Classes to groups in Flex.
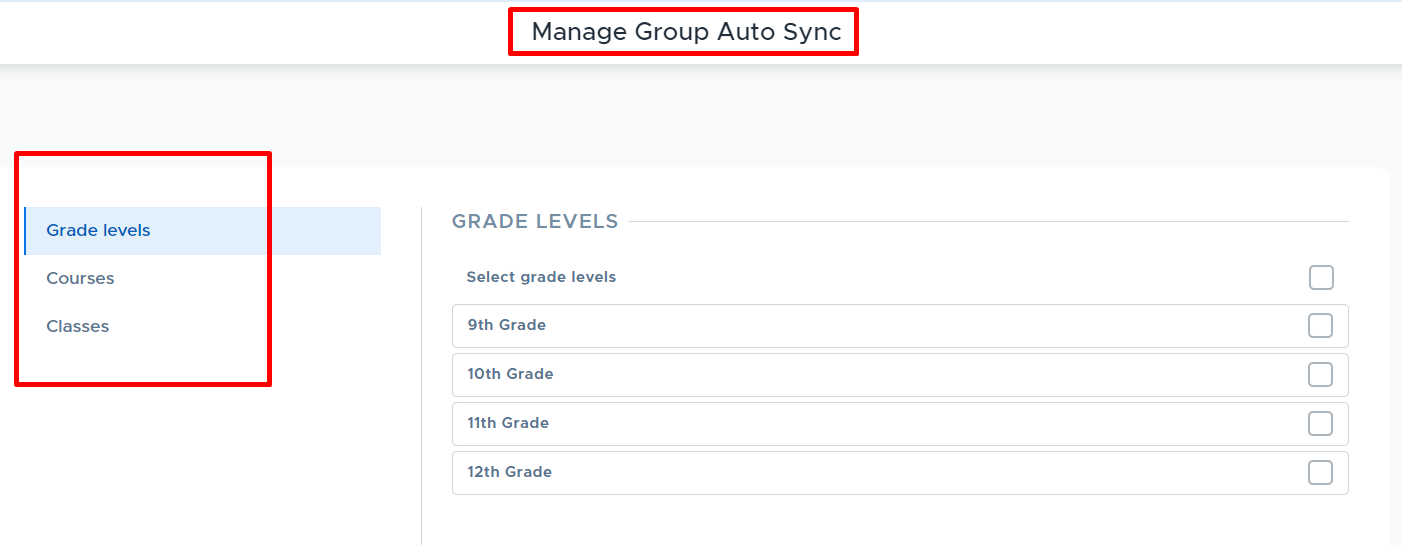
Grade Levels
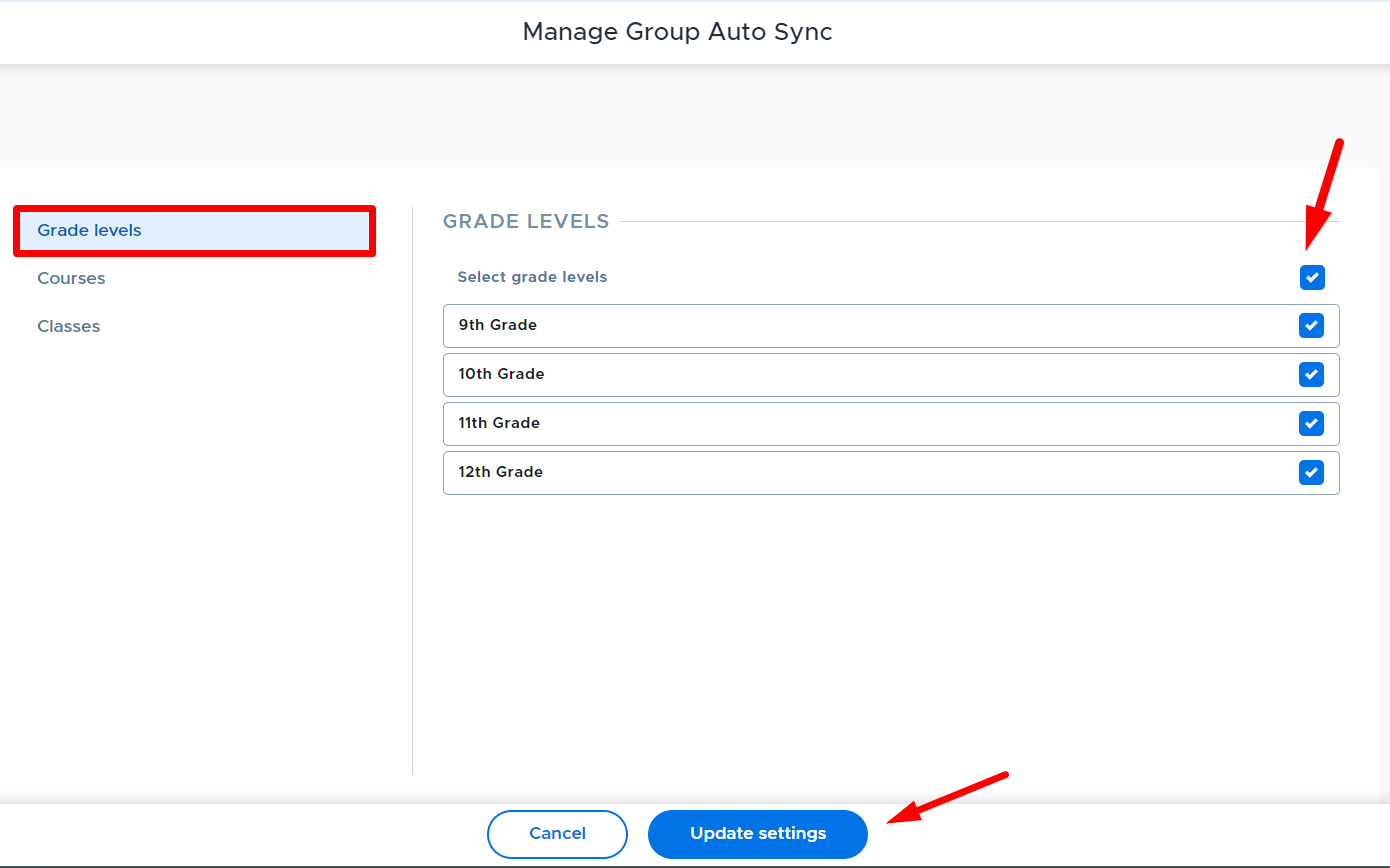
As mentioned above all schools that have “Grad Years” for their students in Flex will be able to automate the creation and maintenance of “grade-level” groups. Simply select the desired grade levels on the screen shown below and click Update Settings.
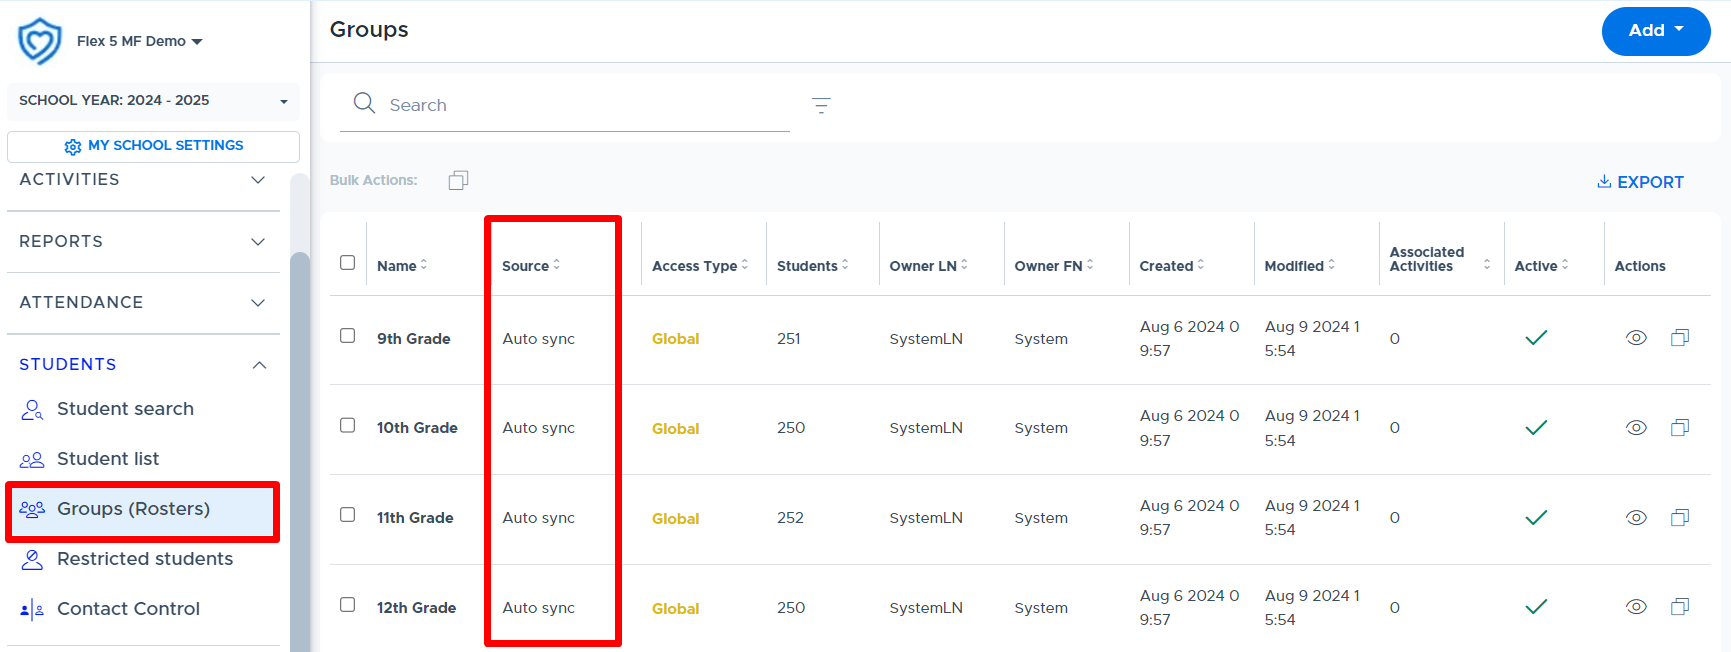
The system will automatically create a group for each of the grade levels selected. These are available on the main menu under Students > Groups (Rosters), as shown below. It can take a few minutes for the groups to be created and populated with students.
The Source will be “Auto sync” and the default Access Type will be “Global”, which means all adults have access to use this group. A Flex admin can update the Access Type if desired. (Please see the instructions below for Changing the Access Type.)
Courses & Classes
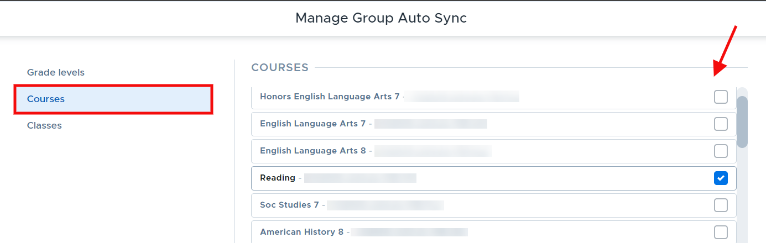
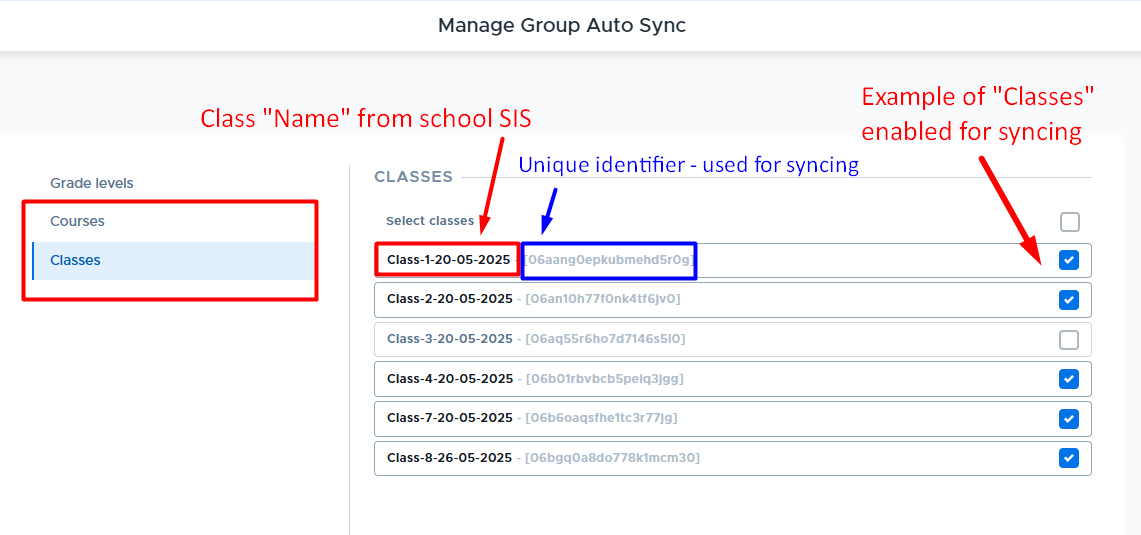
If your school is provisioning users via Securly Sync, which integrates with your Student Information System (SIS), AND shares “course & class” data via this method, then it’s possible to sync Course and Class rosters from your SIS to automatically create groups in Flex. Below are example screens of what this might look like. The Course and Class names will be as they appear in your SIS. (Flex adds a unique identifier behind the group name.)
What is available to sync is dependent upon how your SIS data is managed and made available to other systems. The course/class names that you see on this screen are coming directly from your SIS. (The names can be adjusted once a new Group is created in Flex. See SECTION.)
- New courses/classes will be available to auto sync when they are added to your SIS, which may happen before student enrollment dates. This will allow you to set up activities ahead of time and link the auto sync group.
- Subsequent students added after the first enrollment date to the course/class will be added to the group based on their enrollment date.
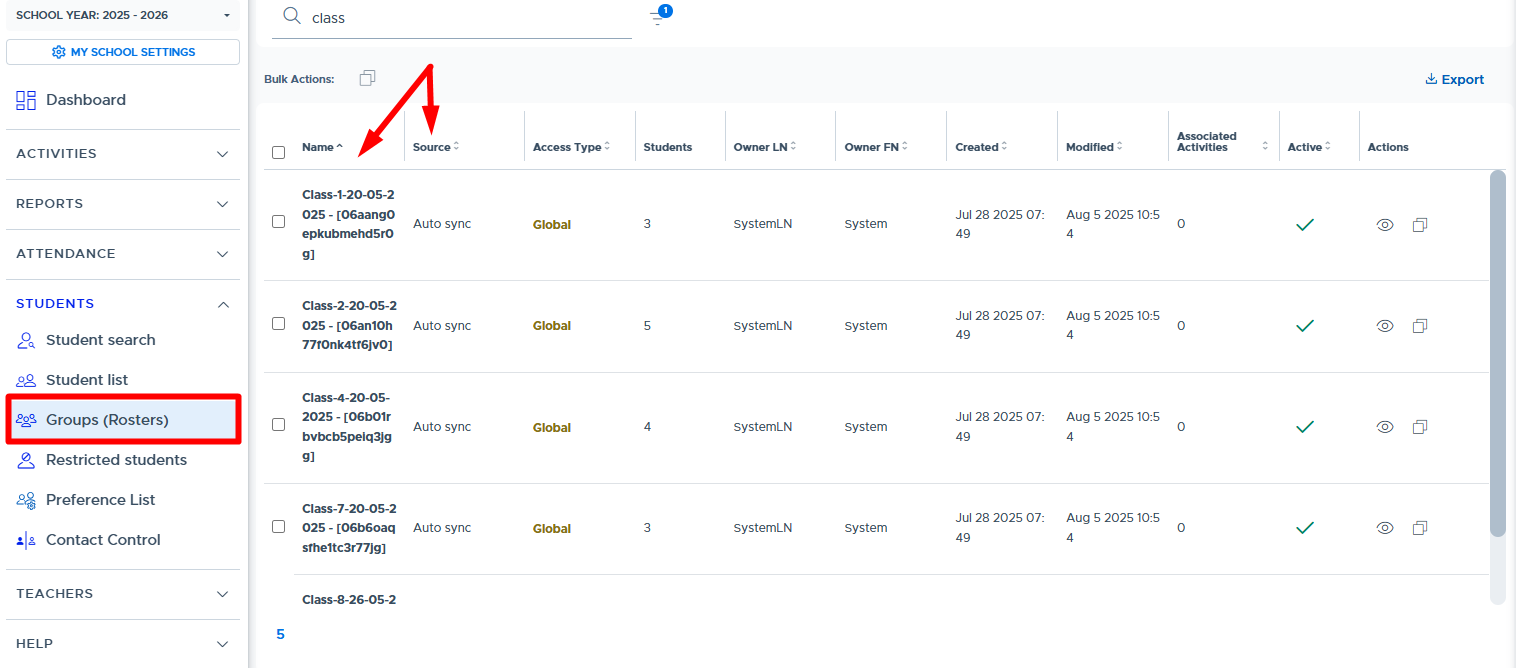
Once Courses or Classes are selected and the Update Settings button is clicked, new “auto sync” groups will be created and can be accessed on the Students > Groups (Rosters) screen in Flex.
- It can take a few minutes for them to be created and show up on the Groups screen. It may take a few hours or overnight for the Group(s) to be populated with students.
As with grade-level groups, the Source will be “Auto sync” and the default Access Type will be “Global”, which means all adults have access to use this group. The Access Type can be updated if desired.

Additional Information
- Auto sync groups will not sync to existing Flex groups with other “Source” types or different/missing identifier numbers. New groups will be created in Flex when auto sync groups are turned on.
- Auto sync group membership cannot be edited within the Flex system. (Students cannot be removed or added to these groups within Flex.)
- Auto sync groups will update automatically when new students are added or students are removed from your SIS and this syncs with Flex.
- Students are added to course and class groups via the sync based on their “enrollment” date.
- The group sync data from your SIS is checked daily but the “Modified” date for a group only updates when the data in the group has changed based on the sync.
- Please see the sections below for Modifying Auto Sync Selections and Making an Auto Sync Group Inactive.
Changing the “Name” of an Auto Sync Group
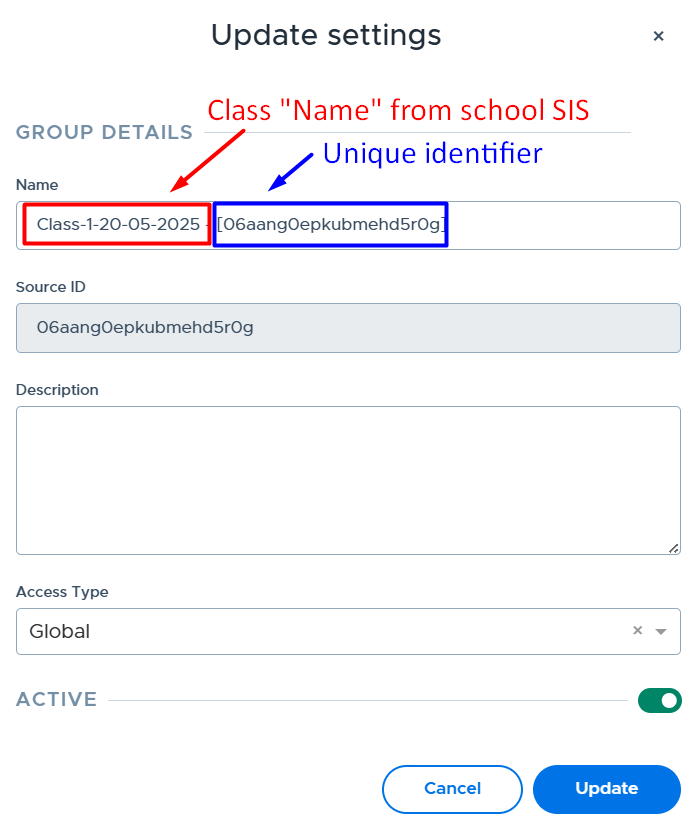
When schools have enabled courses or classes from their SIS to sync into Flex as an “Auto Sync Group”, Flex Admins have access to customize the Group “Name”. (Note: This does not apply to Grade Level auto sync groups.)
Once a course or class is enabled to sync, it will show up as a Group on the Students > Groups (Rosters) screen in Flex.
- The course/class name comes from the school’s SIS.
- There is a unique identifier added (by Flex) behind the name for future syncing purposes.
Below are example screens and how to edit the Group “Name”:
From My School Settings > System Settings > Manage Group Sync
From Students > Groups after the sync has occurred, which is usually overnight after the above selection has been made.
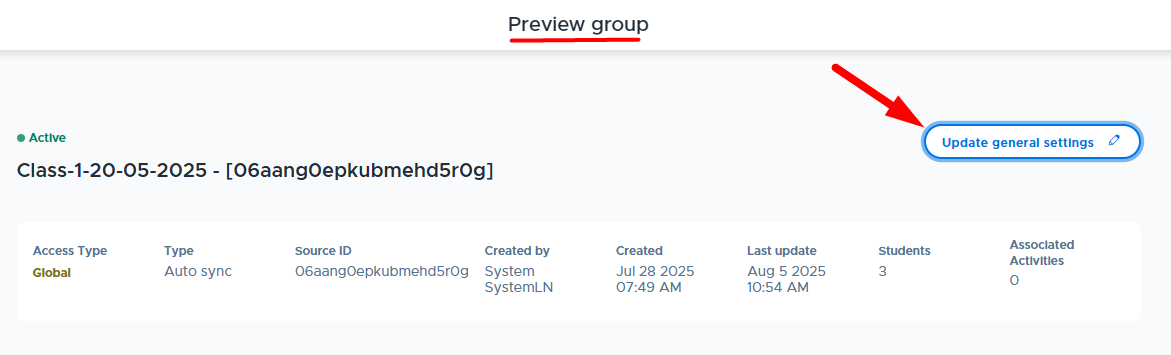
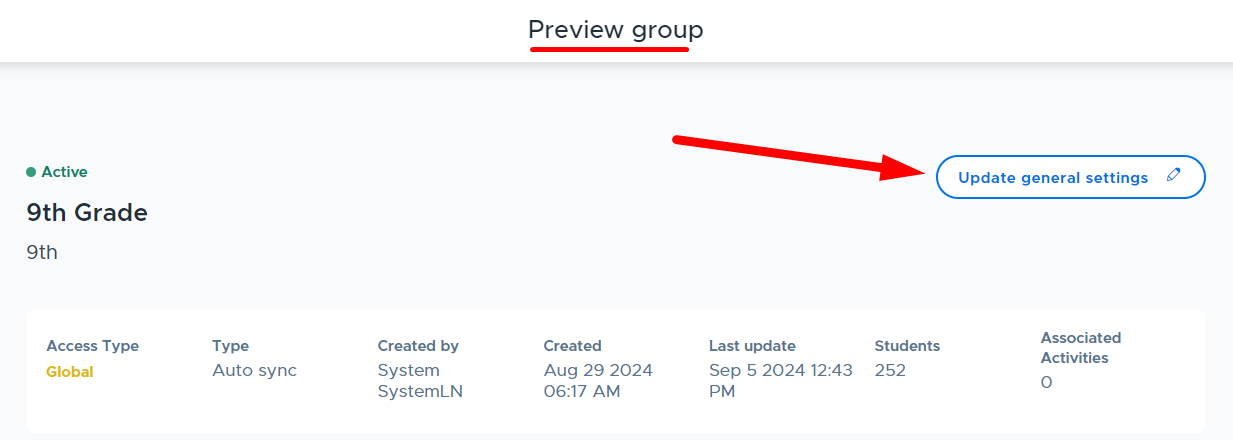
To edit a Group name, go to the Groups (Rosters) screen and select the “Preview” button for the desired Group.

Click the “Update general settings” button on the Preview group screen, as shown below.
A few tips to consider:
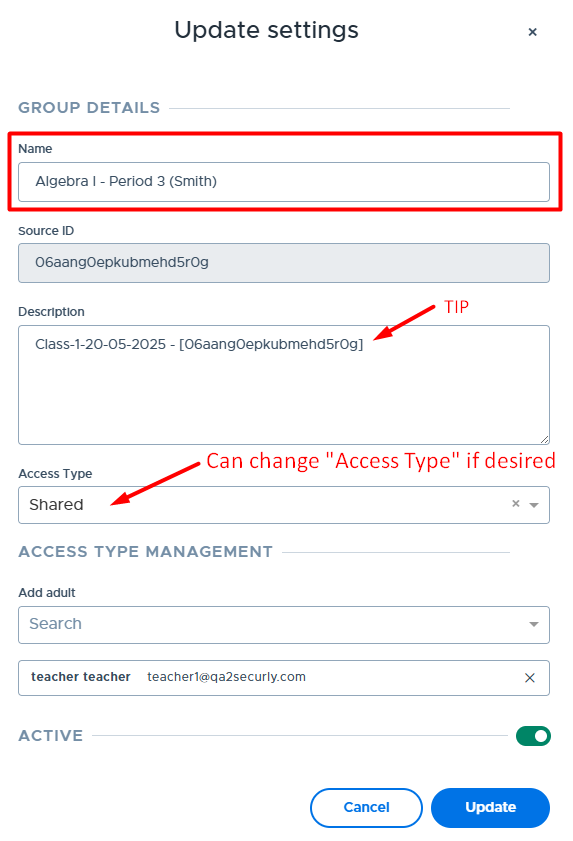
- You may want to copy/paste the original “Name” information into the Description field for future reference.
- Keep in mind that if an update is made to the Course/Class “Name” within your SIS, generally that update is passed into Flex. Here is the detailed logic:
- If you do not customize the “Name” field - SIS updates to the course/class name will be passed/synced into Flex.
- If you replace ALL content in the “Name” field, changes made in your SIS to the course/class name will NOT be pulled into Flex and overwrite your customized name.
- If you leave the unique identifier portion in the “Name” field and just replace the SIS name with your customized name, then the name will revert back to whatever is in the SIS upon the next sync. (So, if you want to customize the name, please replace all content in the name field.)
- The second screenshot below is an example of customizing the Group Name and Access Type.
Changing the “Access Type” of an Auto Sync Group
Auto sync groups will default to have an access type of “Global”, which means all adults in Flex can see and use the group when creating activities. To change the access type for an auto sync group, follow the steps below:
- From the Groups (Rosters) screen, click on the “Preview” button for the desired group, as shown below.

- From the Preview group screen, click “Update general settings”.

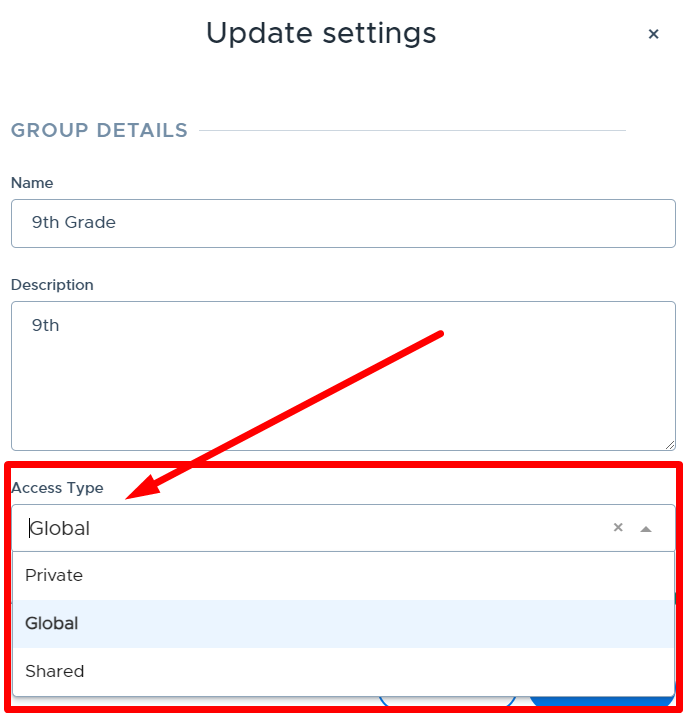
- From the Update settings window, select the desired “Access Type” in the dropdown shown below and click Update when finished. As a reminder, here are descriptions of each option:
- Private: Available only to the creator/owner of the group i.e. the admin making the changes
- Shared: Available to creator/owner, designated (shared with) adults, & Flex admins
- Global: Available to all adults in Flex
Modifying Auto Sync Selections
A Flex admin can make changes to the auto sync selections that have been set up for their school. This can be done at any time, but may be needed at the beginning of a new semester or when a new class/course is added. Follow the steps below to modify previous selections:
- Navigate to the My School Settings > System Settings screen in Flex.
- Click on the blue settings icon in the “Group Auto Sync Settings” section.
- Select the desired option: Grade levels, Courses, or Classes.
- Check or uncheck the options you want to add or remove.
- Click Update settings.
If you have added new groups to the sync, it can take a few minutes for them to be created and show up on the Groups screen. It may take a few hours or overnight for the Group(s) to be populated with students. These new Groups will be available on the Students > Groups (Rosters) screen in Flex.
If you have removed groups from the auto sync settings, they will no longer be updated automatically because you have removed the connection for them to be updated. If you want to remove them from your system, you can go to the group and make them “inactive” if they are not linked to a future scheduled activity. The next section shows how to make an auto sync group inactive in Flex.
If a course/class has been removed from your SIS it will either disappear from the Manage Group Auto Sync settings screen or be unchecked on the screen (depending on how your SIS shares this information). The group in Flex will be marked as “inactive” if it is not linked to a future scheduled activity. If there are future scheduled activities, it will not be marked “inactive” until there are no additional future scheduled activities. Please note that if you schedule an activity that is linked to an inactive group, you will need to update the activity to use an active group the next time you schedule it.
Making an Auto Sync Group “Inactive”
An auto sync group can only be made “Inactive” after a Flex admin has turned it “off” in the Group Sync System Settings or it is no longer being shared from the SIS. If the group is linked to an activity scheduled in the future, it cannot be made inactive.
Follow the steps below to make an auto sync group inactive:
- From the Groups (Rosters) screen, find the desired group and either click on the checkmark in the “Active” column or the “Preview” button in the “Actions” column, as shown below.

- The following message will appear if you click the checkmark in the “Active” column. Click Confirm to make the group inactive. (Proceed to #5 below.)
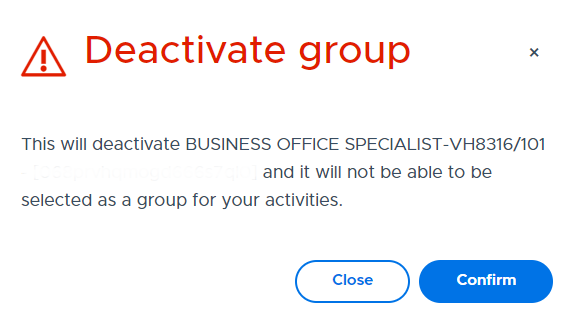
- If a group is in use and cannot be made inactive, you will receive the message shown below:

- If using the Preview option, click “Update general settings” from the Preview Group screen that appears.
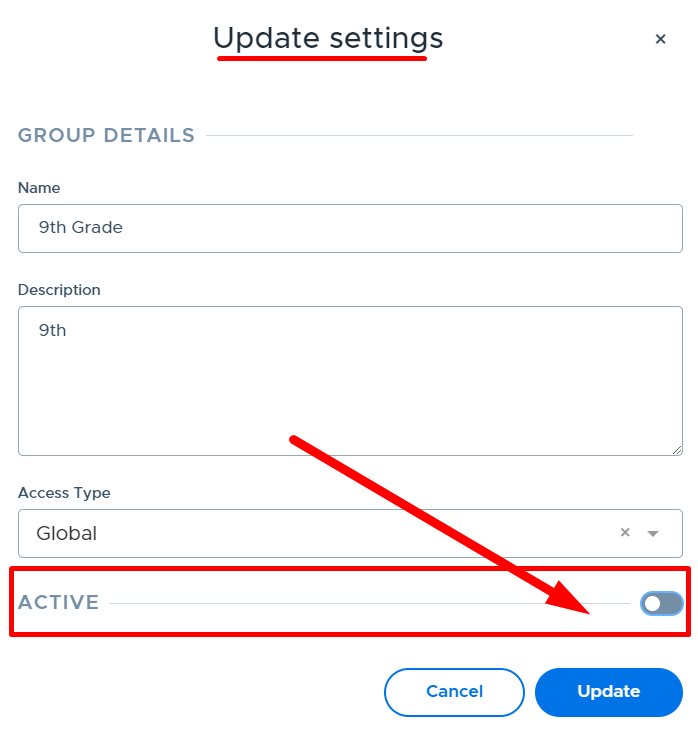
- From the Update settings window, change the “Active” toggle to OFF (gray) and click Update, as shown below.
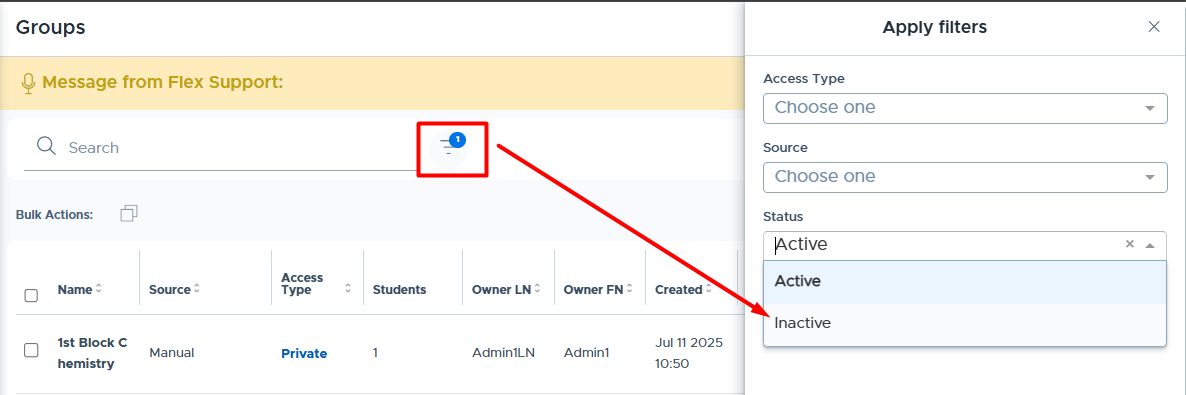
- Inactive groups can be viewed/found by going to the Groups screen, selecting “Filters” and in the Status dropdown, selecting “Inactive”, as shown below.
- If an “Inactive” auto sync group is turned on (or re-shared), the original group can be made “Active” again.
- First, find the inactive group, as described in #4 above.
- Then click the “Preview” button and “Edit general settings”.
- Update the Active toggle to ON and click update (as described in steps #1-3 above).
Updating an Activity to use an Auto Sync Group
Once auto sync groups are in Flex, there may be existing Activities you want to link to an auto sync group. (For example, you might adjust your activity to reference the auto sync group because this is updated automatically.)
To make this change, review the Group screen and note the name of the auto sync group you want to use. Then go to the Activities List screen and click on the edit/pencil icon for the activity that needs to be updated.
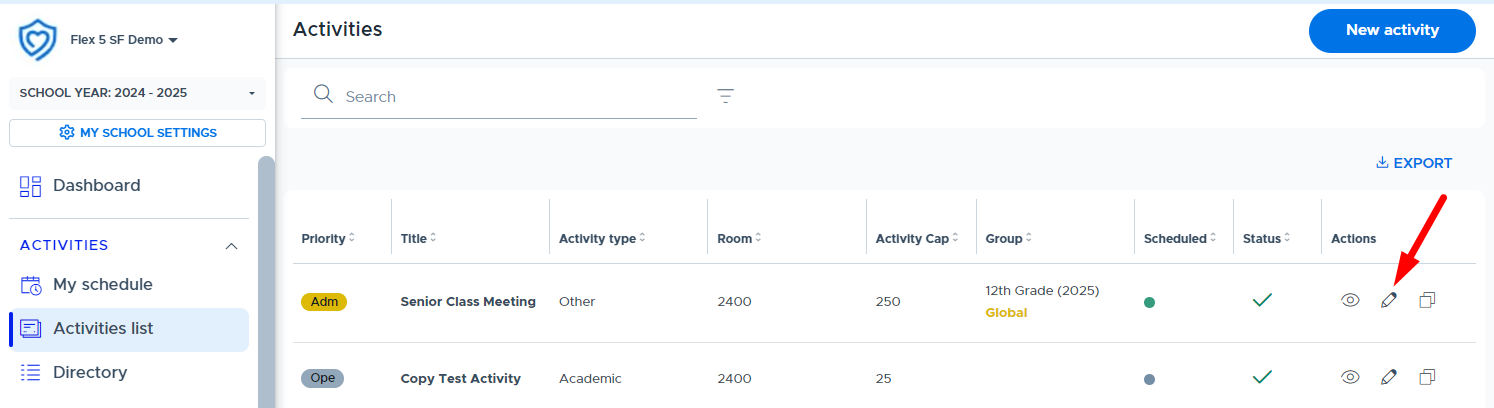
Click in the Group students field and a list of the available groups will appear. Select the new auto sync group you want to link to the activity. Then click Update activity. (As long as you keep the “Apply to scheduled activities” box checked, all future scheduled activities will use this group. The auto sync group will be updated automatically based on the students included in the sync.)

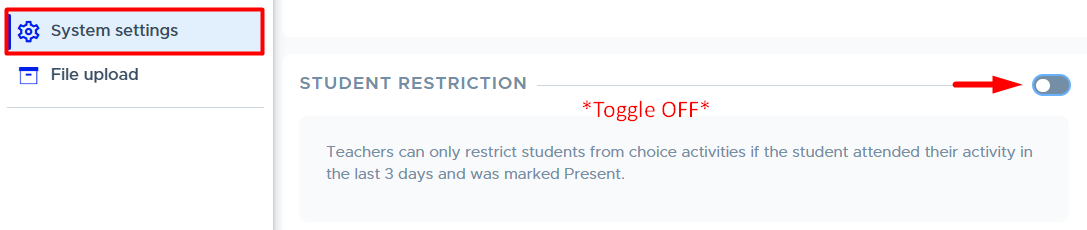
Student Restriction
This setting gives Admins control over how the Student Restriction feature will work at their school. There are two methods of allowing adults to restrict students from their activities:
- Restriction WITH Attendance Requirements: An adult can set a restriction for a student, but only when the student has been on the adult’s attendance roster, and marked “present”, at least once in the past 3 days (including today). (This is when the setting is toggled to the left and gray.)
- Restriction WITHOUT Attendance Requirements: This feature will allow adults to restrict students from attending their activities without any registration or attendance requirements. This means that an adult can set a restriction on any student, blocking them from registering for their choice activities. (This is when the setting is toggled to the right and green.)
NOTE: It’s important to click “Update” after making a change to the “Student Restriction” options shown below.

To see more about how Student Restrictions are used in Flex (including the “Principal” designation for admins and restriction notifications), please see the Restricted Students section of this guide and/or this training video: Student Restriction Settings. (Note: The training video linked here does not have the most recent screen updates but the content is still helpful.)
Agenda Notifications & In-App Notifications
Student Agenda Emails
Flex can be configured to send “Agenda Notifications” to students each morning by email. These are sent only on days when an active Flex period is scheduled. Agenda emails are delivered by 7 AM local time. (The delivery time cannot be customized.)
To enable morning agenda emails for students, please do the following:
- From the Systems Settings screen, toggle the “Agenda Notifications” option to “on” (green), as shown below.
- Check the box for “Email notifications”.
- Click “Update”.
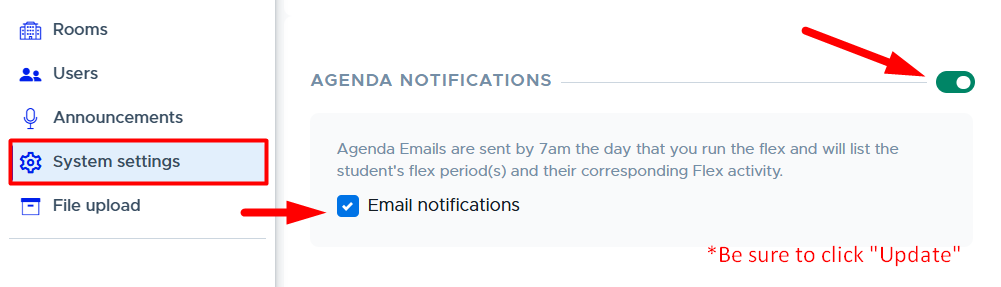
- Emails will be sent from: flex.no-reply@securly.com
- You may want to turn this “OFF” over breaks but must remember to turn it back on when school is in session.
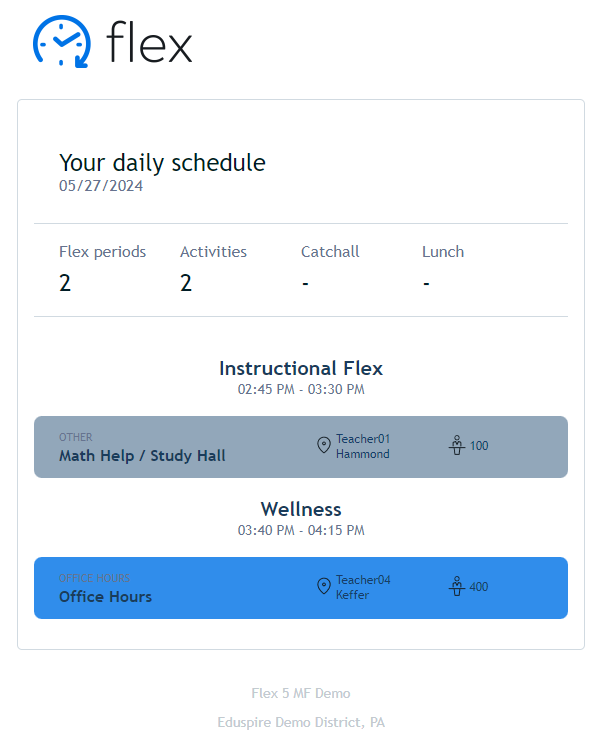
- Below is a sample agenda email to a student in a school with two Flex periods.
Automatic “In-App” Notifications
The system provides “In-app Notifications” to both students and adults when certain “changes” take place regarding their schedule, registrations, or the flex period.
- In-app notifications are automatic for all users in the browser version of Flex and the Flex mobile app. When an in-app notification is sent there will be a number by the notification bell in Flex to let users know there are unread notifications. When a user clicks on the bell, they will see a “Notifications” screen listing their messages.
- Below are examples of the teacher and student screens with new notifications.
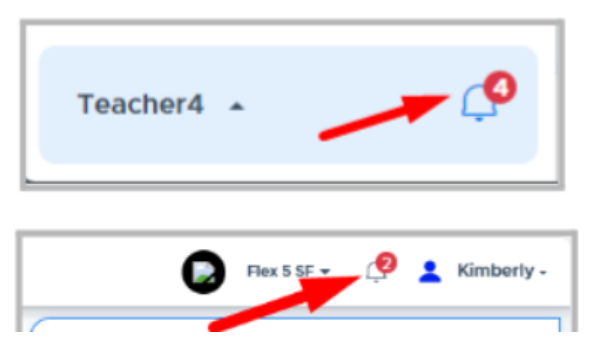
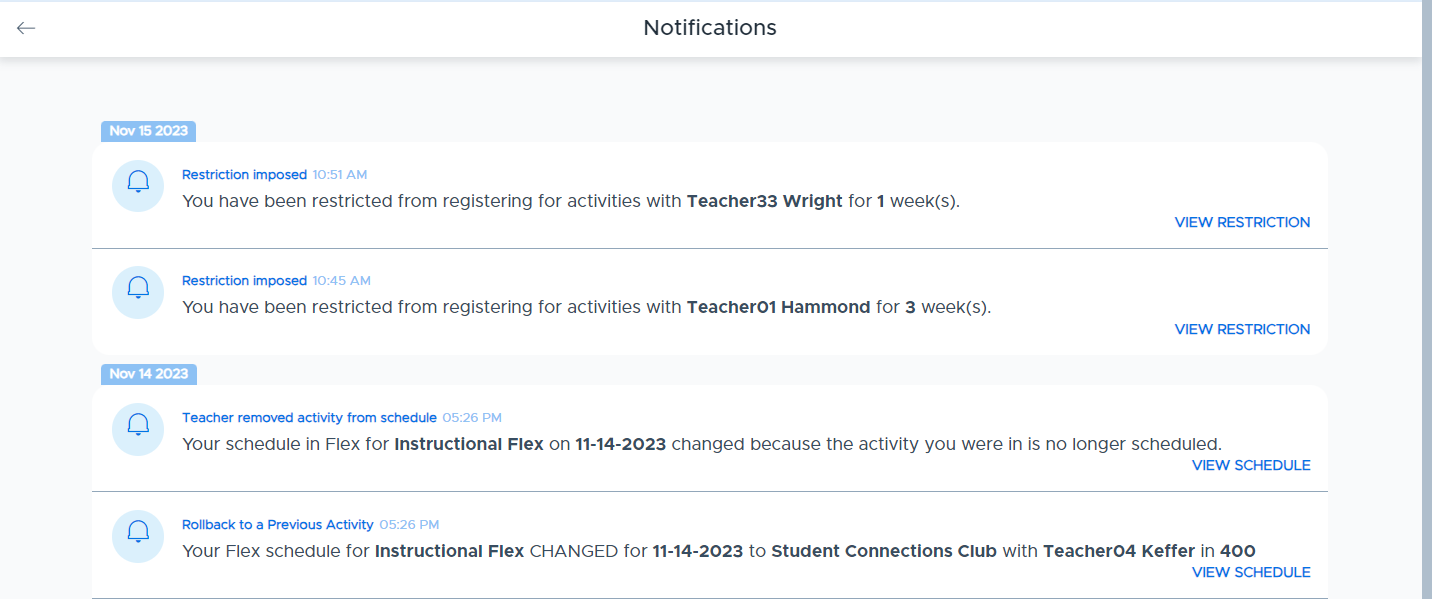
- In-app notifications remain visible on the “Notifications” screen for 30 days. Below is an example of a student’s notification screen in Flex. The adult screen is formatted the same. (There is a message title, the time of the notification, the specifics of the message, and a link to the Flex screen that provides more details to the user.)
Schedule Notification Triggers for Students & Adults
The tables below show the events that will “trigger” an in-app notification to a student or an adult in Flex. Notifications are sent for “same-day” events only unless otherwise noted.
Trigger Events for Students
Trigger Event | Description |
|---|---|
Student Agenda | Students will receive an “in-app” notification if enabled. |
Moved to Higher Priority Activity | A student’s schedule changes the same day because an adult schedules them into a mandated activity. |
Activity is No Longer Scheduled | A student’s schedule changes the same day because an adult removes a scheduled activity from the calendar. |
Student is Removed from Activity | A student’s schedule changes the same day because an adult removes the student from the scheduled activity. |
Teacher Moves Activity to New Date | A student’s schedule changes the same day because an adult moves today’s scheduled activity to a new date. (The student will either be rolled back to previous selection, catchall, or have nothing on their schedule.) |
Rollback to a Previous Activity | Students will be notified if their schedule changes and they are rolled back to a previously scheduled activity. (This will be in addition to a notice for one of the above events.) |
Teacher Edits Activity Title and/or Description* | Students can be notified when an adult makes a change to the activity title and/or description that is scheduled for the same day if they turn the toggle on. (*Please see the screenshot and details below for more information.) |
Room Change | Students will be notified if an adult changes the room an activity is scheduled in for the same day. |
Flex Period Cancellation | Notification will be sent only to students in the applicable grad year to let them know a flex period is canceled for the same day. |
Change or Deletion of Flex Period Cancellation | Notification will be sent only to students in the applicable grad year to let them know a flex period cancellation has been changed or deleted for the same day. |
*When an adult edits an activity for the current day and makes a change to the Title and/or Description, the system will give them the option to notify registered students about the change. The screenshot below shows the toggle button that appears. It will default to being off (gray) but the adult can turn this “on” (green) to send a notification about the change.
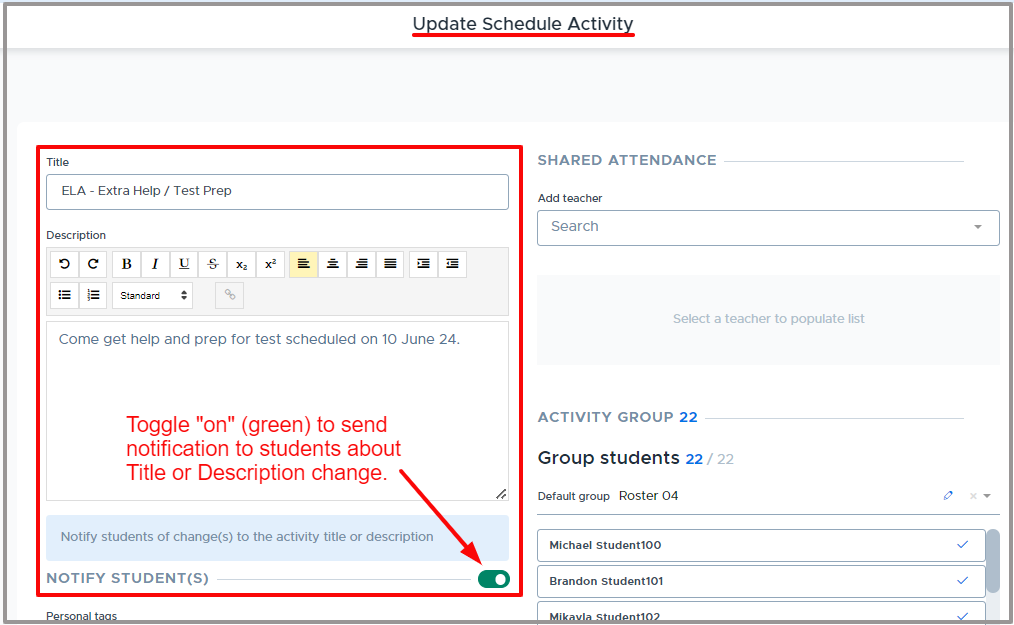
Trigger Events for Adults
Trigger Event | Description |
|---|---|
Flex Period Cancellation | Notifications will be sent to all adults for cancellations within the current calendar week (Mon-Fri). (Viewable list of all cancellations) |
Deletion of Flex Period Cancellation | Notifications will be sent to all adults when there is a deletion of a flex period cancellation within the current calendar week (Mon-Fri). |
Attendance Reminder | If set by a Flex Admin, notifications will be sent, at the designated “same-day” and “next-day” times, to adults who have not fully submitted activity attendance. |
Attendance Admin Summary | If set by a Flex Admin, summary notifications will be sent, at the designated “same-day” and “next-day” times, to the specified “admins”. |
Attendance Reminders
Flex can be configured to send "Same Day" and "Next Day" attendance reminder emails to teachers who do not fully submit their attendance for a Flex period. It is also possible to specify admins to receive a “summary” email listing the teachers who have not submitted their attendance. (When attendance reminders are turned on, users will also receive an “In-app” notification.)
- Here is a video that provides an overview: Attendance Reminder Email Settings
To turn these notifications “on”, do the following:
- From the Systems Settings screen, toggle the “Attendance Reminders” to ON.
- Click the settings/gear icon, which will open the “Admin Reminder Settings” screen.
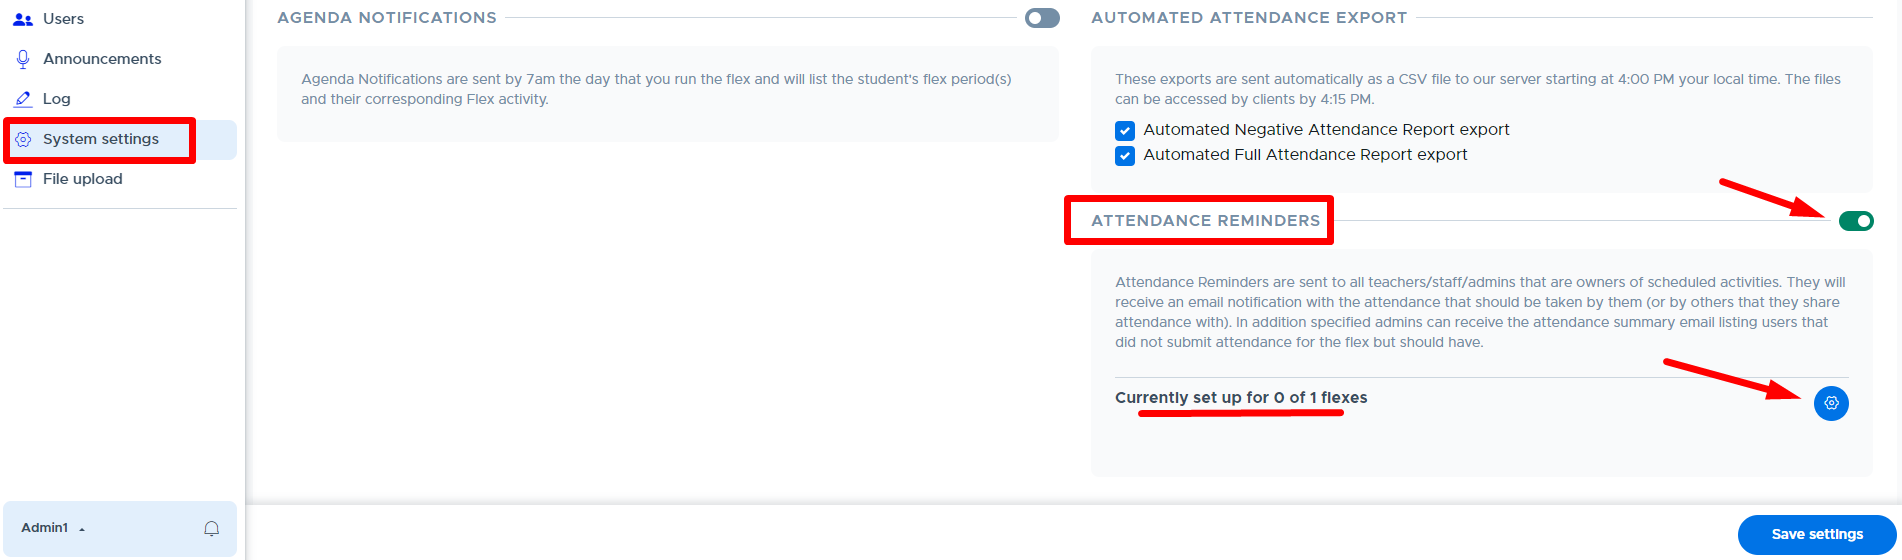
- All Flex periods in your system should be listed here. Click the pencil icon in the “Actions” column for the Flex period you wish to set up with reminder emails.
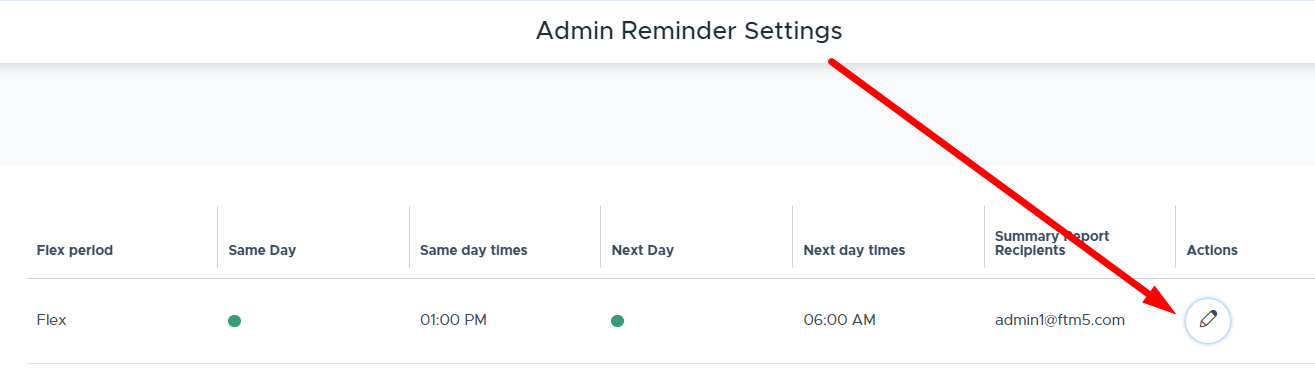
- Complete the fields on the pop-up screen (shown below) as follows:
- Summary Report Recipients: Enter admin who should receive the summary report email/notification listing of all adults who have not yet submitted attendance for this particular flex period. (Email/notifications will be sent at the designated times on this screen.)
- Same Day: Toggle to ON to enter same day times, meaning reminders will be sent at the designated times the same day that the Flex period runs. Reminders are only sent if the teacher/adult does not submit attendance for all students on their attendance list.
- Enter the desired time and click “Apply”.
- Repeat these steps for each time you wish to enter.
- Next Day: Toggle to ON to enter next day times, meaning reminders will be sent at the designated times the day after the flex period runs. Reminders are only sent if the teacher/adult does not submit attendance for all students on their attendance list.
- Enter the desired time and click “Apply”.
- Repeat these steps for each time you wish to enter.
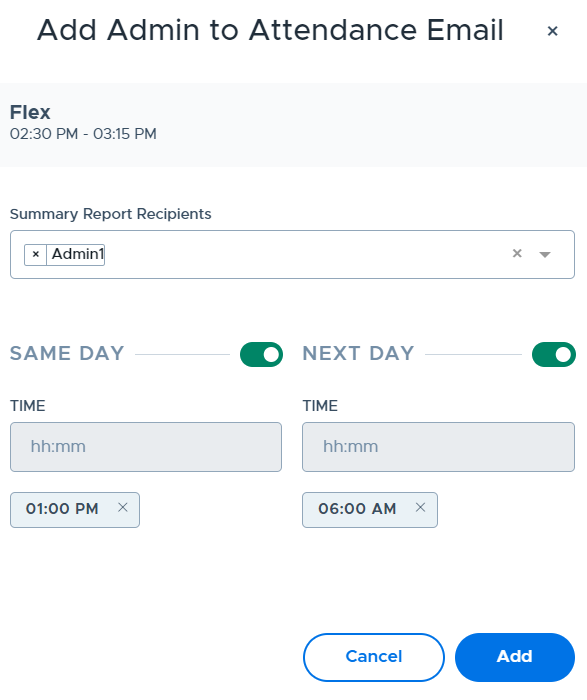
- Click “Add”.
- Times and Summary Recipients will show on the screen below and there will be a green indicator in the “Same Day” and/or “Next Day” columns for any flex periods in which reminders were enabled.
- Repeat these steps for each flex period you wish to have reminder emails set up.
- Click “Update” on the main System Settings screen.
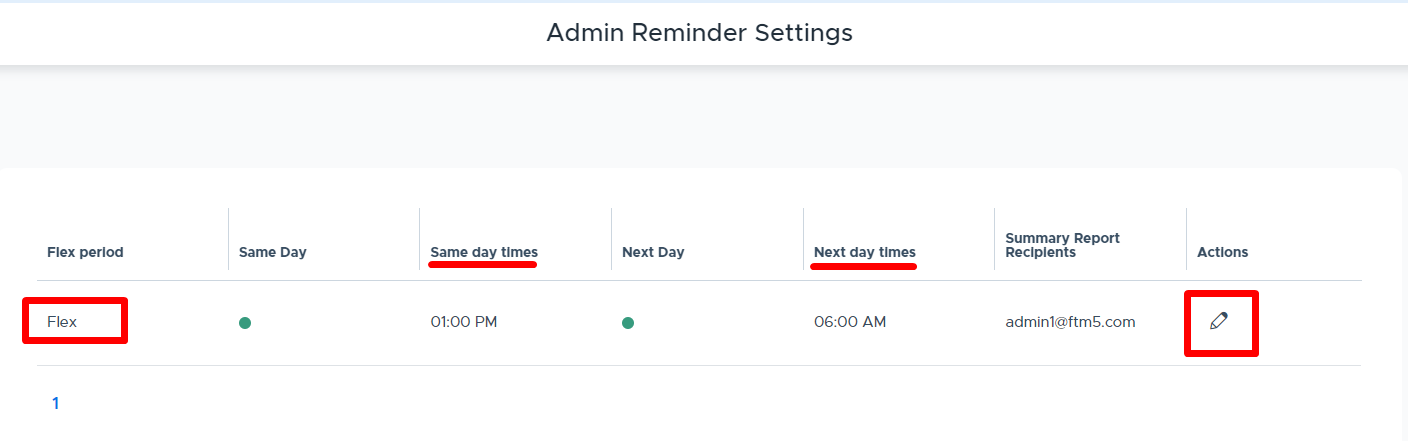
Additional Information and Tips to Consider:
- For the “Same Day” reminders, you may want to consider sending this during the flex period and shortly after it ends.
- For the “Next Day” reminders, you may want to consider sending this early in the morning so the teacher has this when they arrive.
- Please see the Attendance Reminder Email Settings video for more details.
- Emails will be sent from: flex.no-reply@securly.com
- Below are sample emails & notifications:
- Attendance Not Taken: Summary email and in-app notification sent to admins.
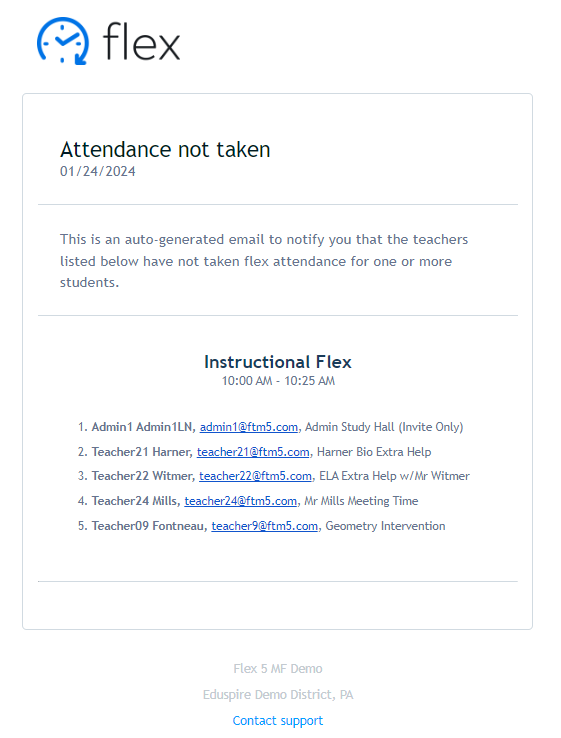

- Attendance Not Submitted: Email and in-app notification sent to the adult who has not fully submitted their attendance.

Automated Attendance Export
There are two options for schools that, when enabled, will automatically export Flex attendance files that can be used to import Flex attendance back into the Student Information System (SIS) or for other reasons. When enabled, the system will automatically export the file(s) to the school’s SFTP directory each day at selected times. The files can then be retrieved by using the assigned SFTP credentials. School IT professionals may be able to write a script to automate this retrieval process.
Exported files are overwritten each time/day with the most current information. Keep in mind this same data is always available to Admins and Staff on the “Full Attendance” report. This can be accessed and downloaded at any time, for any date. Negative attendance can also be downloaded from the Cut List report.
Depending on your school’s SIS file formatting requirements, there may need to be some updates made by the school or IT staff to the file that the Flex system exports. We are not able to customize or change our standard attendance export file format at this time.
The two available attendance reports are:
- Negative Attendance Report - This file lists all students who were not present (marked absent, late excused, or late unexcused) during the flex periods that are run at your school. If your school has multiple flex periods, they will all be included in one attendance export file, with each flex noted under the “Period” column. Below is an example of the export file and the data that is included:
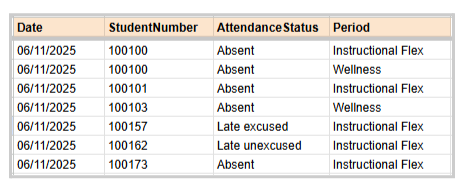
- Full Attendance Report - This file contains all data included in the “Full Attendance” report that is available to admins and staff within Flex Reports. This includes student information, SIS attendance (if being imported), Flex attendance information, and registration information. Please see the screenshot below:

To enable these exports, do the following:
- From the Systems Settings screen, under “Automated Attendance Export”, check the desired options.
- Add the time or times the reports should be exported.
- The default time is 4:00 PM local time.
- When adding a new time, it may take up to 24 hours to be recognized by the system.
- Newer files will overwrite previous files.
- Click “Update”.
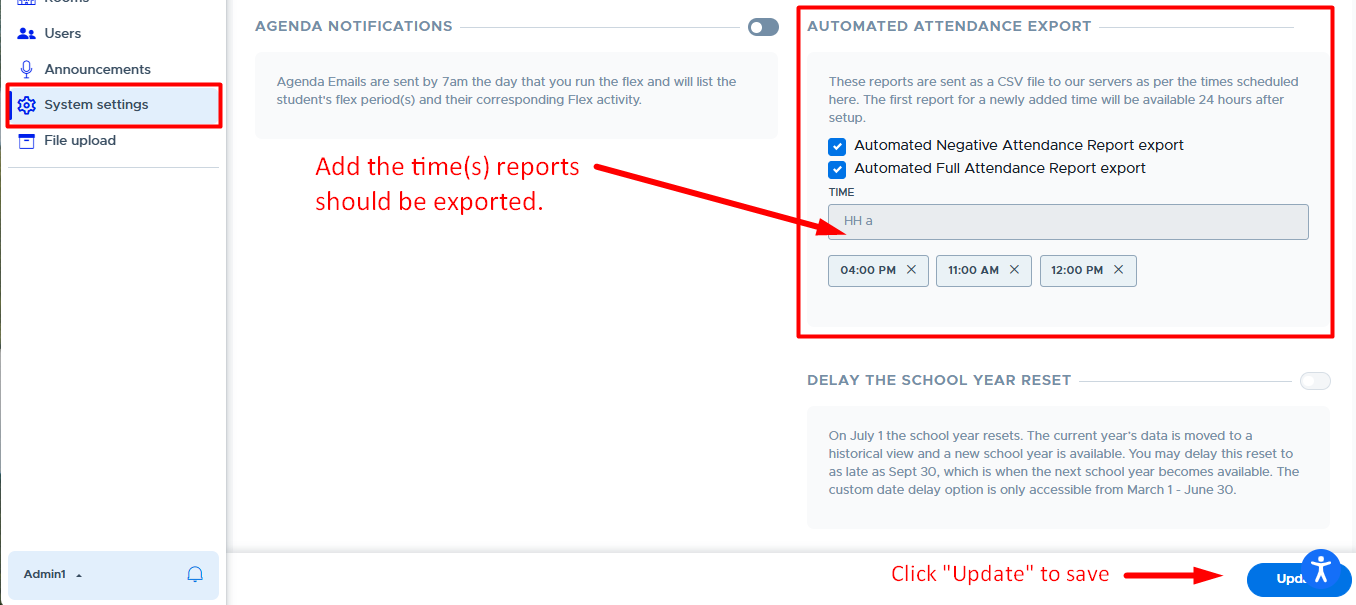
Delay the School Year Reset
The default system reset takes place on July 1 of each year. There may be reasons at your school to delay this reset, such as summer school usage of Flex, etc.
The new school year “reset” captures the data from last school year and makes it available in “read-only” format under the “School Year” drop-down menu. Your system carries over some data for the new school year but many settings need to be reviewed and updated. Details will be communicated in a “New School Year Checklist” document each year. Any questions can be directed to the Flex Help Desk.
If you do not wish to have your Flex system rollover and reset for the new school year on July 1, admin can go to “System Settings” and set the Delay of School Year date. This will delay the Flex system rollover for that particular school.
Here are some additional parameters that apply:
- The delayed date can only be between July 1 - September 30.
- Once July 1 passes, the delay date cannot be readjusted and the option will be unavailable until the following March.
- The window for adjusting the Delay of School Year date is March 1 - June 30.
- Be sure to click “Update” when selecting this feature.
- It’s also important to go into the “Flex Periods” screen and adjust your end date for the flex periods that need to run for an extended period of time.
Below is the “System Settings” screen where an admin can make this change during the designated time frame:
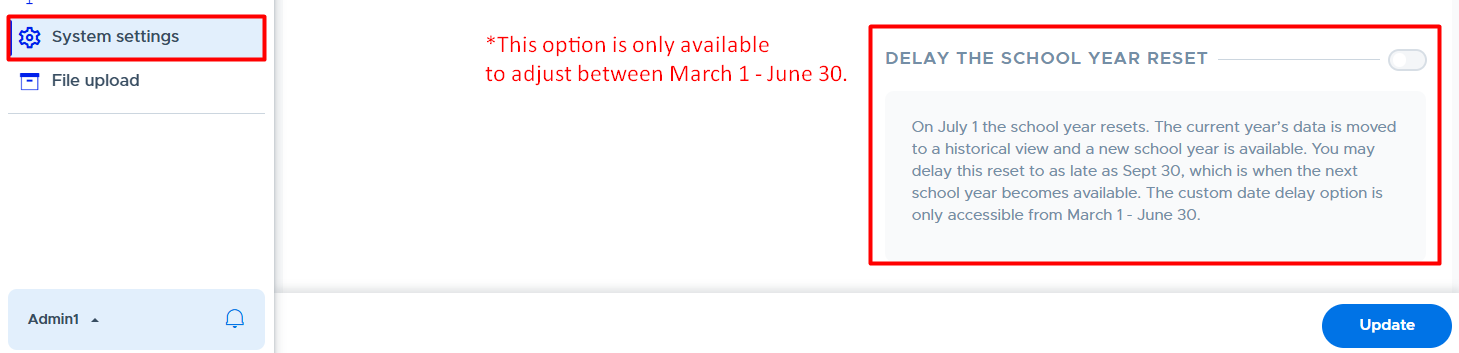
FILE UPLOAD
The File Upload screen displays all files that have been uploaded to the Flex system manually by an admin or via SFTP. (SFTP = secure file transfer protocol and is often used by IT professionals to transfer files securely.) There are various types of CSV files that can be uploaded to Flex, depending on which system features are being used. The system recognizes the type of file by the column “headers” in each file. The various files that can be uploaded to the system include the following:
- User Files
- SIS Attendance Files
- Group Files (formerly “Rosters”)
- Catchall Files
- Here is a video that provides an overview: File Uploads
Below is the main File Upload screen which displays the following: Title, File, Created (date), Modified (date), Type (of file), Status, and Actions. From this screen new files can be uploaded manually using the “Upload” button. The screen also provides a search box, filters, and an “Export” option.
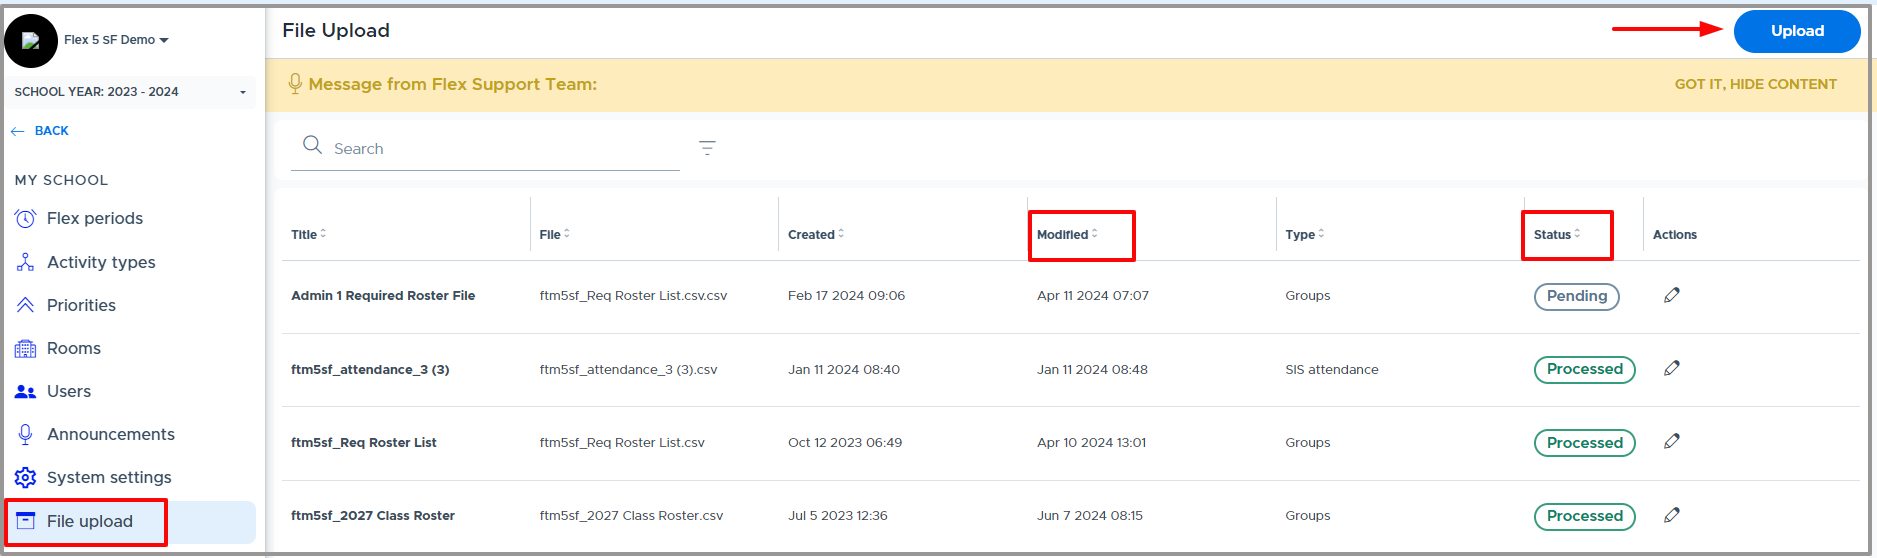
When files are uploaded to Flex (manually or via SFTP), the “Status” column will display one of the following depending on what is happening with the file:
- PENDING: Waiting to be processed.
- QUEUED: In line to be processed.
- PROCESSING: File is currently being processed.
- PROCESSED: File is received and able to be read by the system. This does not always mean that everything in the file is imported into the system correctly. Issues with actual data, such as wrong domain names in an user file, will not be updated in the system, but the file will still be processed successfully.
- FAILED: File processing was not successful. (Check the file format and headers.)
It’s very important that the column headers are correct. These tell the system what to do with the data in the file - where to put it in Flex. If they are not correct, the system does not process the file.
- Many file templates can be found in the Flex system and samples are linked here. (This linked document has tabs across the top and “displays” the proper column headers for each type of file. It cannot be downloaded but you can copy and paste the headers.)
- The file name does not matter but it can be helpful to use the same file name each time (rather than renaming the file) so that your file overwrites the previous file. This will make it easier to manage the list of files in Flex.
MAIN MENU - ADDITIONAL “ADMIN” FEATURES
My Profile
All users have access to their “My Profile” screen in Flex. For adults this is found on the bottom left portion of the menu in Flex by clicking the up-arrow by the user’s name.

The following screen is what appears. Here you can view summary information about your Activities and “Edit” your personal information.

When the “Edit” button is selected, the following window appears where you can update the last three fields. If you update your name here, it may get overwritten the next time your system syncs with the third party rostering system or a new user file is uploaded.
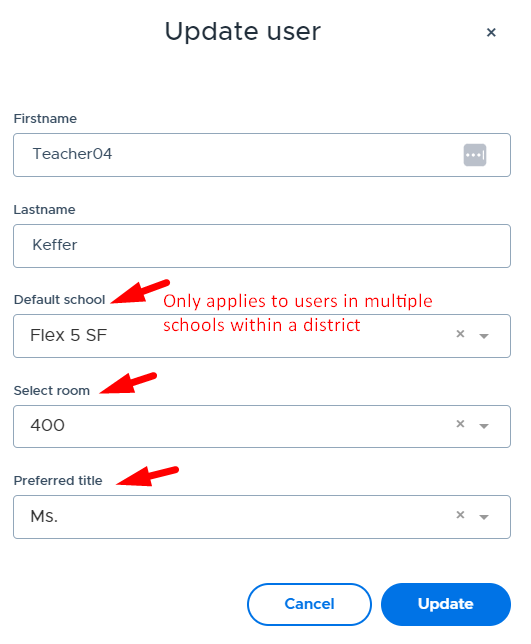
Access to Prior School Year
If your school used the Flex system during the prior school year, all admins, teachers, and staff will have access to “view” last year’s Flex data. This can be done by selecting the “School Year” drop-down menu shown below. This is located in the top left corner of the adult’s Flex screen.
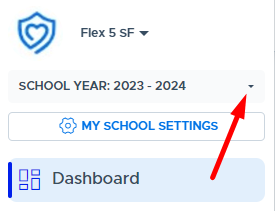
Select the ‘prior year’ to be taken into the Flex system for that year. Only the previous year is available for viewing. Users will not be able to make any changes to prior year data but they can use this for viewing and searching reports, student registration data, prior activity information, roster data, etc. It’s even possible to copy data, such as an Activity Description and then paste it in a current year’s Activity.
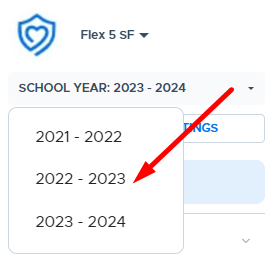
Simulate Feature
The “Simulate” feature in the Flex system provides an Admin with the ability to search for any other user in the system, go into that user’s Flex screen and act on their behalf. For this reason, it is important to consider and use caution when assigning a user to have “Admin” role access in the system. Using this feature can be very beneficial in assisting other users and troubleshooting questions that arise.
- Please see the Simulate Feature video for more details.
The blue simulate button is located in the upper left corner above the school name.
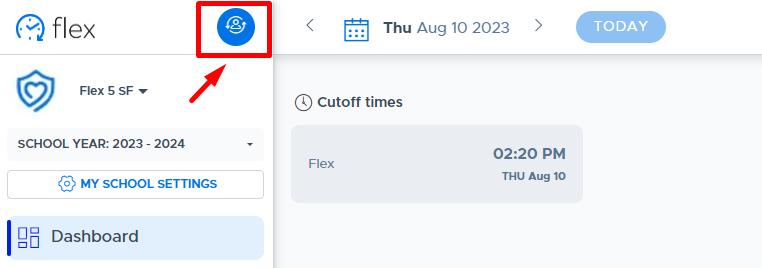
From the “Simulate” search box, which appears in the top center of the screen, simply start entering the user’s name or email address and a list of matches will begin to appear. Once you find the user you wish to simulate, select that user and you will be taken into their Flex screen, as shown in the examples below.
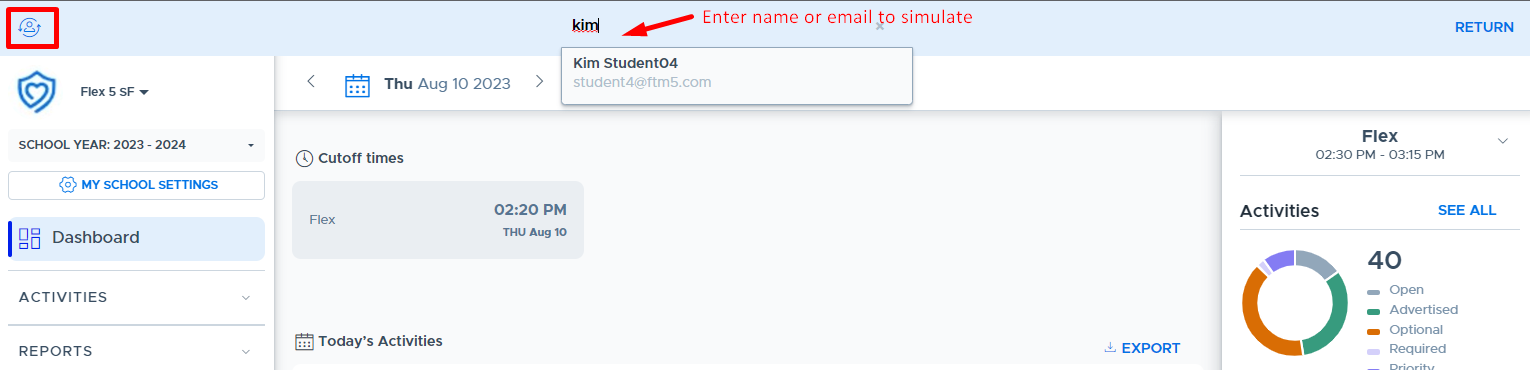
Below is the student’s screen that was simulated above.
To return to the Admin screen, click the word, “Return”, in the upper right corner.
You can also simulate another user if desired. It is not necessary to return to your admin screen between simulating multiple users.
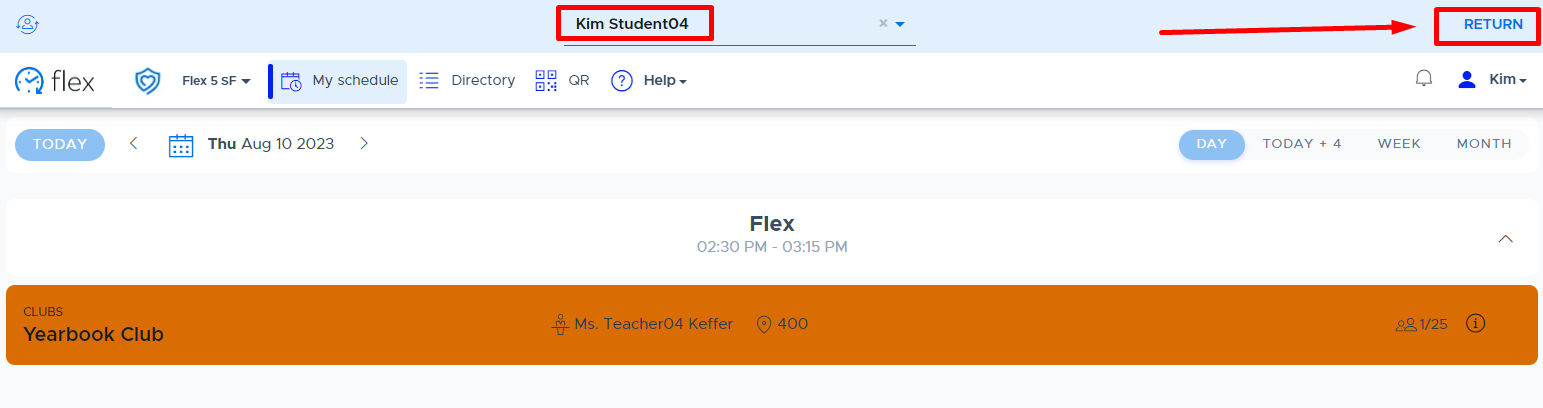
DASHBOARD & REPORTS
Dashboard
As an Admin, the home screen in Flex will be the Dashboard. It will present you with a lot of great information about the activities scheduled for “today”. You can toggle back and forth to view other dates or select a specific day from the calendar. You can search for a particular teacher or activity in the “Search” field. Each column can be sorted and your data can be exported for further analysis or documentation. Please see the following video for more details: Dashboard Overview.
- Tip: By exporting the complete Dashboard for the day, the Registered Students column and the Activity Cap column can be calculated with Autosum to check that there are enough “seats” available for student sign ups.
- You might also consider using the “Autoassign with Catchall by Room” functionality that will automatically fill available seats. Watch this video for more information.
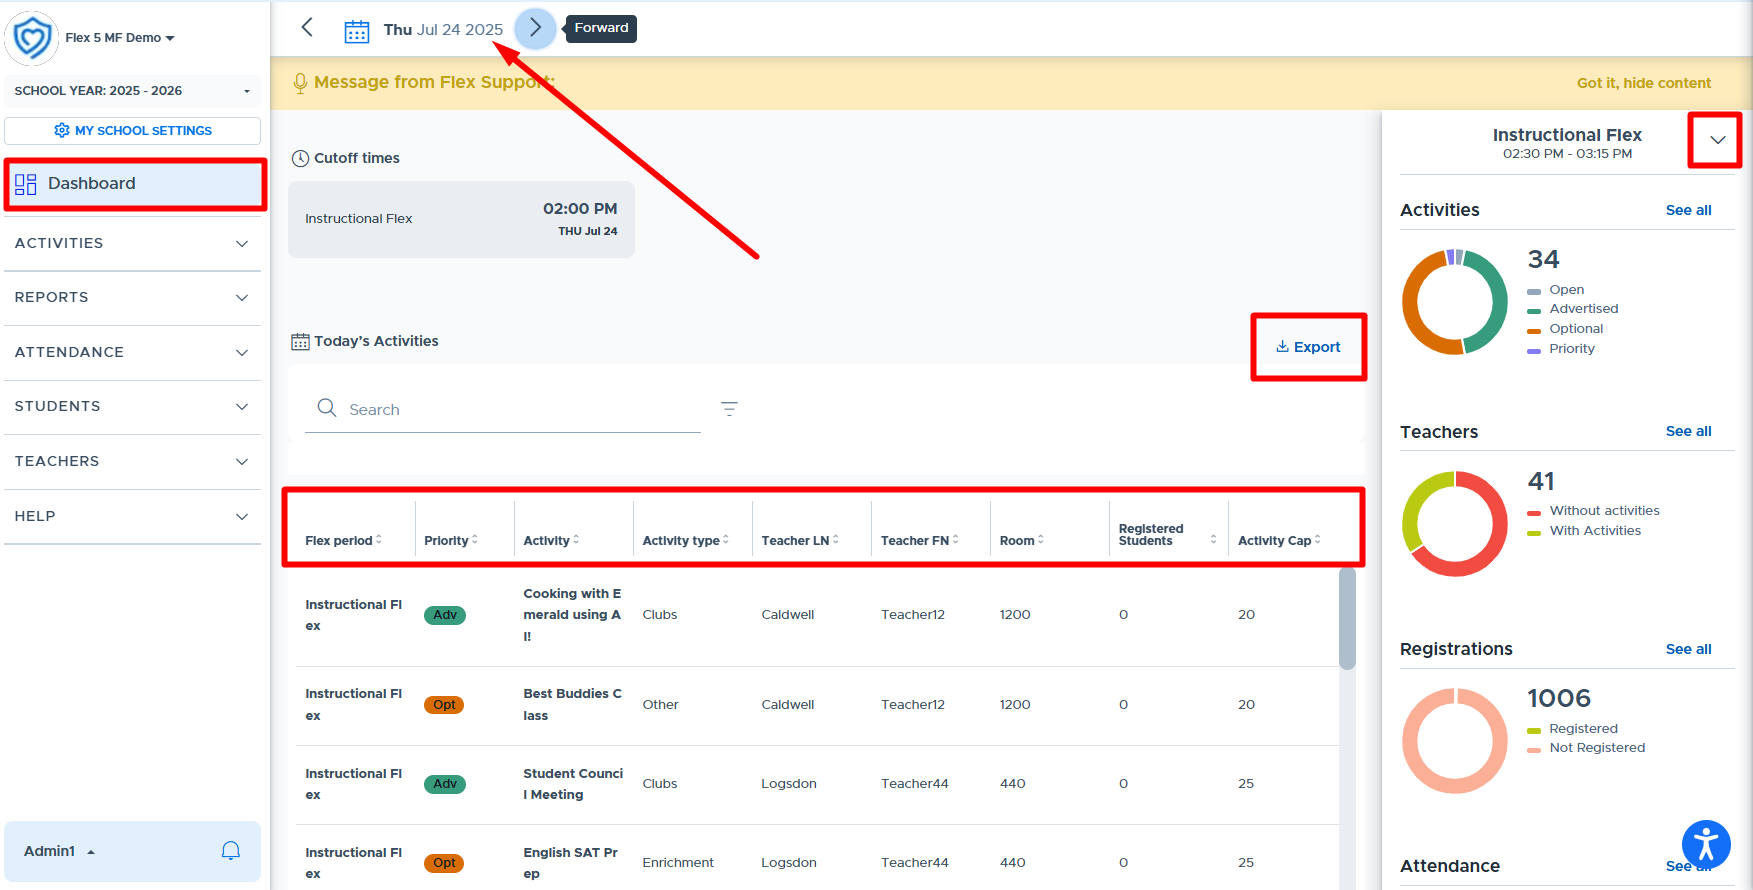
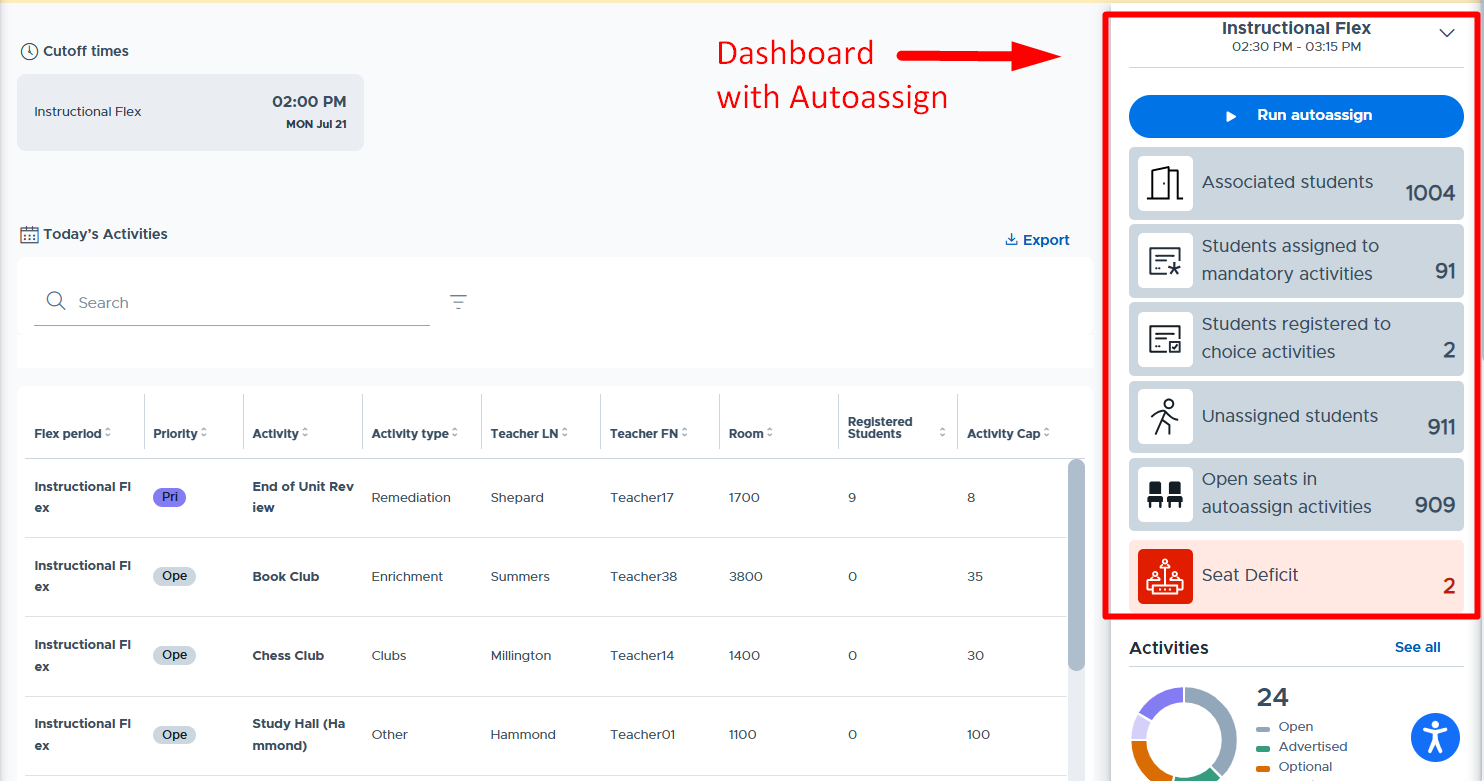
| Cutoff Times The active Flex periods for the date selected will be displayed at the top of the screen. Prior to the cutoff time, these will be shaded in light gray white. After the cutoff time, these will be shaded in dark gray, as shown to the left. |
|---|
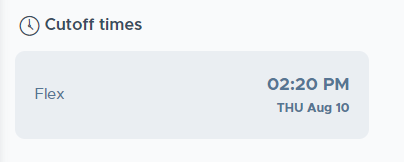
Graphics Summary:
| Sort by Flex (for multiFlex schools) You can click on the Flex period at the top of the graphics summary to see a listing of all available Flex periods and can select the one you wish to see. |
|---|---|
| Activities The circle graph contains the number of activities scheduled in the school for the selected Flex period and date. These are organized by priority level. This does not include Catchall or Lunch activities. (“See All” links to the Activities > Directory page.) |
| Teachers The circle graph displays the number of teachers who do and do not have activities scheduled. It does not include Catchall by Homeroom, nor other roles (admin and staff) who may have activities scheduled. Currently, this data does include active and inactive teachers (no admin or staff) so the numbers may not match your current teacher totals. (“See All” links to the Reports > Attendance Activity page.) |
| Registrations This circle graph shows the proportion of students registered versus not registered for an activity for the selected Flex period. Students registered for a Catchall activity will be counted as not registered for the purposes of this graphic. (“See All” links to the Reports > Full Attendance page.) |
| Attendance This circle graph shows Attendance Taken versus Attendance Pending. Attendance Pending includes Catchall activities, but does not include Lunch because we do not track lunch attendance in our application. Teachers must take attendance for all students listed on their attendance list in order to be counted as Attendance Taken. An activity will remain in Attendance Pending until all students have attendance recorded. (“See All” links to the Reports > Attendance Activity page.) |
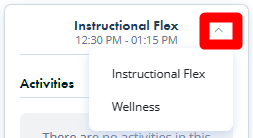
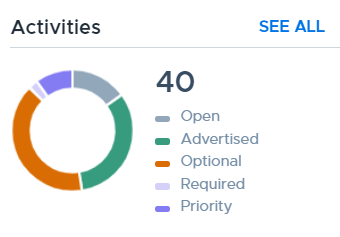
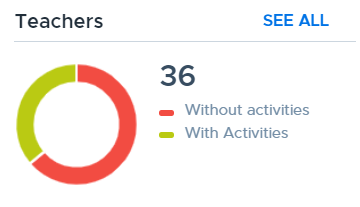
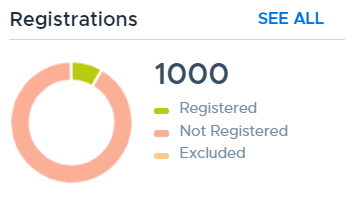
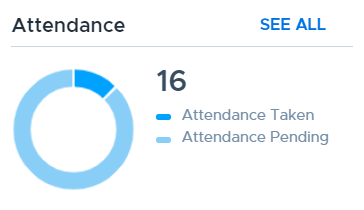
- In Flex, you can hover over the graph to see the actual number represented in the circular graph.
Cut List
The Cut List is a report that is designed to show Admins/Staff which students were absent during Flex - or other “outliers” such as students who were late, not registered, or when attendance was not submitted. In addition, if you are importing attendance from your Student Information System (SIS), Flex will compare this attendance to the Flex period attendance submitted by the teachers. The results of this comparison will show students that may have cut the Flex period or have other “attendance discrepancies”.
If a student’s attendance is the same in both the school’s SIS and the Flex period, the student is removed from the Cut List report. At the beginning of the day, ALL students will show up on the Cut List report. As the SIS and Flex period attendance are processed/submitted, student records are updated and will be removed from this report if the attendance is “Present” in both the SIS and Flex. “SIS Absent” students are also removed from the report. Ideally, the list has no students on it or is very small after all attendance has been submitted.
The report shows other “discrepancies or outliers” related to the Flex period attendance such as when teachers do not submit attendance, when students are not registered for an activity, and when a student shows up late excused/unexcused.
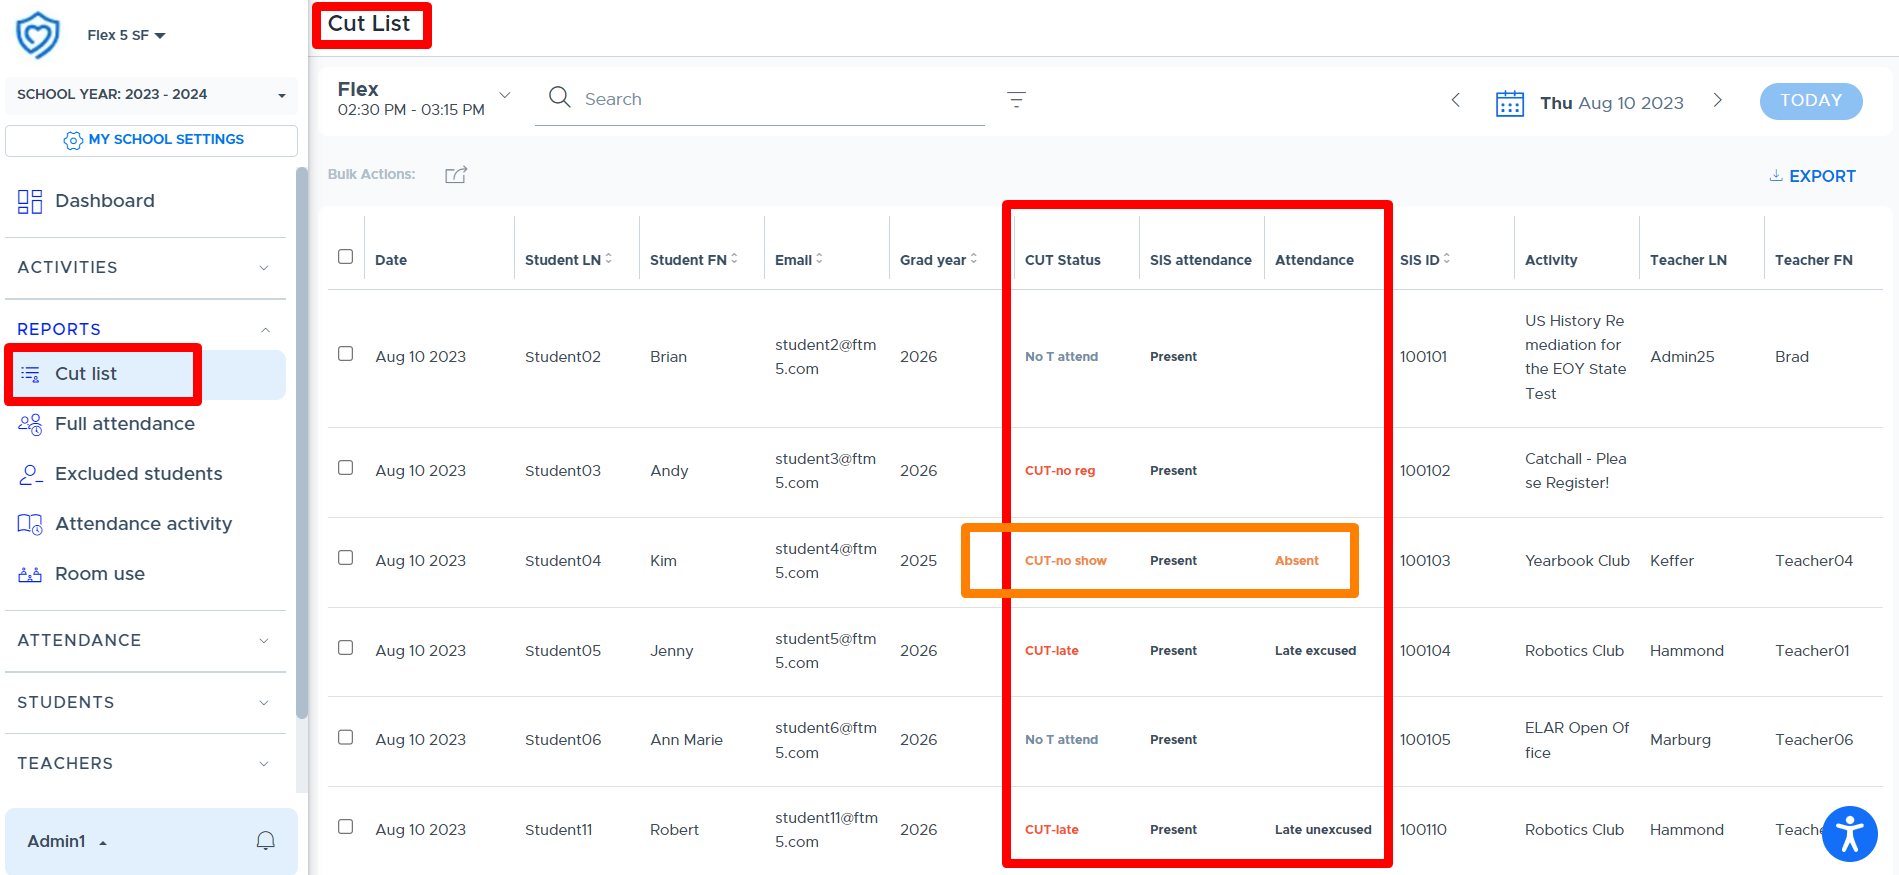
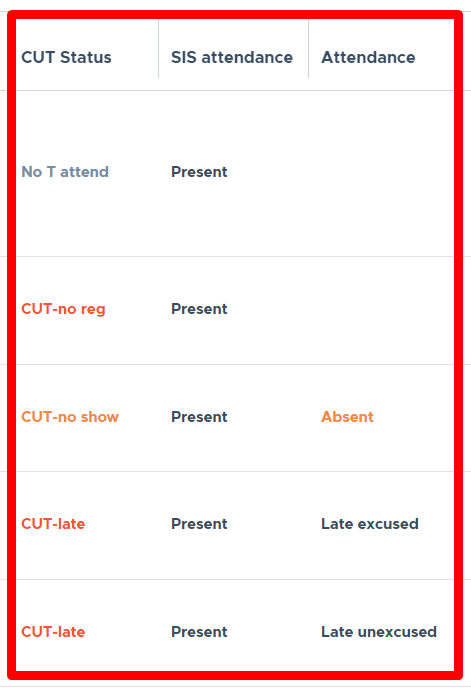
Here is what the various colors and the “CUT STATUS” abbreviations mean:

The “SIS Attendance” column shows “Present” if the attendance is being imported from the SIS. (SIS “Absent” students fall off this report but can be seen on the Full Attendance report.) If the attendance is not being imported, this column will be blank. The “Attendance” column shows the attendance status submitted by the teacher for the Flex period.
Please note that if your school is using “Catchall” functionality and a student does not register for an activity but is in the catchall. They will be on the Cut List report with the status = “Cut - No Reg”. Once the Catchall attendance is submitted in the system, students marked “Present” will be removed from the Cut List but can be seen on the Full Attendance list as “Not Registered”.
It is an option for schools to import their SIS attendance into Flex to be used for comparing SIS attendance to Flex attendance. (Please see the “Attendance Imports & Exports” section of this guide for more details on how to set this up.) If a school chooses not to import the SIS attendance data, the Cut List report can still provide value.
- The SIS Attendance column on the report will be blank if attendance data is not being imported.
- Once teachers submit their Flex attendance and the “Present” students come off the Cut List, the report can then be exported and you will have a smaller list of students. This list can then be compared to your list of “absent” students for that day.
- Once you “remove” these absent students from the exported Cut List, you will be left with students that may have cut the Flex period or have other ‘attendance discrepancies’.
Catchall and the Cut List
When a Catchall is being used by a school and students are in the Catchall, and not registered in an activity, they will show up on the Cut List with a “CUT-no reg” status.
- When the Catchall attendance is submitted, students marked “Present” will fall off the Cut List report.
- If the school is importing SIS attendance, any students in the Catchall but marked “SIS Absent” will also fall off the Cut List.
- Catchall students who are left on the Cut List (those marked Absent, Late Excused, or Late Unexcused), will retain the original “CUT-no reg” status.
Excluding Students from the Cut List
It is possible to “exclude” students from the Cut List. You may want to consider doing this for students who do not typically participate in the Flex period. (Examples would be cyber students, vocational students, students in a self-contained classroom, etc.)
There are two ways to exclude a student directly from the Cut List. (1) by clicking on the box to the left of the student or students’ name and then the “Bulk Actions” button or (2) clicking on the “Exclude” icon located on the far right of the student’s name. (See screenshots below.)
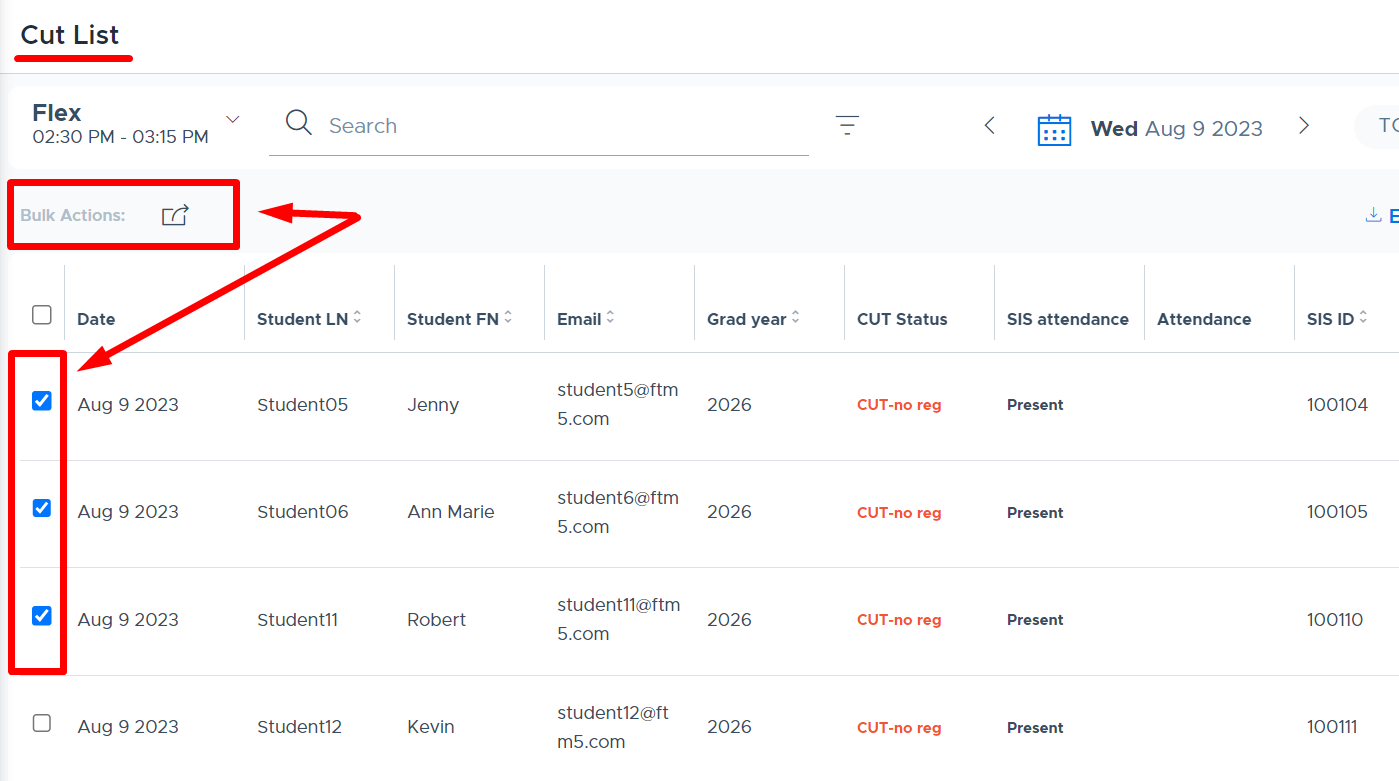
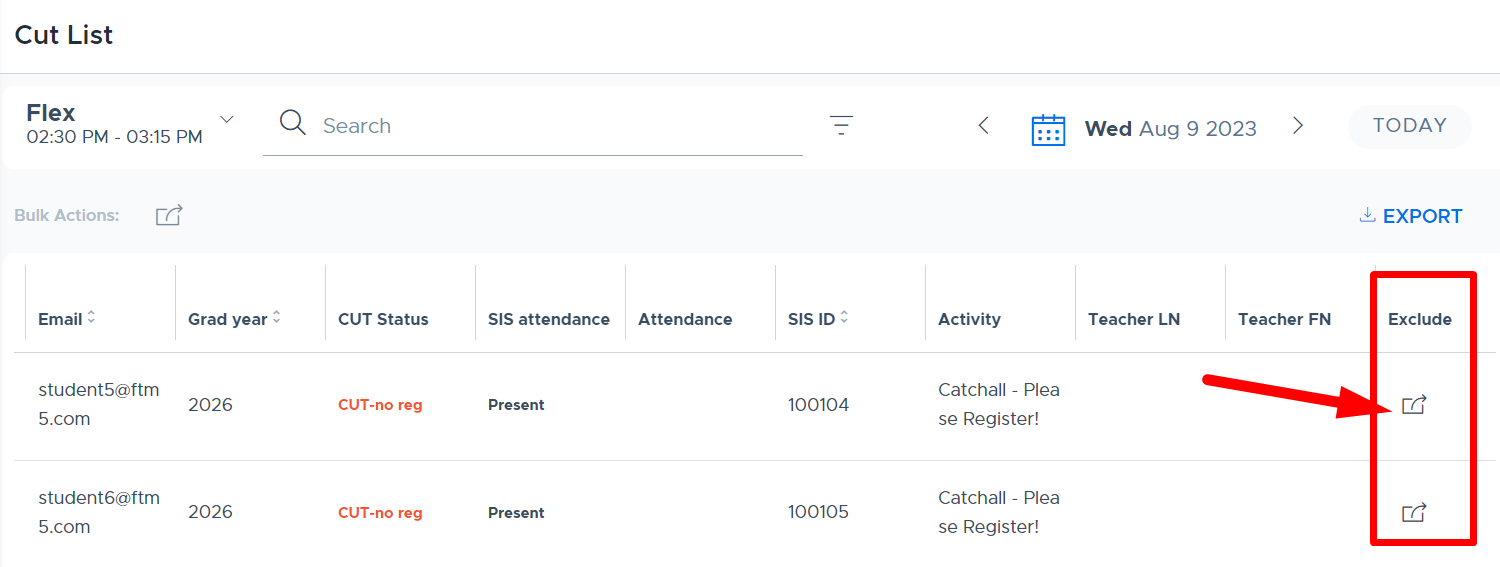
For more information on the Cut List Report and “Excluded Students” please see the following resources:
- The Cut List Report training video.
- The Excluded Students training video.
- The Excluding Students section of this manual.
Full Attendance
The Full Attendance report is one of the most comprehensive reports in the system. It defaults to the current day and shows what is going on for ALL of your students per Flex period. This report can be viewed by: All, Excluded, Not Registered, and Registered (Students).
- Note: This is the best place in the system to quickly see the students who have not (yet) registered for an activity during the Flex period. Simply click on the “Not Registered” option shown below.
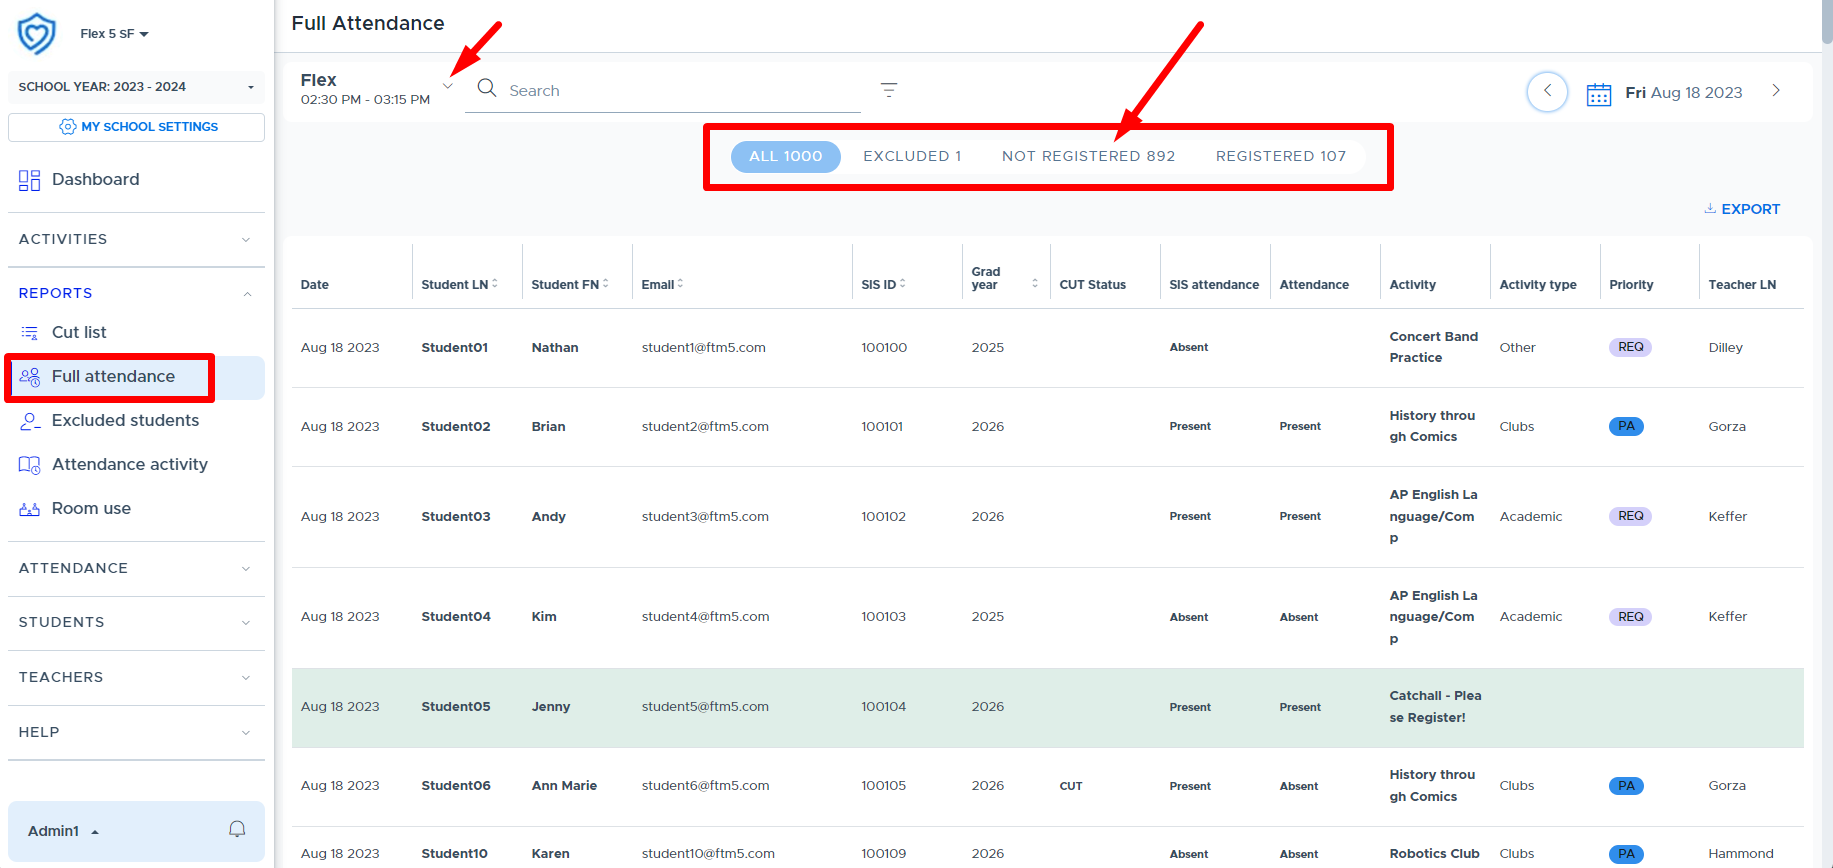
You can easily search for a student by name, email, or SIS ID - and specify the Flex period if your school has multiple periods. (See the sample below.) When searching for a student, be sure you are on the desired tab, such as “All” or “Registered” vs. “Not Registered”.
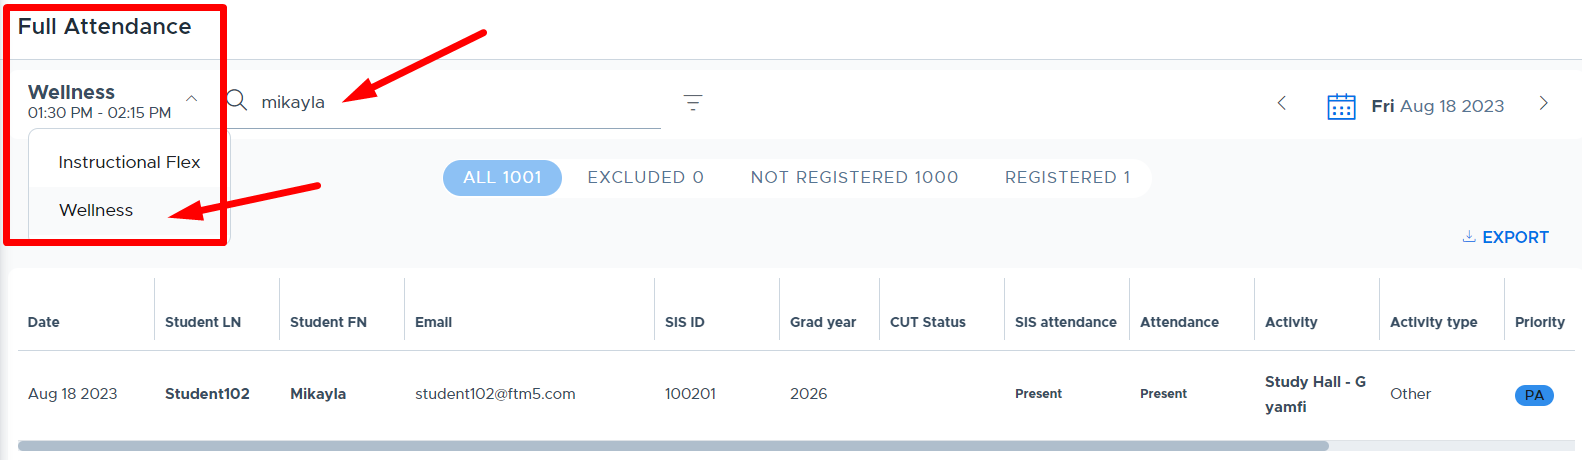
It is possible to navigate to different dates using the calendar and arrows in the top right corner. You can also use the filter options to enter a date range to view data across more than one date. The “Export” button allows you to download the Full Attendance information. When exporting, be aware that the system will download the data from the tab you are currently viewing. (For the most comprehensive results, search using the “All” tab unless you are specifically looking for criteria that relates to “Not Registered” or “Registered”.)
- Please be aware that searching for large date ranges or amounts of data at one time, or during school hours, may take some time or possibly slow your system down. We recommend doing this during off-hours and using small date ranges.
- Also, it is possible to have this report automatically exported each day to your SFTP directory. From this directory, your technical staff may be able to retrieve the file for your reporting use. Please see more information in the "Automated Attendance Export” section of this guide.
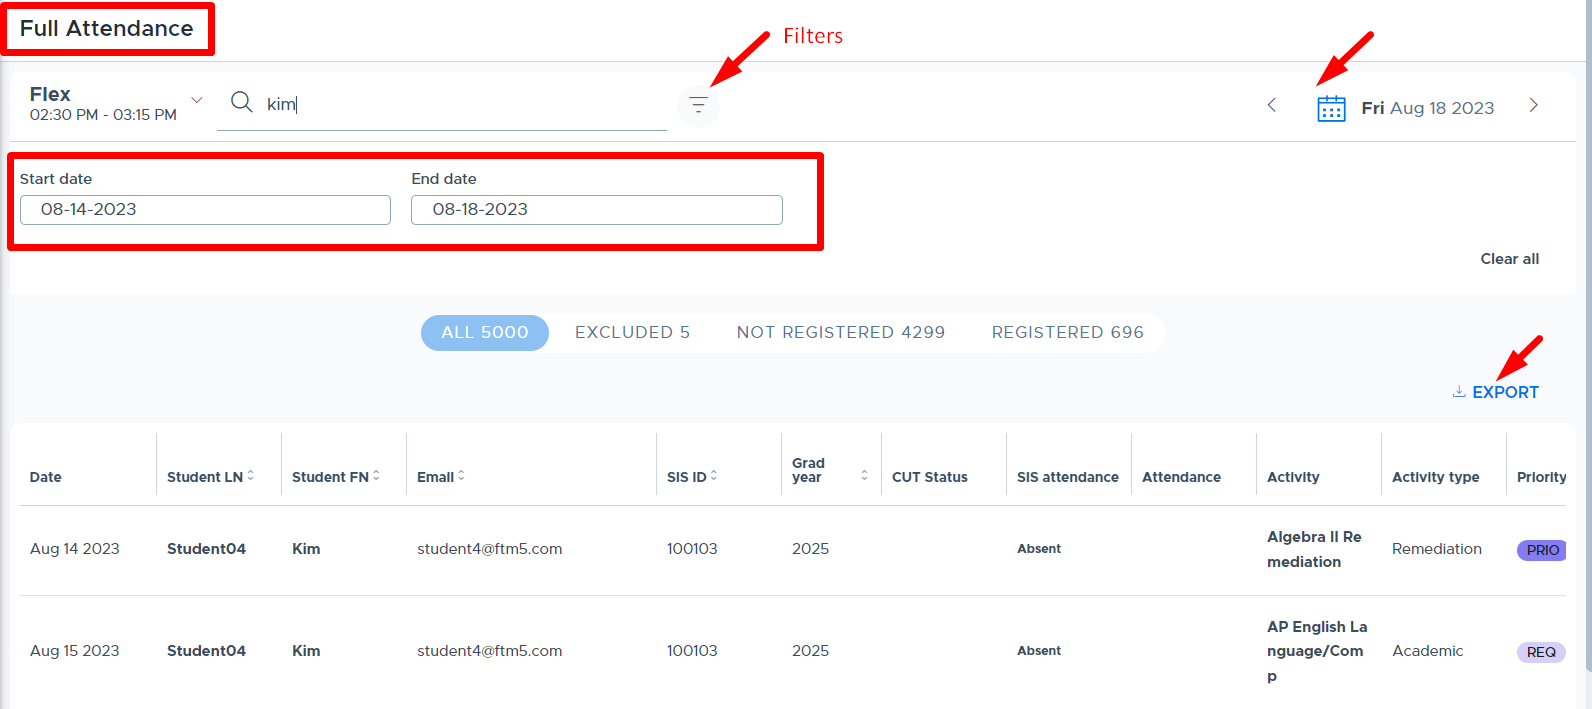
Lastly, this report displays both the “SIS Attendance” if a file is being imported the day of Flex (otherwise this column will be blank) and the Flex “Attendance”. It also displays the “CUT Status” which means the student is on the Cut List report because there is some type of attendance discrepancy. The below screenshot shows a variety of attendance examples.
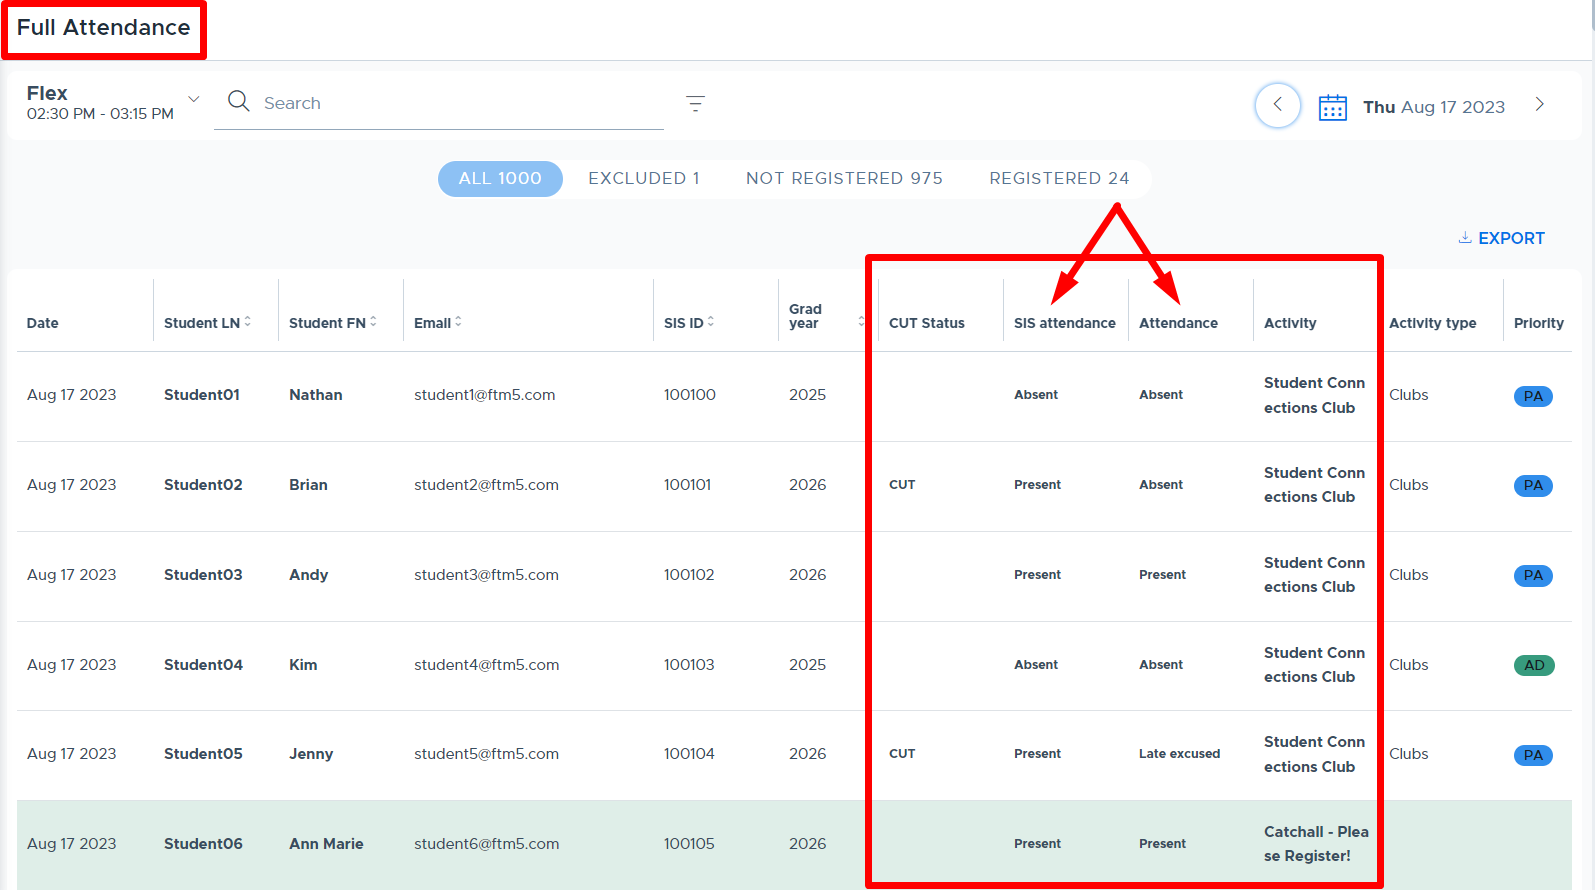
- Please see the Full Attendance Report video for more details.
Excluded Students
It is possible to “exclude” students from the Cut List report in Flex and from participating in your Flex period(s). By doing this, these students will not continue to show up on the Cut List or the “Not Registered” list in Full Attendance, since they are not expected to participate. The system allows Excluded students to register for an activity but they are not counted towards the Activity Cap or Room Cap.
Here are some of the common reasons that you might add students to the “Excluded Student” list:
- Homebound Students
- Early Dismissal Students
- Vo-Tech and Travel Students
- Students in a self-contained classroom
There are two ways to exclude students in Flex:
- From the Reports menu > Excluded Students - See below for detailed instructions.
- From the Reports menu > Cut List - See details in the “Cut List Report” section or the linked training video below.
Steps to add students to the “Excluded Students” list in Flex:
- From the “Excluded Students” menu, click “Exclude Students”.
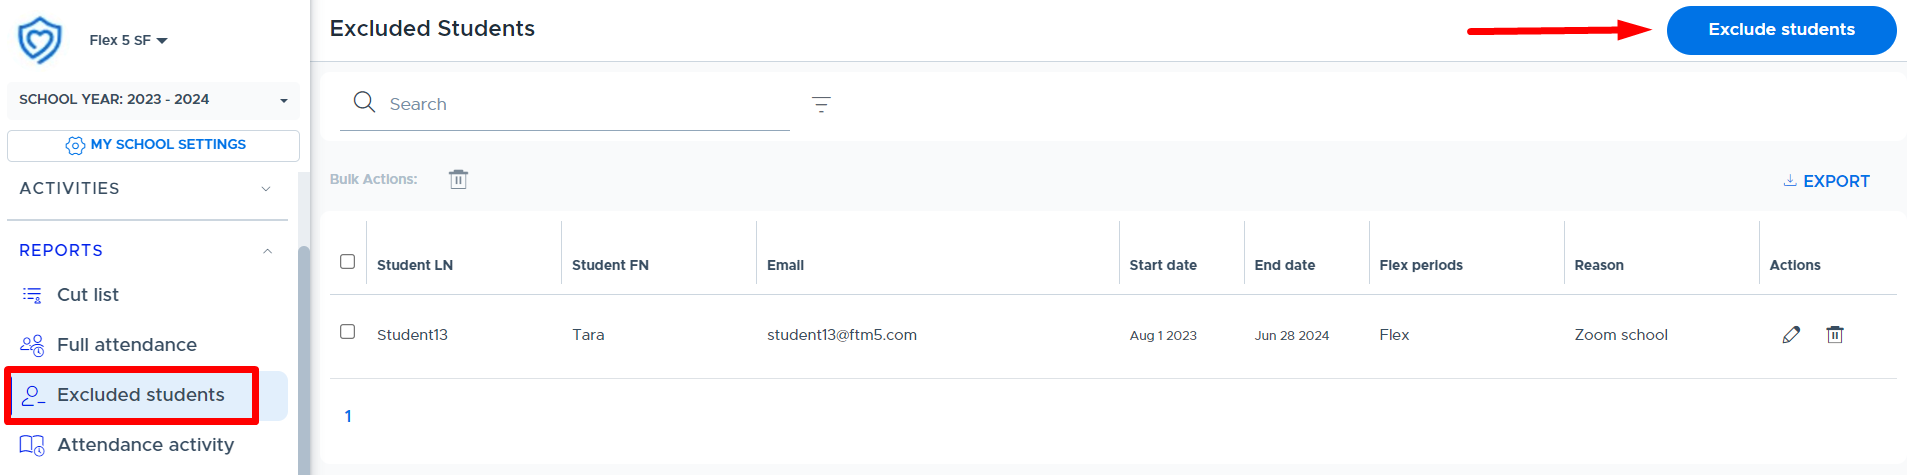
- At the window shown below, search for the student(s), select the appropriate Flex period(s), enter the date range, and enter a reason. Then click “Confirm”.
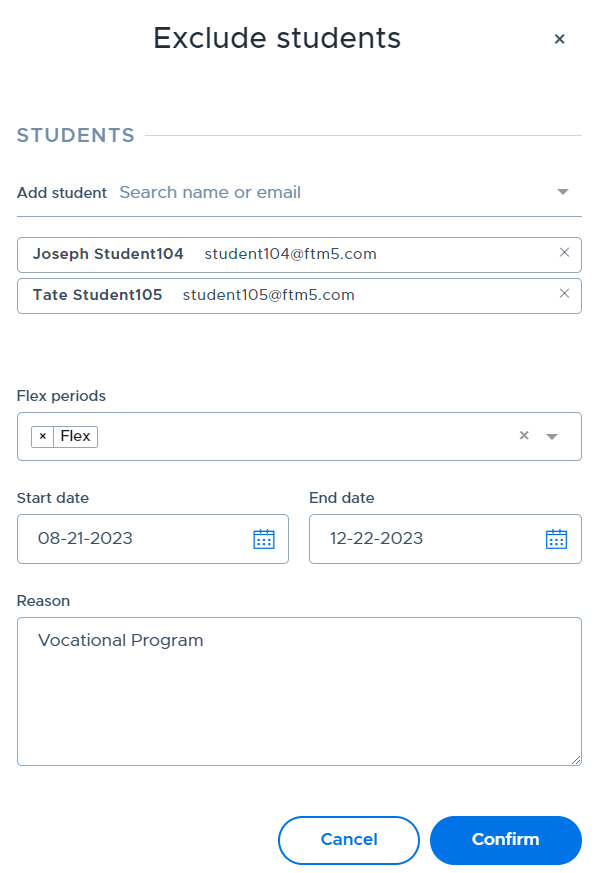
- The student(s) will be added to the main list as shown below. From this screen you can search for students in the list. You can also edit or delete an exclusion using the options in the “Actions” column.
- Note: If you want to end an exclusion but keep a record of the exclusion in this list, use the “Edit” option and change the “End Date”, rather than the “Delete” (trash can) option.
- Multiple students can be bulk deleted/removed from this list by checking the boxes in the left column and then clicking the trashcan icon next to “Bulk Actions”.
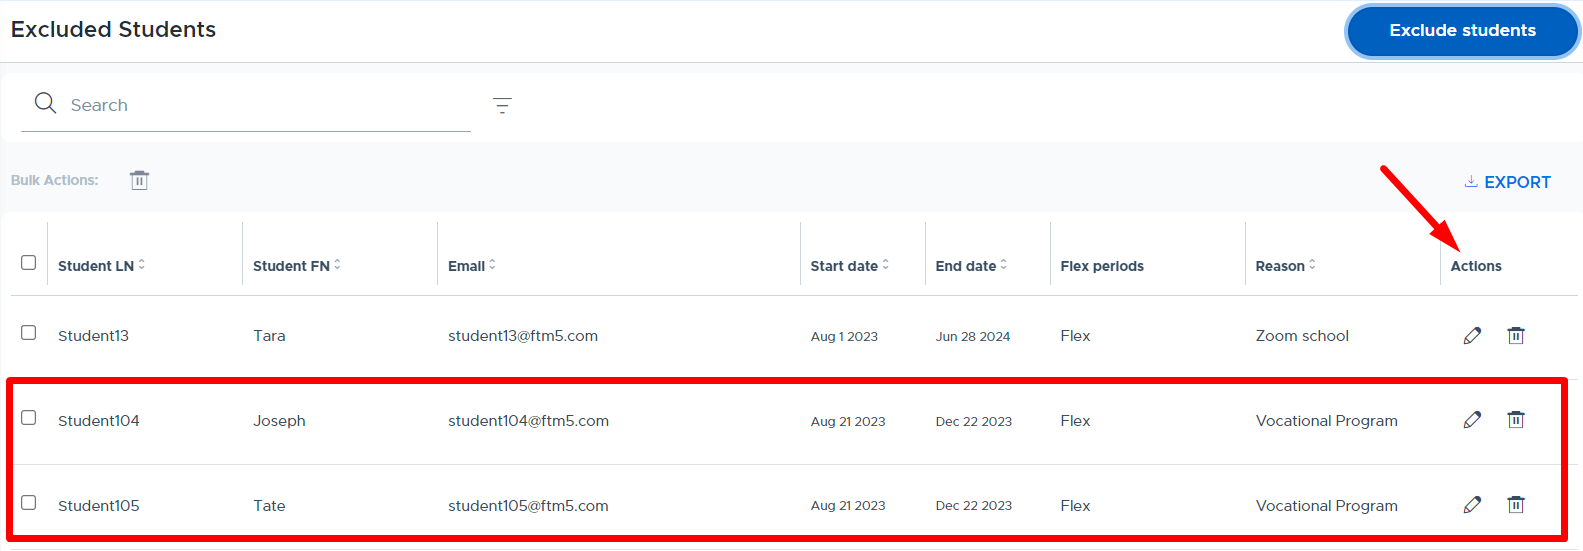
Below are a few important things to understand about Excluded Students:
- They will not show up on the Cut List report.
- They will be listed on the Full Attendance report with a “Manually Excluded” designation. (There is also a separate “Excluded” tab that shows all excluded students for that particular day.)
- Excluded students CAN register for activities and be added by teachers to activities. They are not “expected” to attend, therefore they will show up in the “Missing Student” section of the teacher’s attendance. This lets the teacher know that the student “was manually excluded” and by which Admin in the system. (See screenshot below.)
- Excluded students do not count towards the Activity or Room Cap, regardless of whether they register for an activity or a teacher mandates them.
- Excluded students will NOT receive a morning agenda email.
- Note: Attendance cannot be taken or submitted for Excluded students.
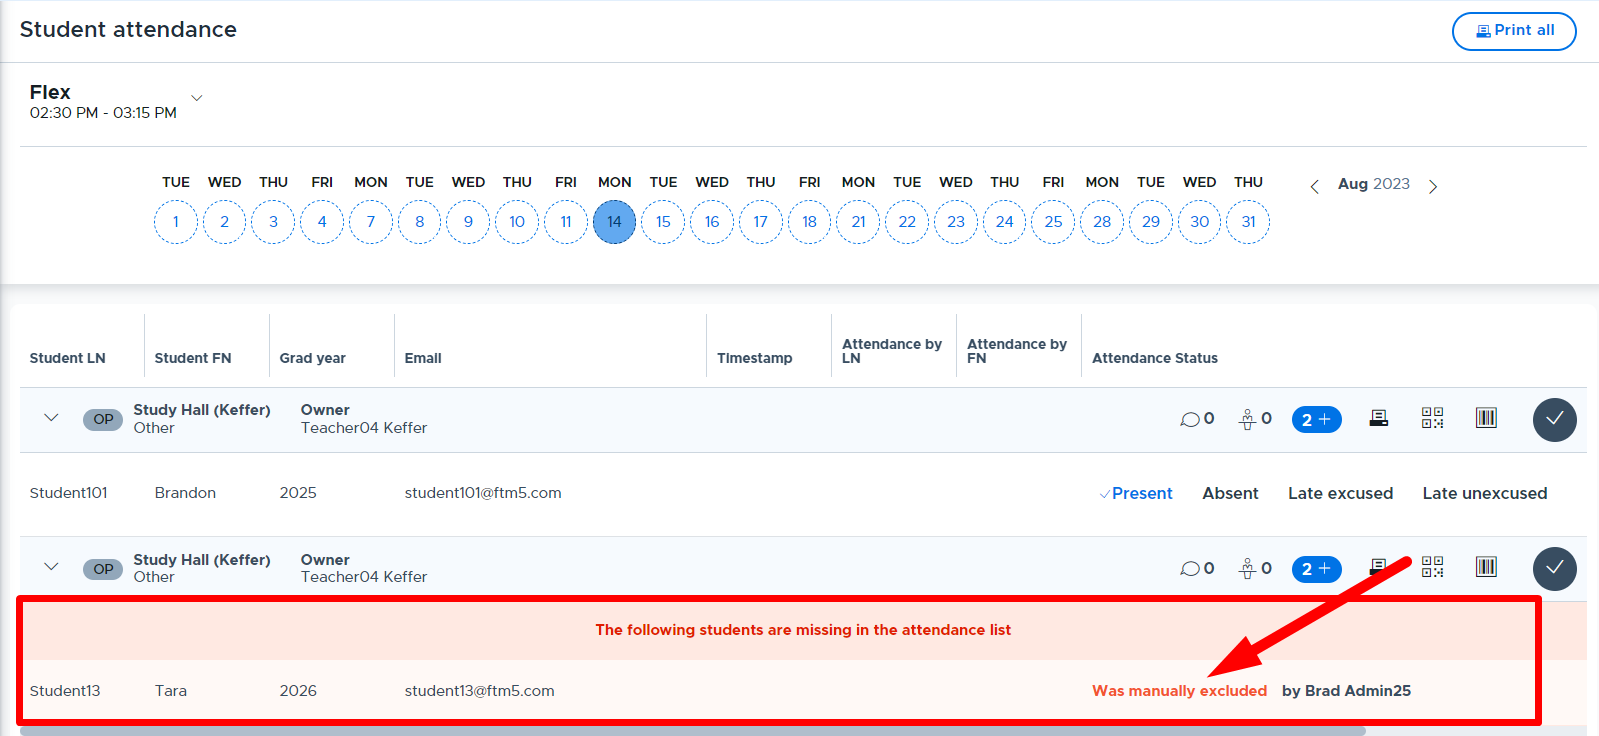
- Please see the Excluded Students video for more details.
Attendance Activity
The Attendance Activity report is designed to show Admins which teachers/adults have scheduled a Flex activity for the day and if/when they submit the Flex period attendance. Admins can also easily see which priority levels are being used for the scheduled activities and which teachers did not schedule any activities for the day (or designated time period). Please see the examples below.
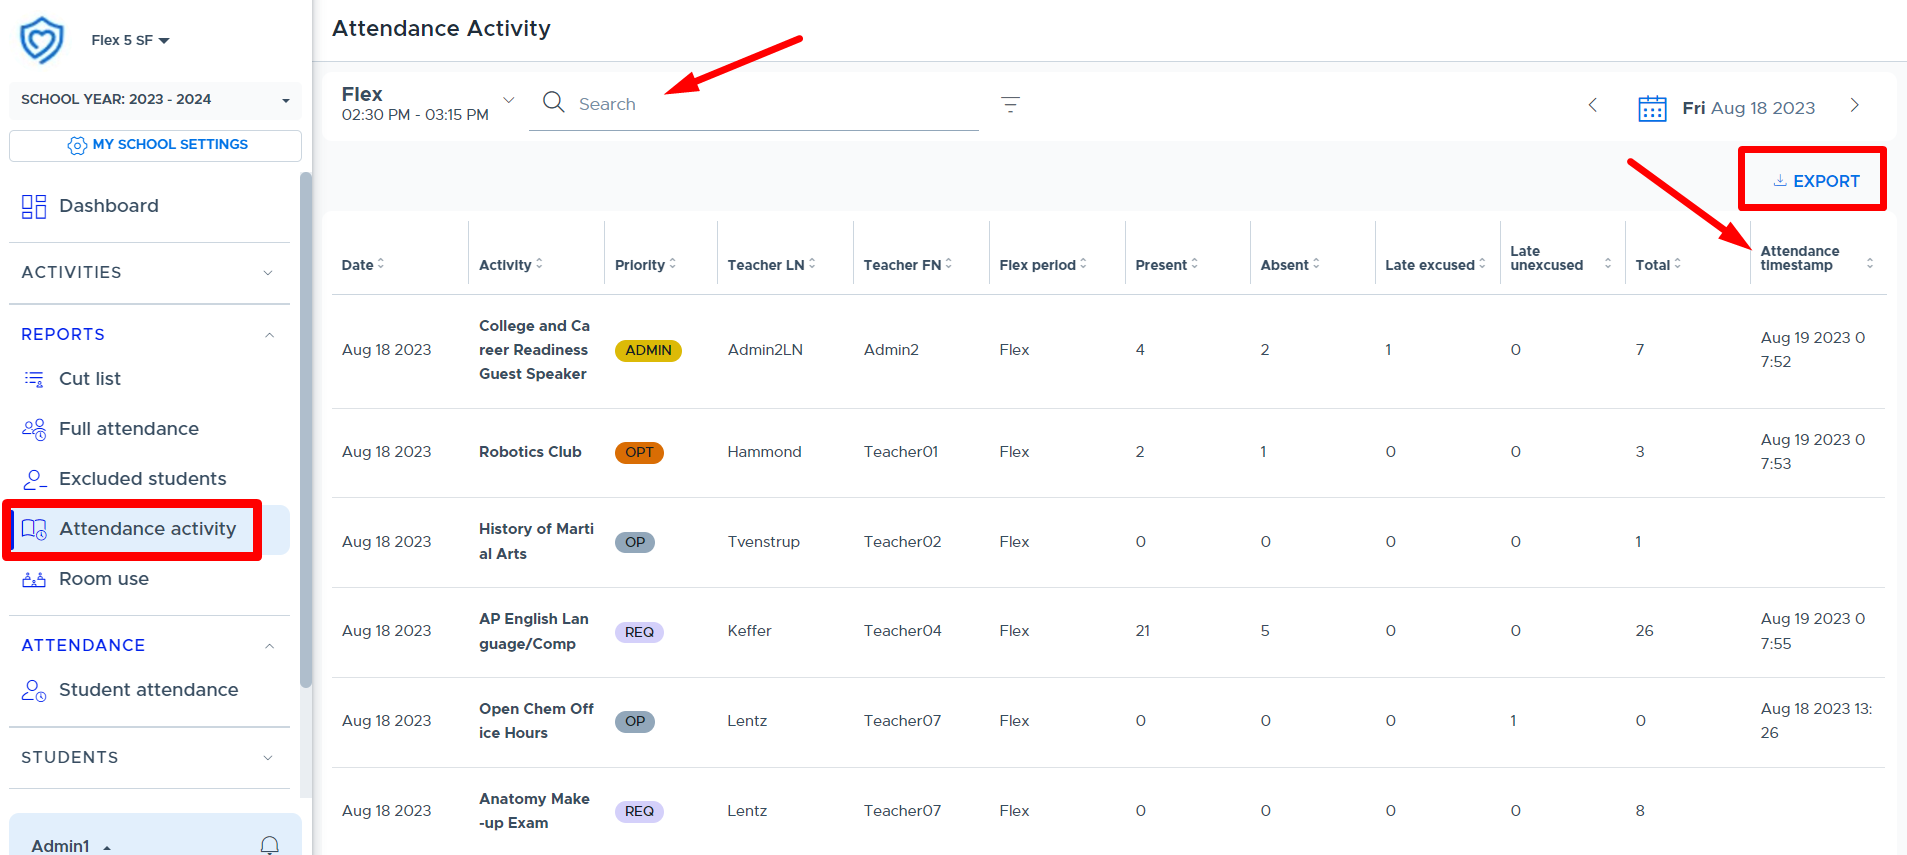
If you want to see teachers who did not schedule any activities, scroll to the bottom of the list. (This may be easier to sort and see when the data is exported.)
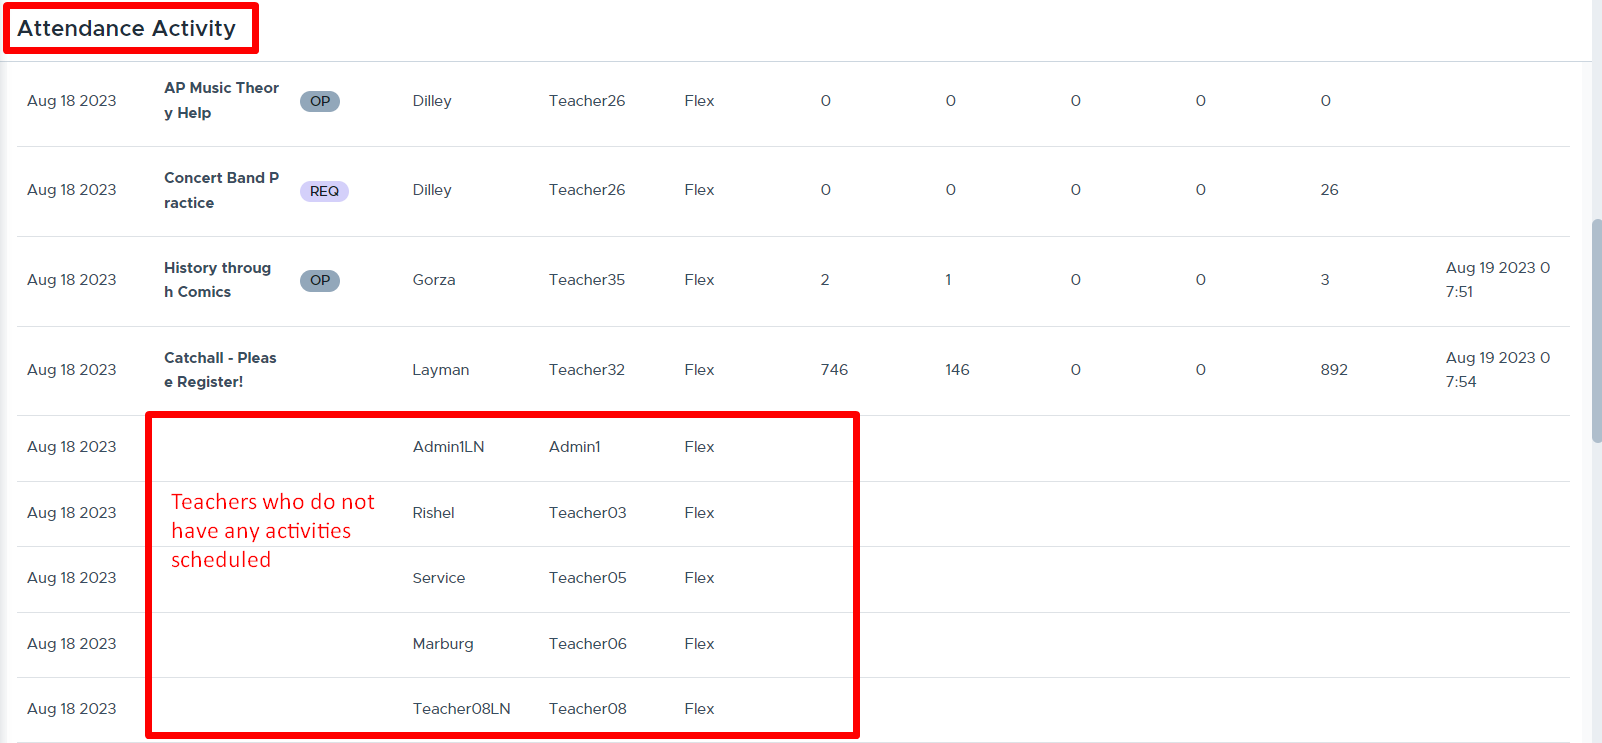
There are filters available where a date range can be entered. This may help Admins pull a report to see what types of activities specific teachers have been offering over a certain period of time, etc.
- Please be aware that searching for large date ranges or amounts of data at one time, or during school hours, may take some time or possibly slow your system down. We recommend doing this during off-hours and using small date ranges.)
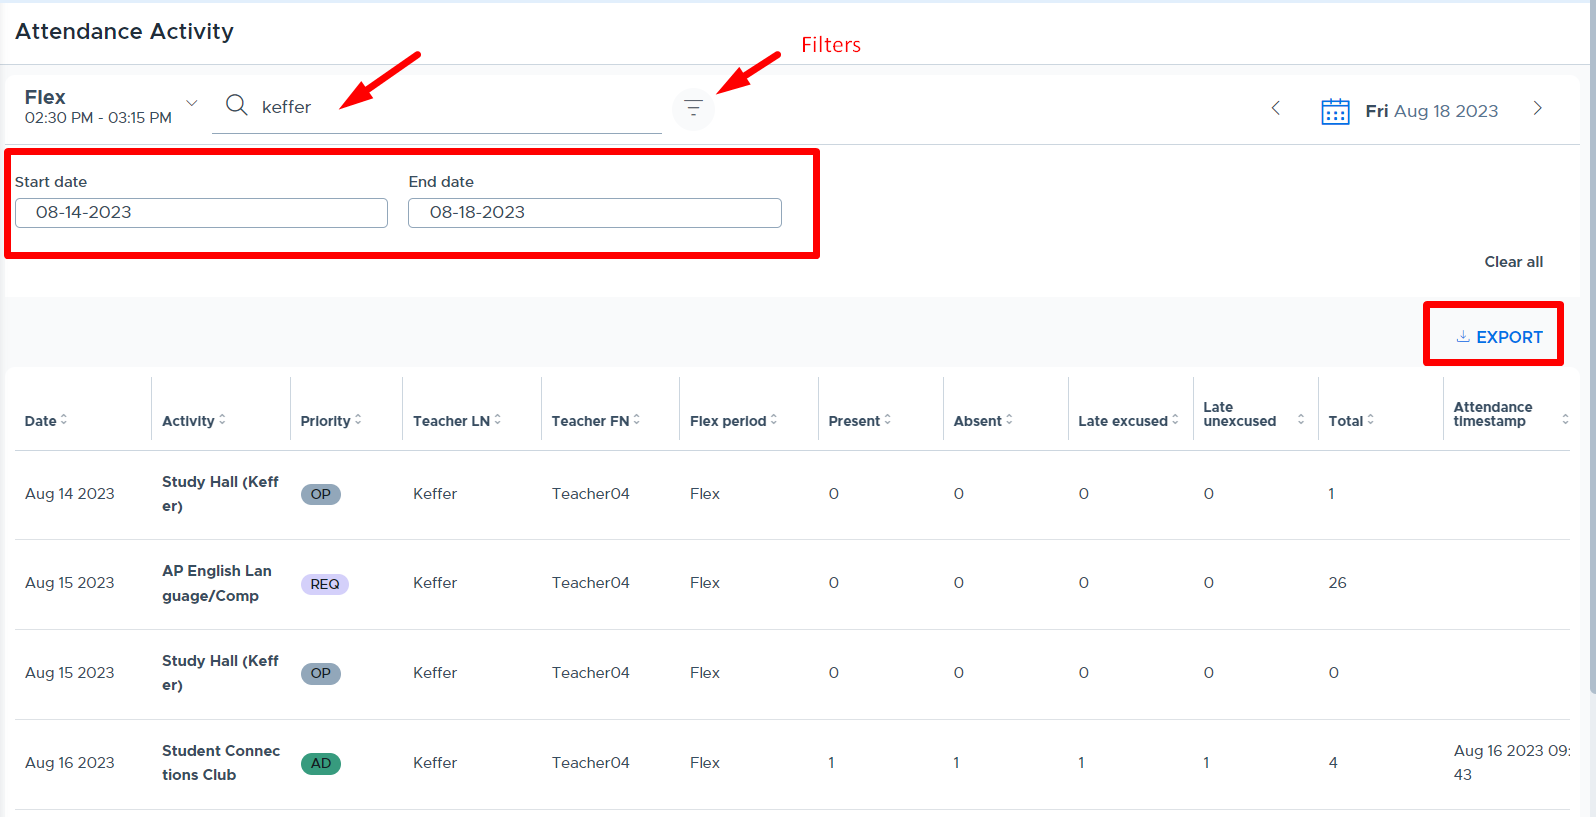
- If you discover that many teachers are not submitting their Flex period attendance and want to set up reminder emails, please review the information in the “Attendance Reminders” section of this guide.
- Please see the Attendance Activity video for more details.
Room Use
The “Room Use” report lists all active rooms for the current day (or specified date) and shows which teacher has the room scheduled during Flex. The Activity name and Room Size are also displayed. The “Search” box can be used to quickly find out if a room is available or see what the Room Size is for a particular room.

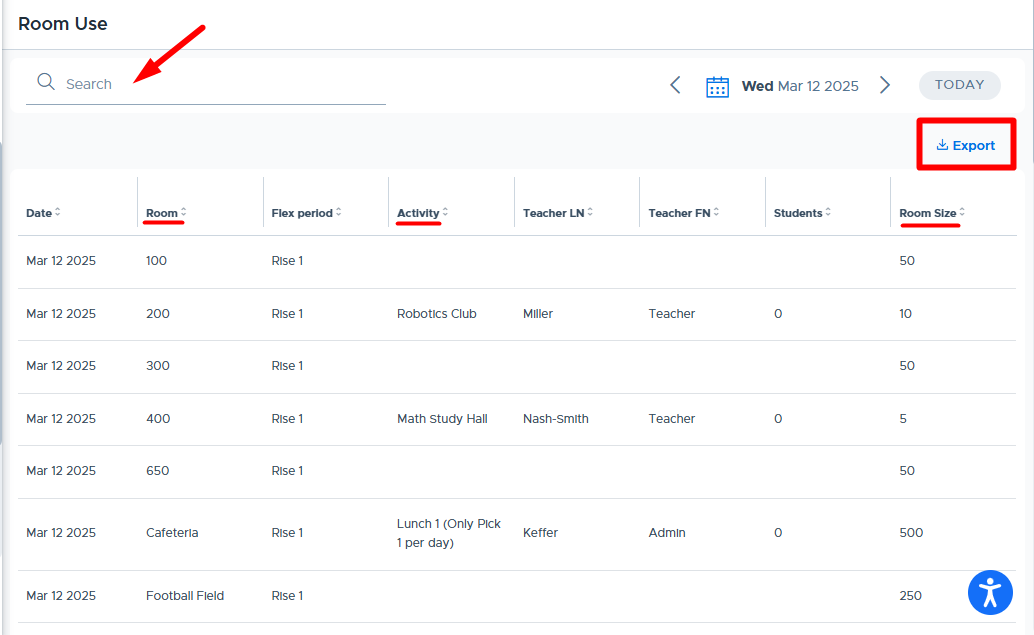
Notes:
- This report currently only shows one activity per room, but the system does allow more than one activity to be scheduled in the same room. The room showing in the report is the first one scheduled.
- In addition, the “Students” column does not yet show the number of registered students. (It shows “0” for all rooms at this time.)
ACTIVITIES
Most of the menu options under “Activities” are the same for all adults in Flex, with the exception that Admins are the only ones who have access to the following:
- Default Activity Lists
- Flex “Cancellation”
- Access to edit ALL Activities from the “Directory”
Keep in mind that all Admin, Staff, and Teacher roles have the same access to create and schedule activities for themselves to run during Flex. In the My Schedule and Activities List sections of this guide, there are links to other training resources that provide detailed instructions for using these screens and basic system functionality.
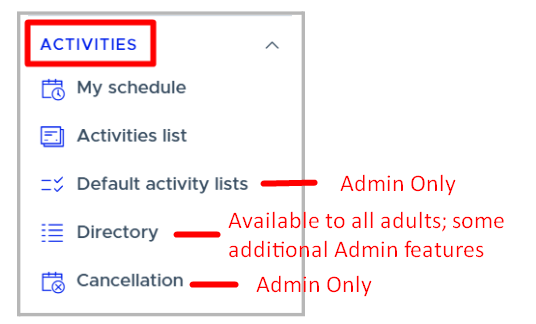
Here are two important resources geared towards adults who are creating and scheduling activities for themselves in the Flex system. These resources will help explain how the “My Schedule” and “Activities List” screens are used.
My Schedule
This screen is the user’s calendar where activities are scheduled. Please see the following video for specifics on how to schedule an activity.
Activities List
The Activities List is the user’s main list of activities. Please see the following video to learn more about creating activities with and without a student group.
Default Activity Lists
Default Activity List - Table of Contents |
|---|
Default Activity Lists allow Flex Admins to create lists of activities (or schedule templates) and apply them to a desired date, which schedules all the activities in the list at once. This will be beneficial to schools where Flex Admins are creating and scheduling most of the activities. It may also be something to use at the beginning of the school year or semester when preparing the system. Lastly, using a default activity list can be helpful if Admins are planning a special day of activities or testing.
The “Default activity lists” screen can be found under the Activities menu, as shown below. Here, an Admin can create new “lists” of activities (templates) for scheduling purposes. Activities are added to this screen and then included in the desired “lists” that will be used to schedule them on a specified date. It’s also possible to create a new activity for another adult from this screen and add this to the desired list. (Please note, all Admins within a school’s Flex system have access to see and share the default activity lists that are created.)
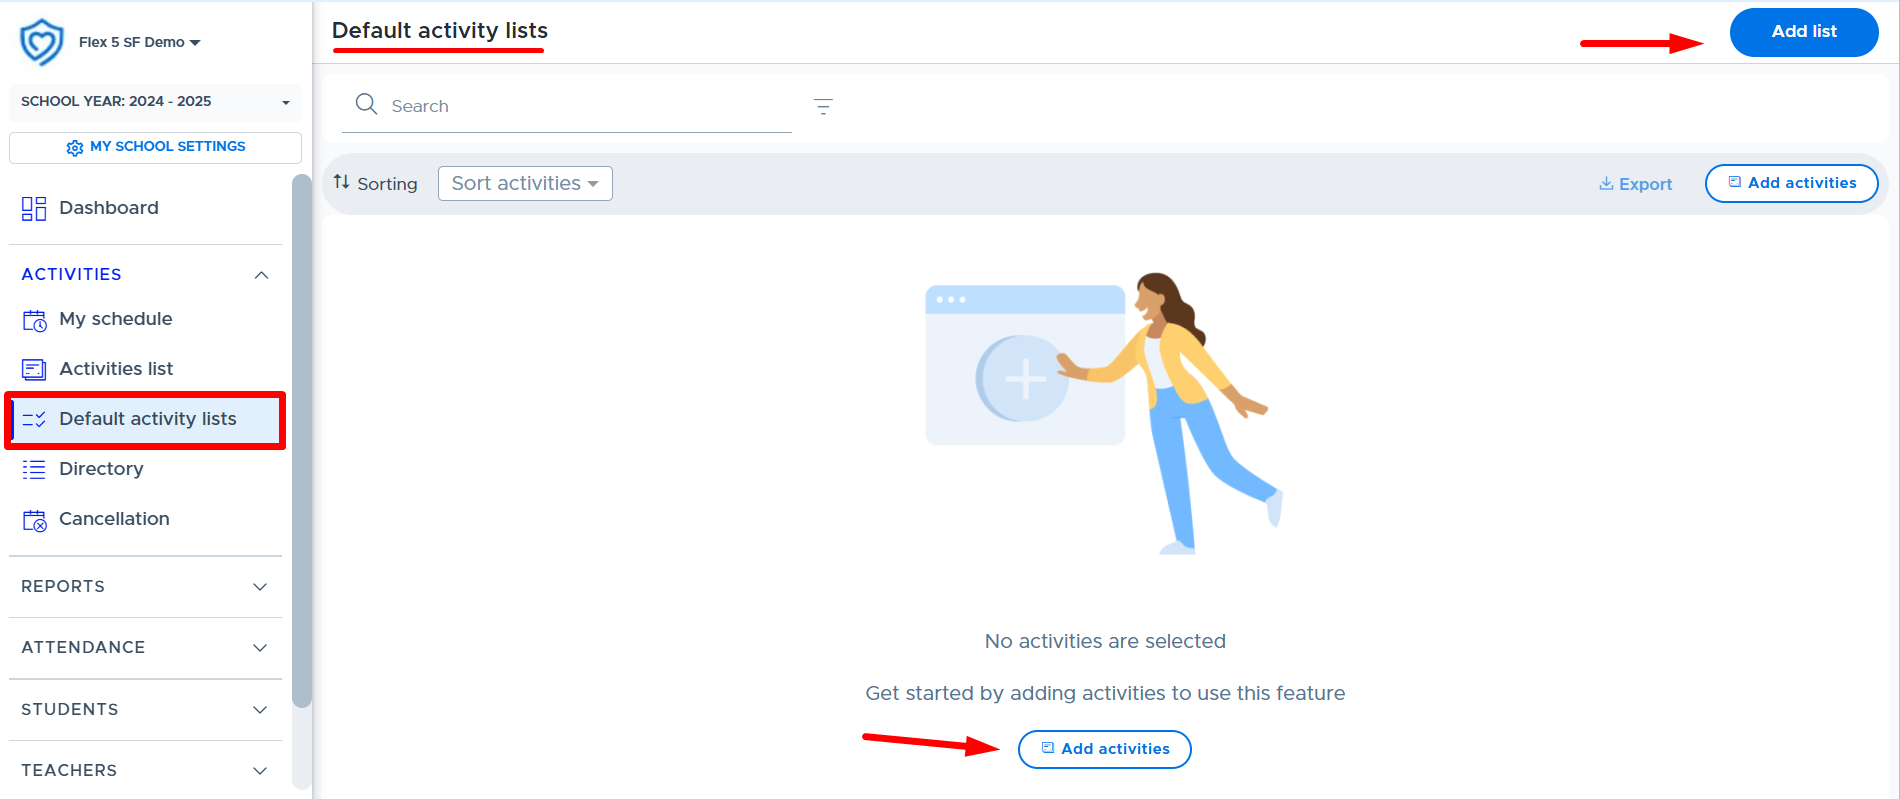
Adding Activities
The Add activities button begins the process of creating a default activity list. (Although, it is possible to do this step later after “Adding Lists”.) Existing or new activities can be added to the main Default activity lists screen by clicking the Add activities button, shown above and below. After activities are added to the main screen, the Admin can decide to which “default list(s)” each activity is included.

The Add activities window appears where the Admin searches for the Activity owner, which is most likely a teacher or staff member. The owner’s existing activities will be listed if any have already been created. Admin can click the box to the left of existing activities and click Add selected to add them to the main Default activity lists screen. Below is what this looks like in Flex.
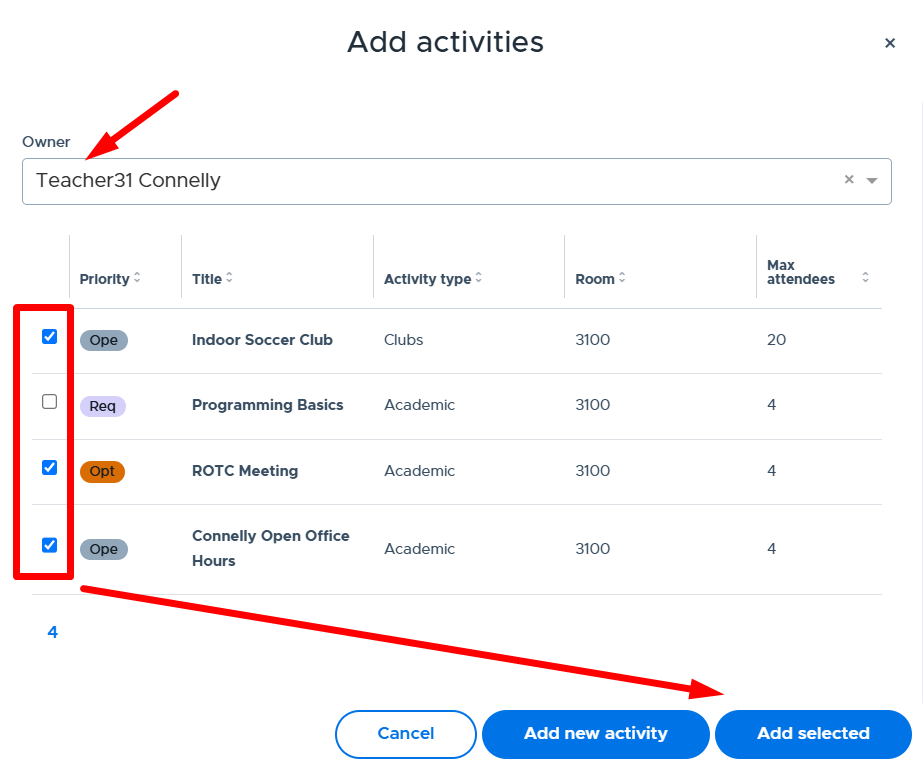
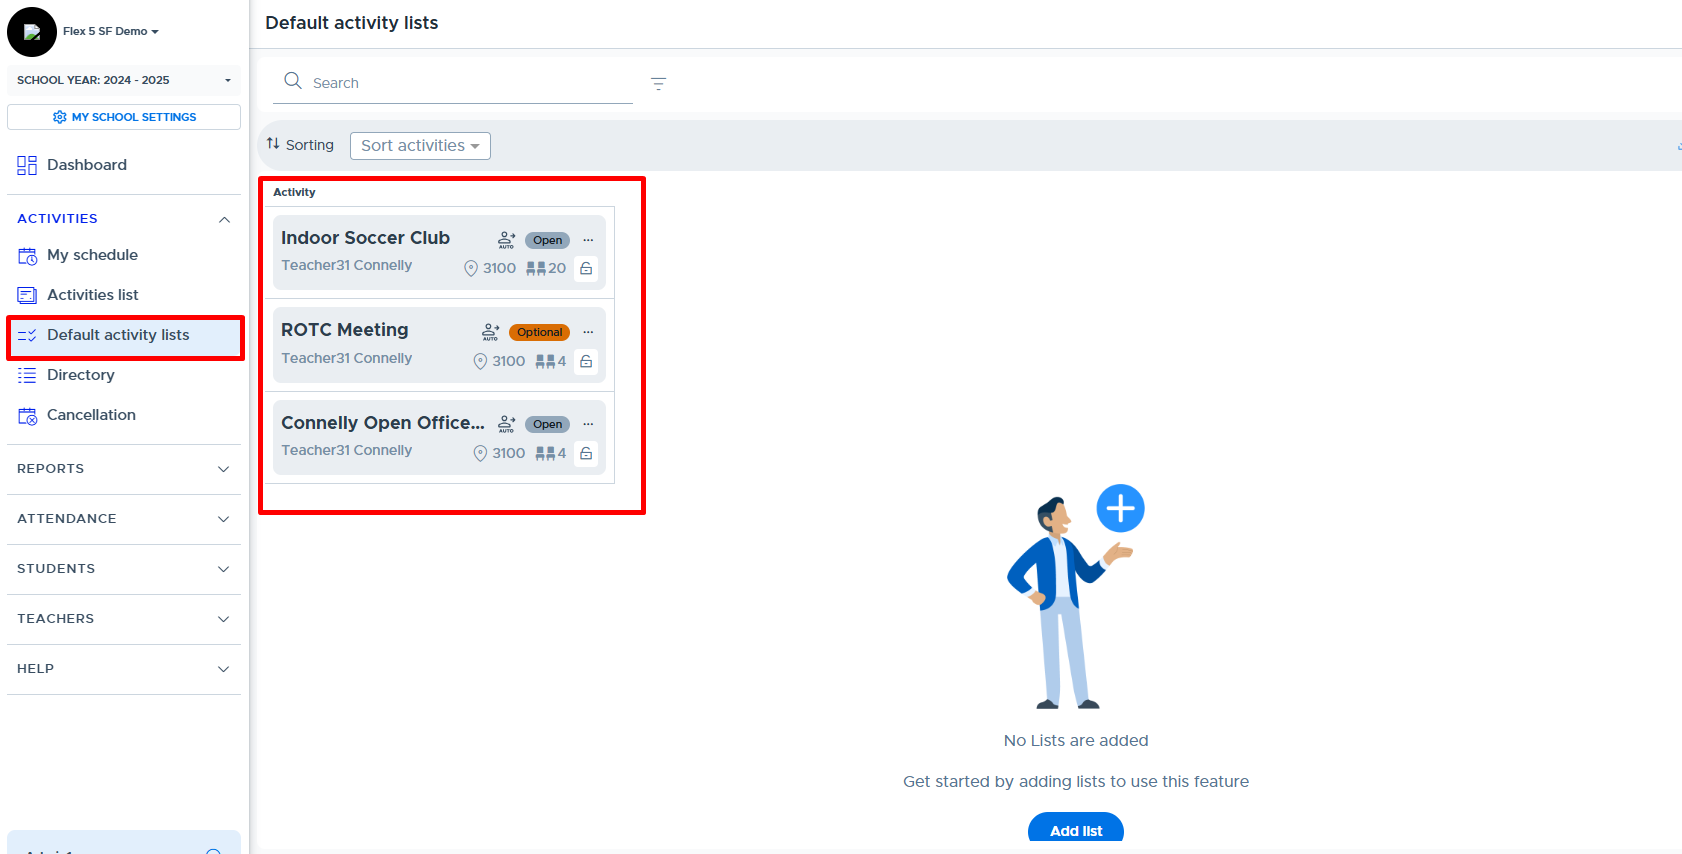
Creating & Adding a New Activity
The other option when adding activities to the Default activity lists is to create and add a new activity with the owner of the activity being another adult. To do this, click Add new activity from the Add activities window after searching for the desired “Owner”.
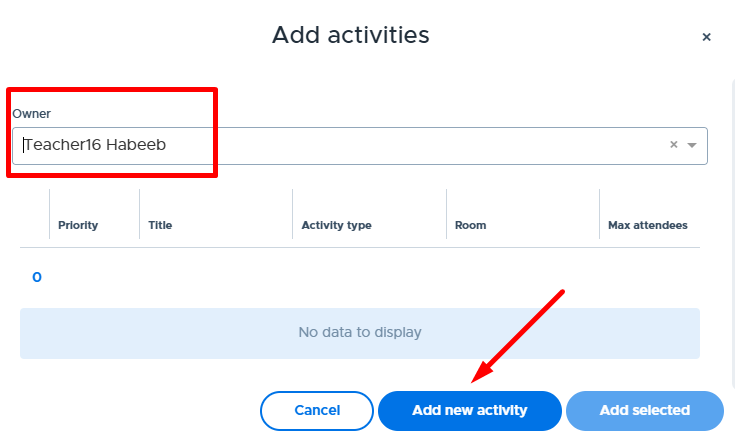
The New activity screen will appear where the Admin can enter the desired activity details and then click Add to both create and add the activity to the main Default activity lists screen.
- The “Admin Required” Priority level will be available when Admins are creating activities for other adults who are the activity “owners”. (The Admin can only use the “Admin Required” priority level when creating new activities from the Default Activity Lists screen. This will not be available via user simulation.)
- Only Groups that the “owner” has access to are available for the Admin to link to the new activity being created.
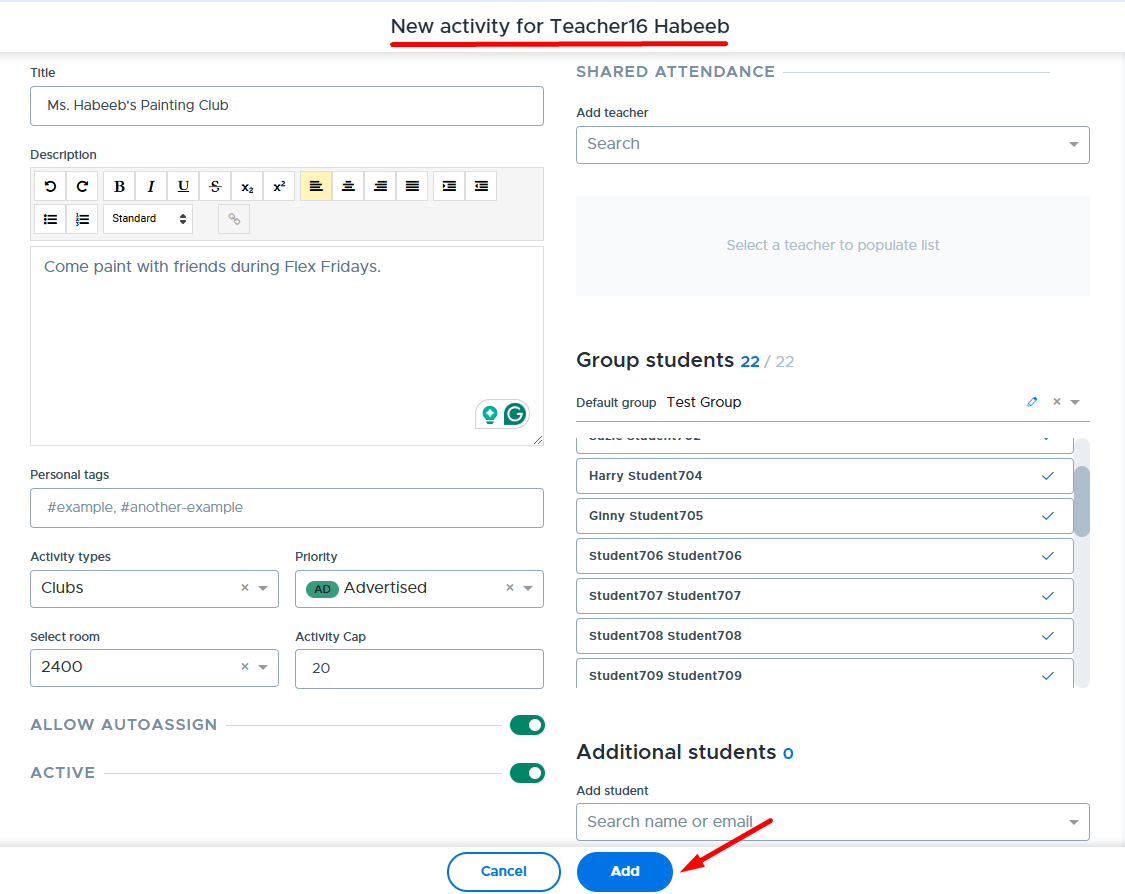
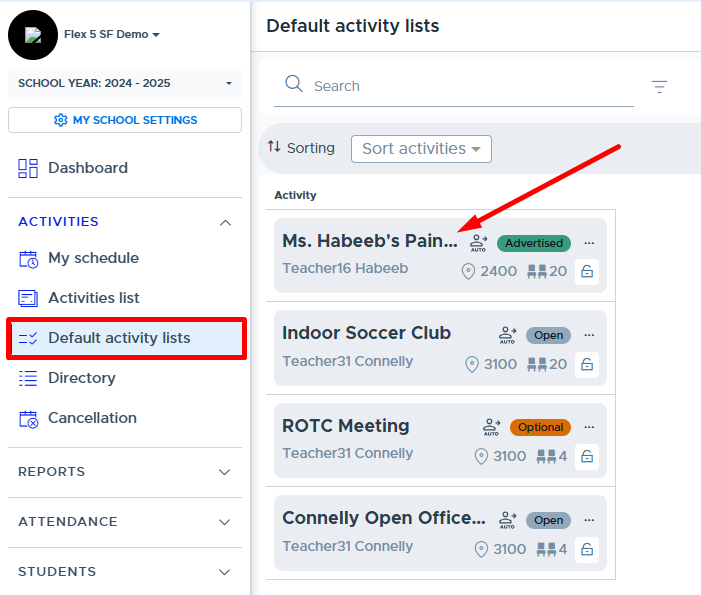
Adding a List
Click the Add list button to create a default activity list. Start by giving the list a “Title” in the window that appears. For example, maybe you have a “Club Day” that is run during flex. The default list title might be “Club Day” as shown below.

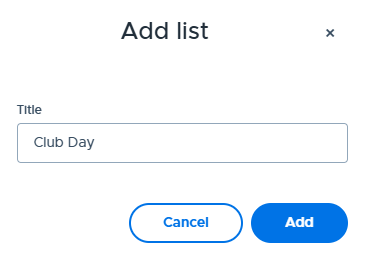
Additional lists can be added as needed. There is no limit to how many lists can be added but a good guideline would be as few as makes sense. Below is an example of the screen after adding two lists:
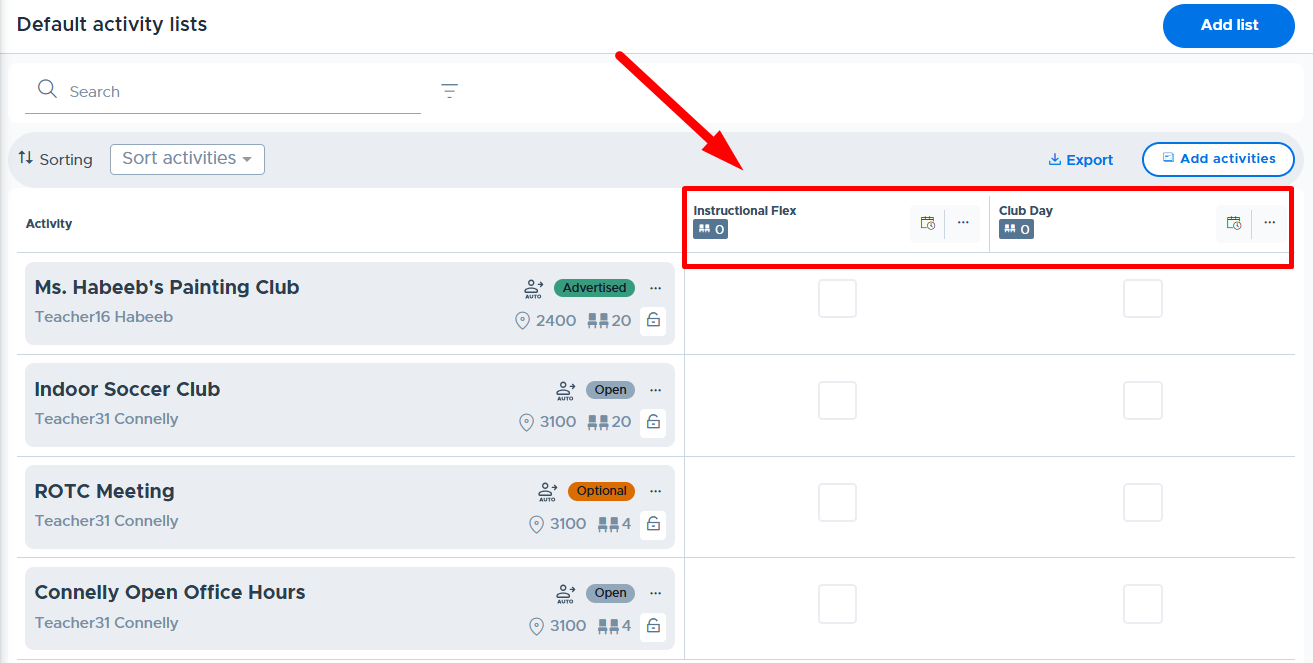
Adding Activities to a List
Once the desired list(s) and activities are added to the main Default activity lists screen, the Admin can check the box in the desired list(s) to include the activity. Included activities will be scheduled when that particular default list is scheduled by the Admin. Please see the example below.
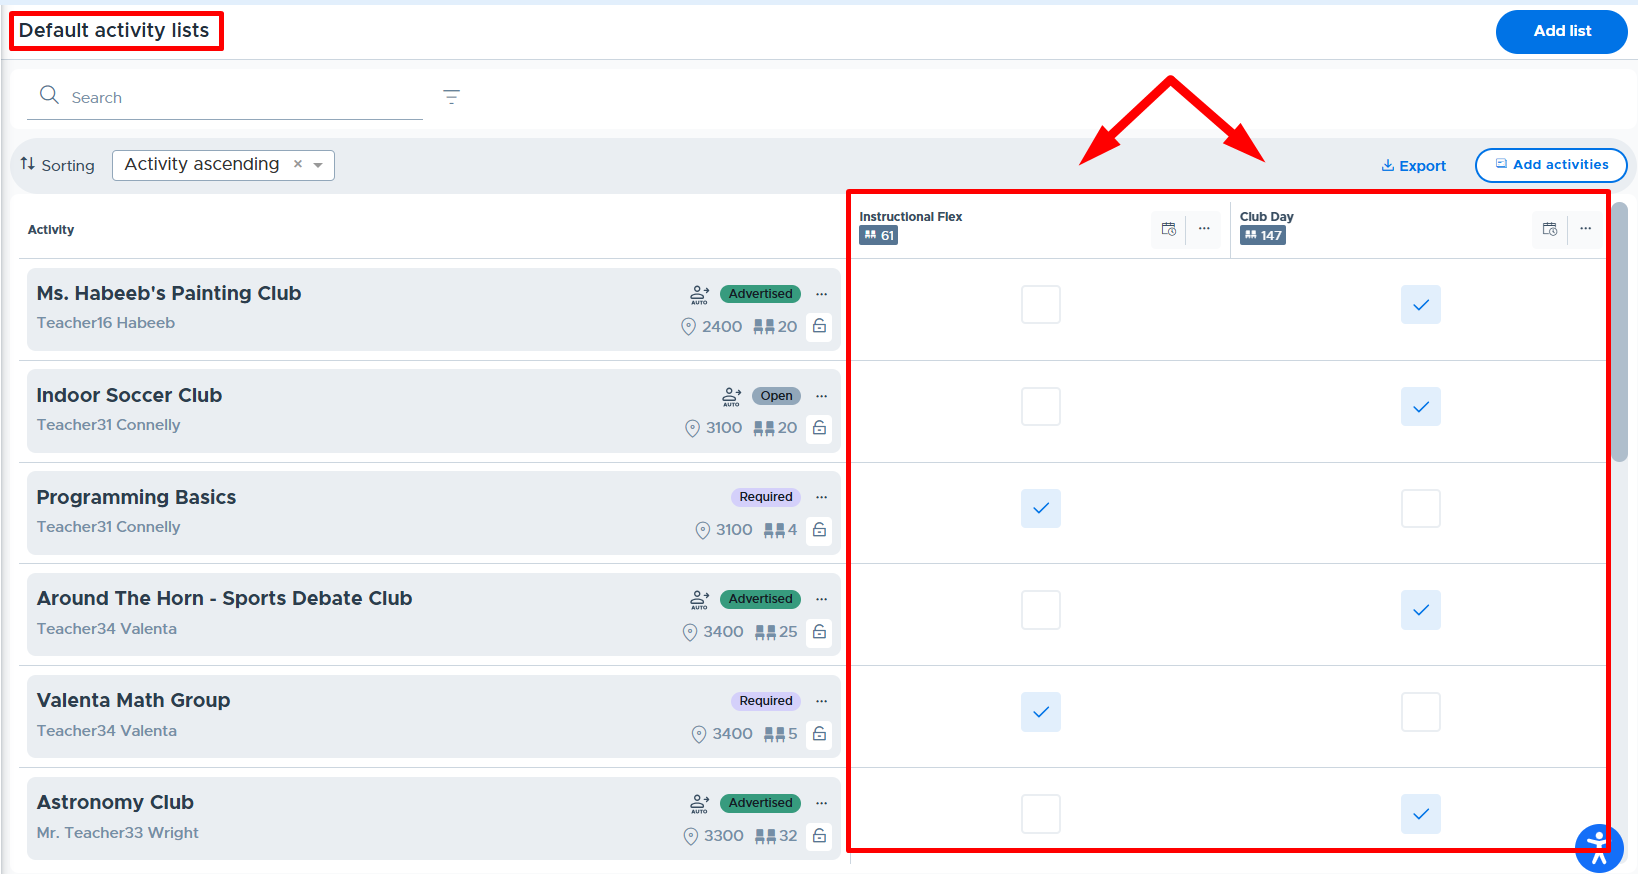
Scheduling a List
To schedule a list, click the calendar icon at the top of the list, as shown below.
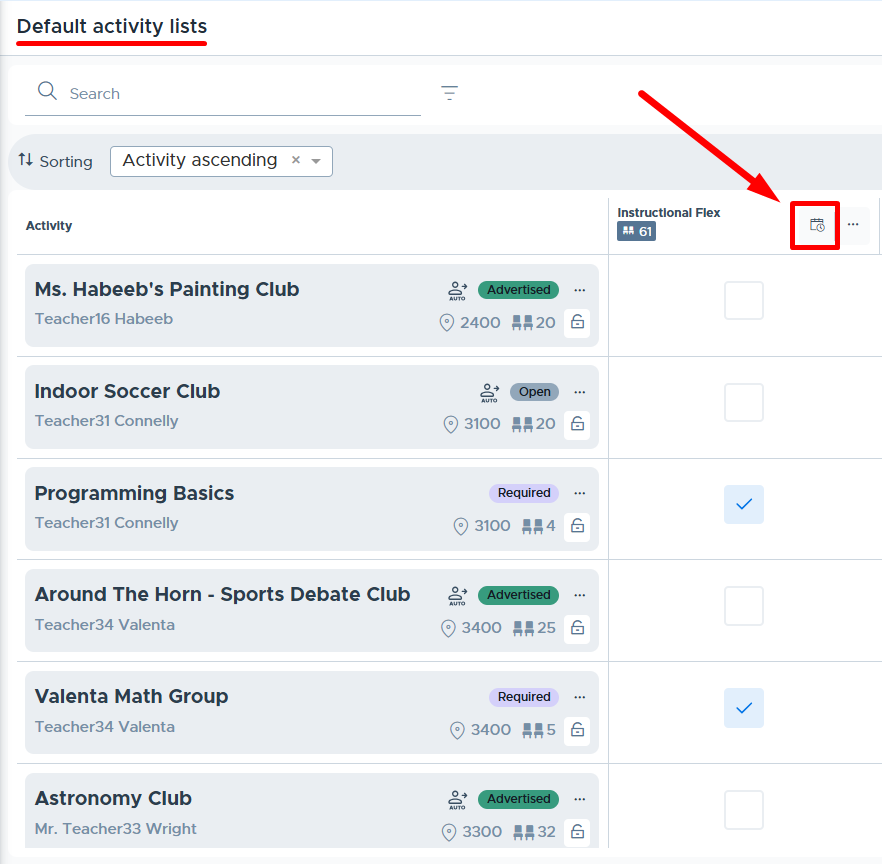
In the window that appears, select the desired Flex period and Date. Default activity lists are scheduled for a single date because the system checks for room and scheduling “conflicts” and presents them to the Admin for review. (See below for more information about conflicts.)
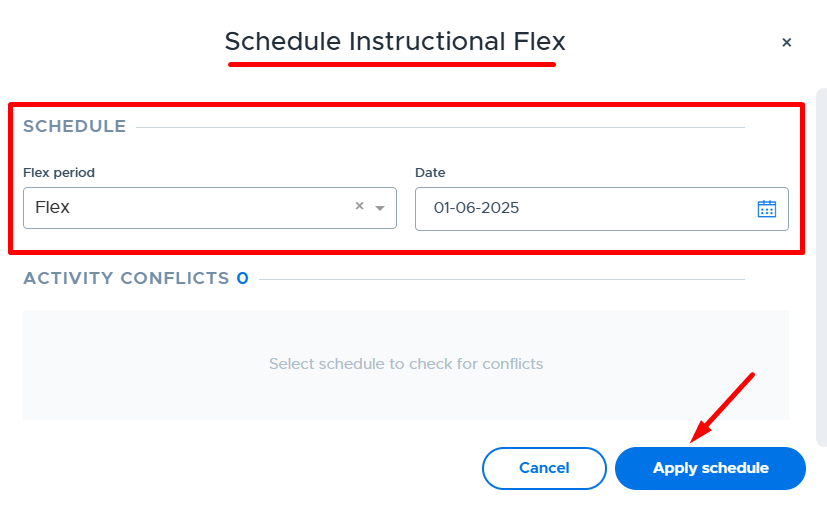
To schedule the default activity list, after conflicts have been reviewed, click Apply schedule. The following confirmation message will appear:

Managing Conflicts
If there are any “conflicts” when scheduling a default activity list, they will be displayed in the window for the Admin to review and make the appropriate scheduling decision(s).
The following are considered “conflicts”:
- When an activity/activities on the list are being scheduled in the same room as a previously scheduled activity.
- When there is already an activity on the schedule for an owner of an activity included in the list.
The following are NOT considered “conflicts”:
- When the same activity is already scheduled for the same day/flex period. (Note: Only one instance of the activity is scheduled.)
- When two or more activities in the same room or for the same owner are included in the same default list.
When conflicts exist for the Admin to review, the system directs the Admin to “select the activities that will be ADDED regardless of schedule conflicts.”

In the example below where two activities are being scheduled in room 3100, if the Admin does not check the box for Programming Basics it will not be scheduled. If the box is checked, both activities will be scheduled in room 3100 on the specified date.
- Note: When scheduling multiple activities in the same room using a Default activity list, the system will cap the available seats using the “Room Size”, which is set in My School Settings > Rooms. Custom “Room Cap” settings are available with Default Activity Lists. Please see the xxxx section below for more details.
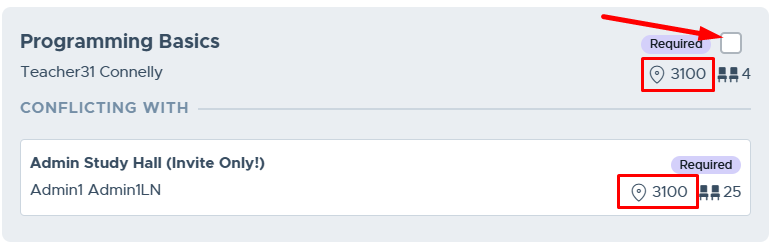
In the example below there is already an activity on the schedule for Teacher Wright. If the Admin does not check the box for the Astronomy Club activity it will not be scheduled. If the box is checked, both activities will be scheduled for Teacher Wright on the specified date.
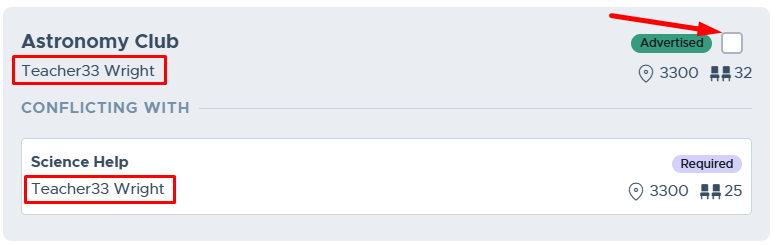
Screen Overview
Below are explanations of the various icons and functions on the Default activity lists screen.
- Add list: Add a new default activity list here.
- Search: Enter the keyword to search the activity titles on the list.
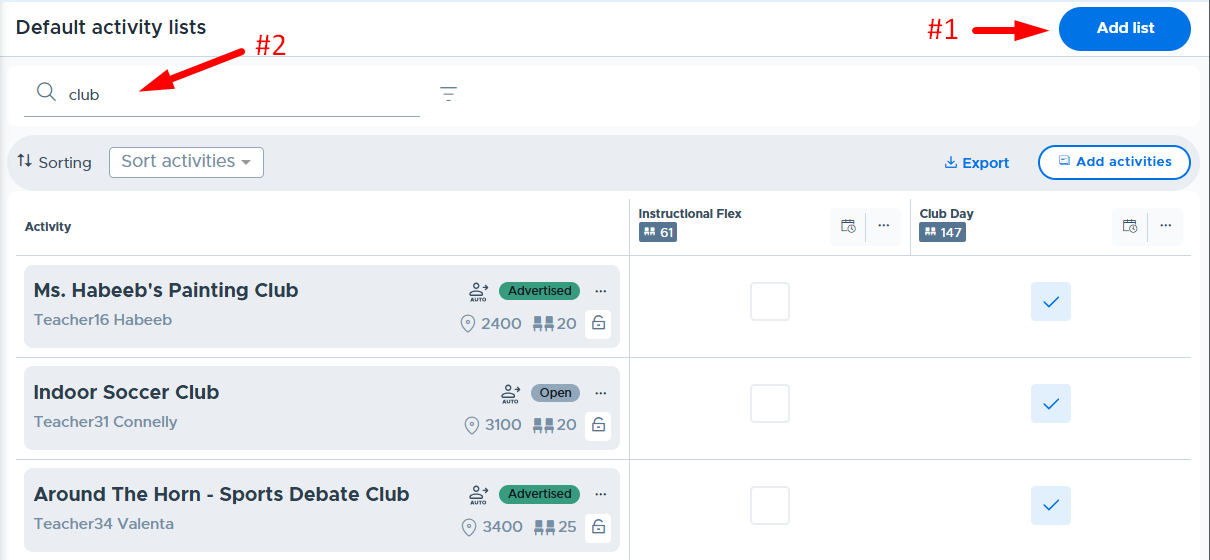
- Filters: Filter the list of activities by one or more of the following - Owner, Priority, or Select room.
- Start typing Owner or Room name to filter by this information.
- Click “Clear All” to reset filters.
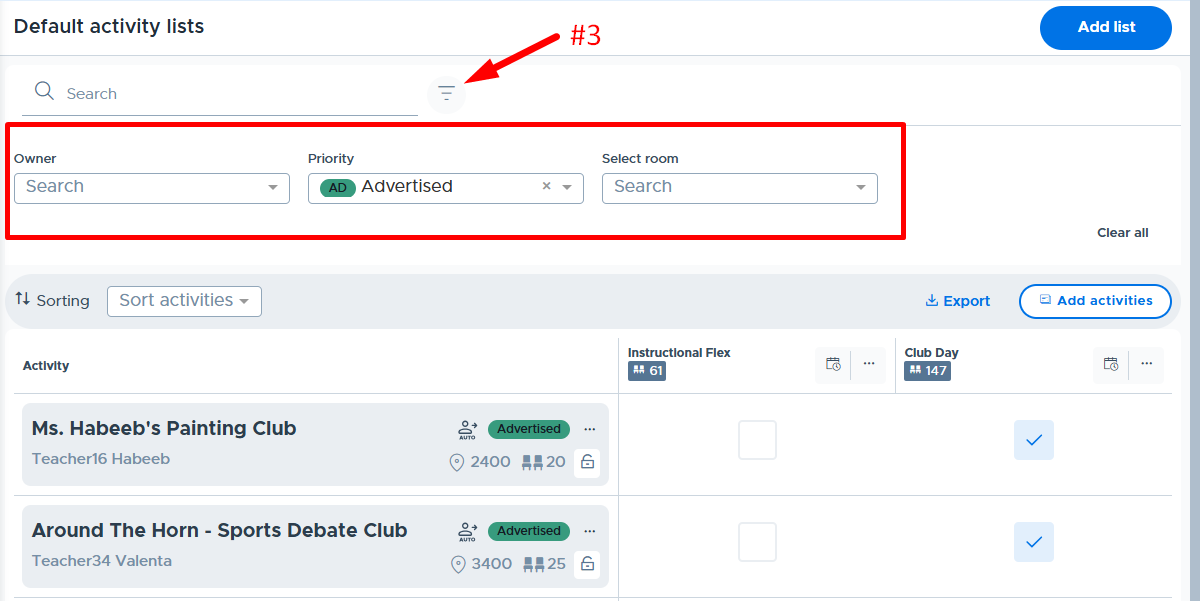
- Sorting: Click the dropdown to see the options to sort the list of activities.
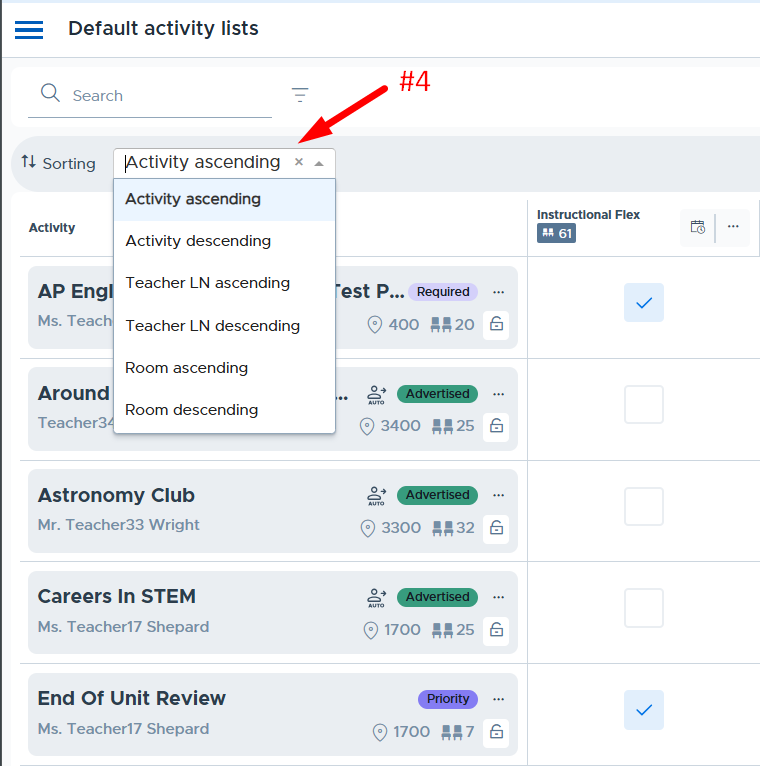
- Activity Detail: The following details are displayed for each activity added to the Default activity list screen:
- Activity title
- Activity owner (first and last name)
- “Auto” - Activity has autoassign allowed. (Only displayed for schools using Autoassign.)
- Priority level name (with color)
- Room name/number
- Activity Cap
- Three dots/menu - Access to Preview, Update master activity, and Remove from all lists
- Lock - Toggle Edit Restrictions: When toggled to red (on) this restricts the activity owner from editing the master activity and the following fields on scheduled activities: Activity Type, Priority Level, Room, and Activity Cap.
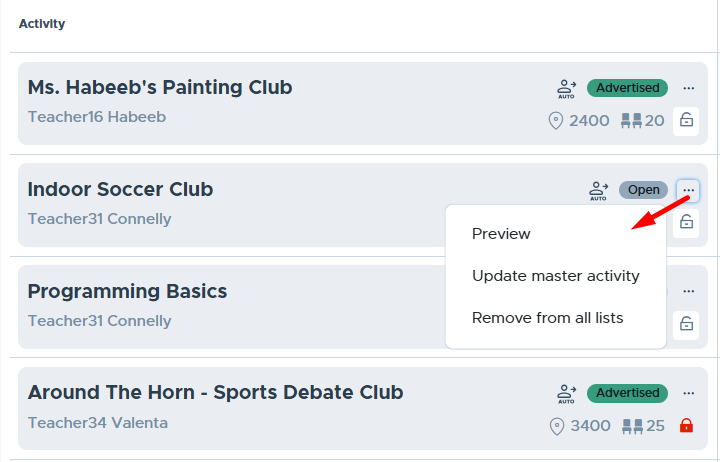
- Default Activity Lists & Including Activities: Below is the section of the screen where the “lists” are displayed and an Admin can check the boxes to include the activity when scheduling the list. In addition, the following icons/information is available:
- Total Activity Cap - The “total” number of seats for all activities included in the list.
- Calendar icon - Used to schedule the list; see more information in the Scheduling a List section.
- Three dots/menu - Access to Rename or Delete the list. (Note: Deleting the list does not remove activities that were scheduled via the default activity list.)

- Export: The default activity list details can be exported into a CSV file. Below is a screenshot showing the data included in the export.
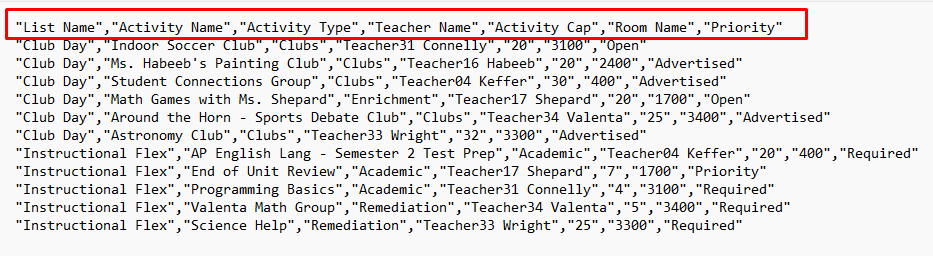
Additional Information
Below is some additional information that’s helpful to know when using Default Activity Lists.
- Normal system functionality is available once an Admin schedules a Default Activity List. If it’s before the Cutoff Time, activity owners could remove what was scheduled via the default list and make changes.
- Activity edits can be limited by “locking” the activity. Please see more details in the “Locking an Activity” section below.
- In addition, the Plus Add feature continues to function the same.
- If an Admin needs to remove an activity from the calendar that was scheduled with a default activity list, this is done by simulating the activity owner and removing the activity from the My Schedule screen. (This must be done before the cutoff time.)
- An Admin can schedule the same Default Activity List multiple times for the same date/period. This might be needed after changes are made to the list or if changes are made outside of the default list by activity owners.
- It’s also possible for an Admin to schedule more than one default list for the same date/period. This is considered “layering” lists. The system will stamp out (schedule) any activity not already on the schedule. (For example, a school might have lists for “A” vs “B” days and these don’t change. In addition, on certain days there are special clubs or activities added but the Admin prefers to manage these on a separate default list, which can be scheduled as needed in addition to the A or B day list.)
- If an adult is archived from Flex any activities owned by the adult will be removed from the schedule and any default activity lists. If the same adult is unarchived, their activities and schedule are returned but are no longer linked to the default activity list settings. (An admin will need to re-add activities and lock them again as desired.)
Locking an Activity (Activity Owner “Can Do/Cannot Do” Table)
When Admins create and/or add activities to the Default Activity Lists screen, they can “lock” them. Locking an activity restricts edits an activity owner can make to their activity as the “owner”. It does not completely block them from interacting with the activity. Below is where an Admin can lock an activity on the Default Activity Lists screen.

When an activity has been locked by an Admin, the activity owner cannot update the master activity. They can schedule a locked activity. In addition, they can update/edit certain fields on a scheduled activity from the My Schedule screen. Here is what can and can’t be done by the activity owner when an Admin locks an activity:
Can Do: | Cannot Do: |
|---|---|
Schedule a locked activity | Update/edit a master activity |
Remove a locked activity from the schedule before the Cutoff Time | Edit the Activity Type, Priority Level, Room, & Activity Cap fields (on scheduled activity) |
Edit the Activity Title, Description, & Shared Teacher fields (on scheduled activity) | Edit the “Allow Autoassign” toggle (on scheduled activity) |
Update the members in a Group linked to the locked activity | Change the linked Group on a locked activity (on scheduled activity) |
Add “Additional Students” to a scheduled activity that is locked | Make a locked activity “Inactive” |
Apply edits to other dates the activity is scheduled (but not to the master activity) |
Note: If a Flex Admin locks another Admin’s activity, it will limit the Admin activity owner in all the ways outlined above. All Admins have access to the Default Activity List screen and can “unlock” their activity, so there should be no reason to lock another Admin’s activity.
Below is what a “locked” activity looks like on the activity owner’s Activity list:
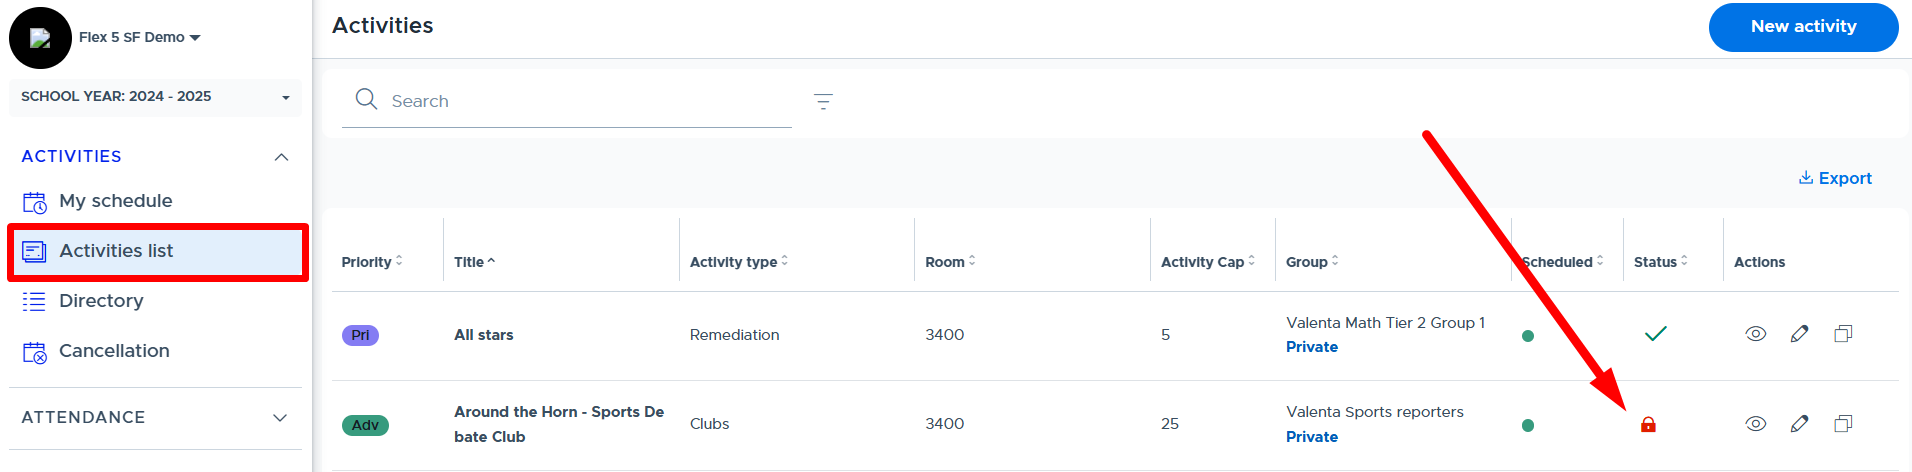
Here is the message if the owner attempts to edit the activity:
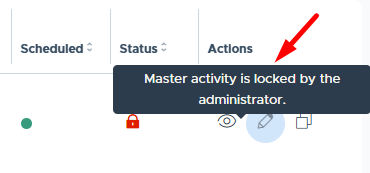
The activity owner can schedule a locked activity. Below is what this looks like when scheduled.
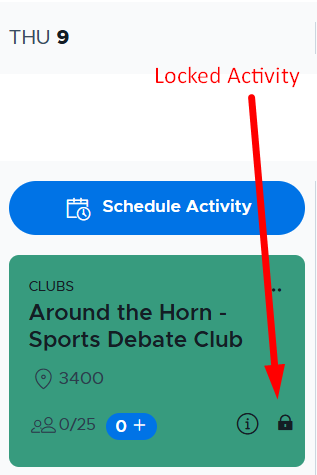
The activity owner can edit the following information for a scheduled locked activity: Title, Description, Shared Attendance, & Additional Students.
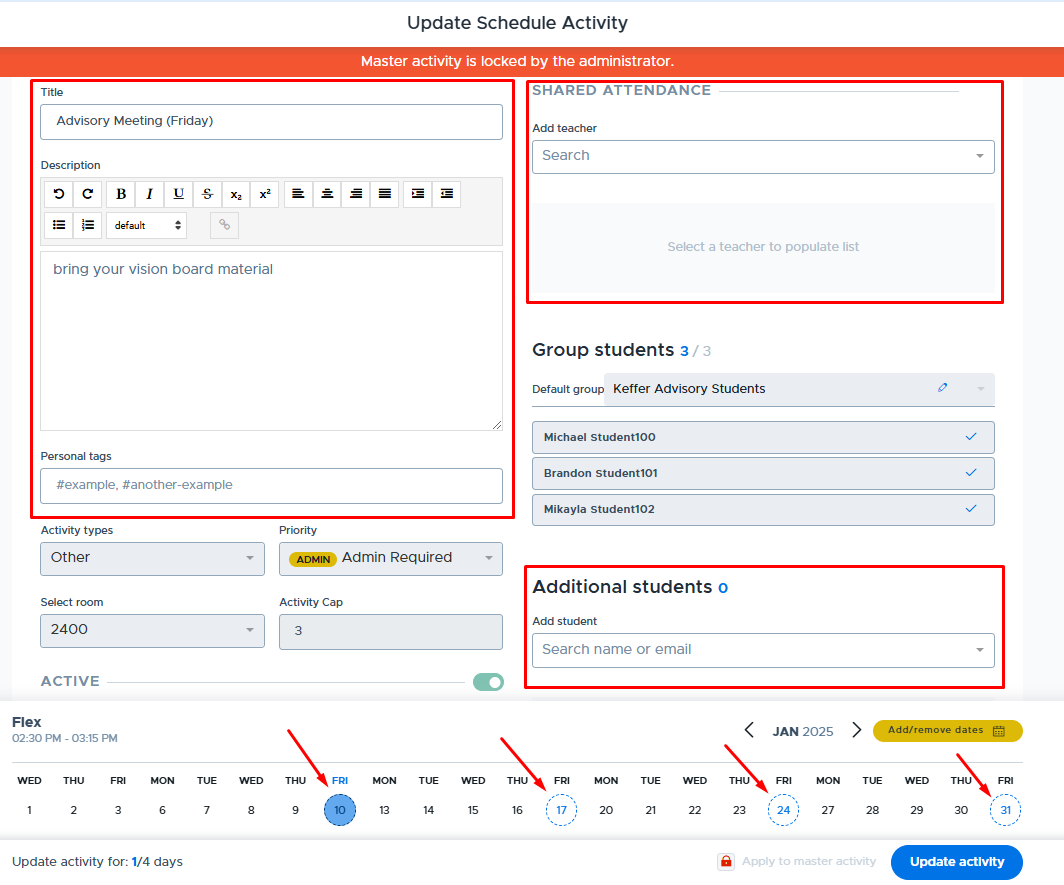
In addition, the activity owner can update the Group membership of the Group that is linked to a locked activity. This is done from the Students > Groups screen in Flex, shown below. (Updates must be done before the school’s cutoff time to be applied the same day.)
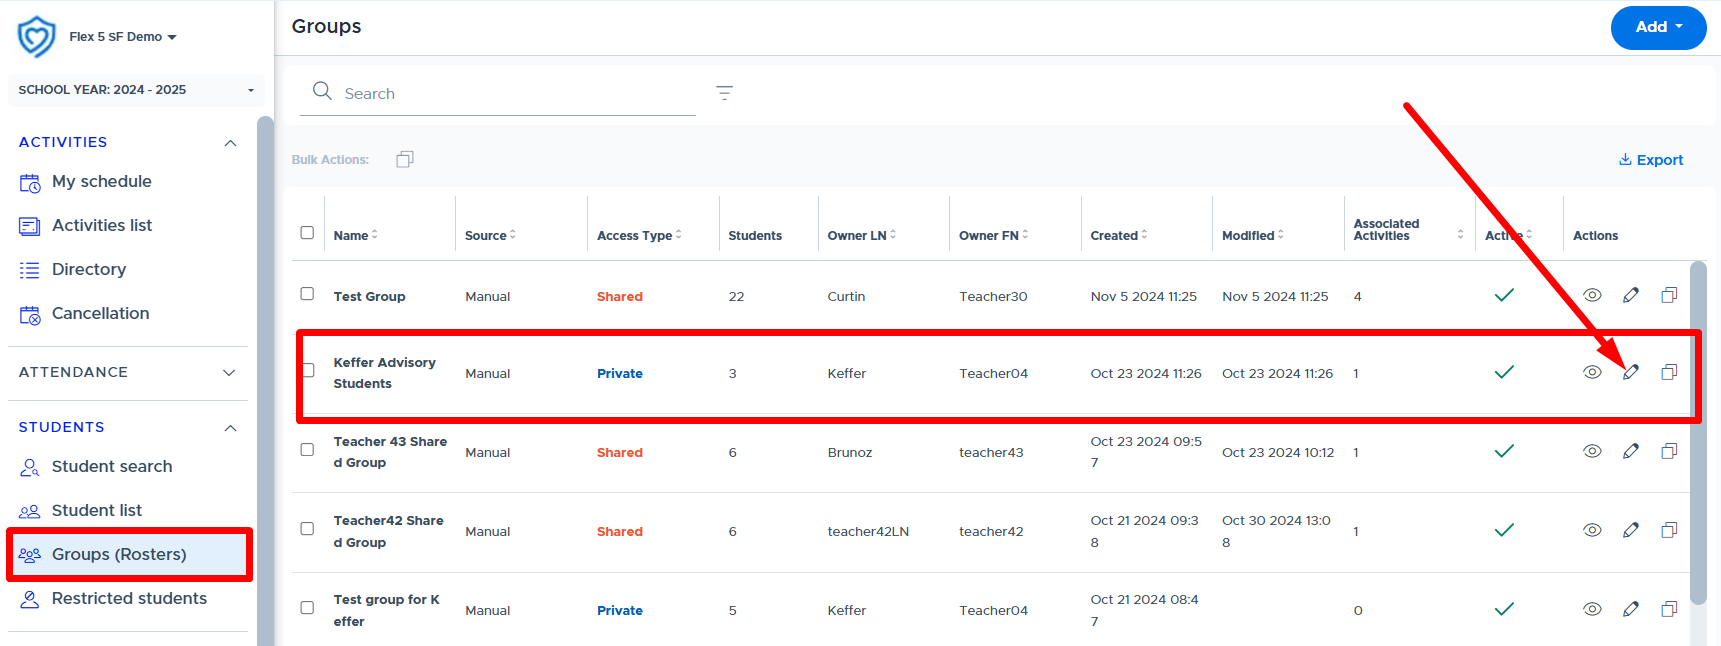
Setting a Custom Default List “Room” Cap
In rare circumstances, there may be a need to set a custom “Room Cap” for a specific default list. This is helpful when multiple activities are being run in the same room on the same date, and the “Room Size” is not the desired Room Cap. The activities can be included in the same default list and then a custom “Room Cap” can be set for when that list is scheduled. (Please note, normal “Room Cap” logic will apply based on the types of activities and Activity Caps.)
To set this up, navigate to My School Settings, Rooms, and search for the desired room name/number. Once found, click the edit/pencil icon in the “Actions” column. Then do the following:
- Toggle “Custom Default List Capacities” to on (green).
- Select the appropriate “list” and enter the desired “Custom Capacity”. (This is the capacity that will default for this room when the designated list is scheduled. The Room Cap can still be changed by the activity owners in the room if the activity is not locked by an admin.)
Directory
The Activities Directory shows what activities are scheduled for today (or the specified date), the priority level, the teacher who scheduled it, the room, and activity cap/room cap details. This screen is the primary resource for teachers to see what other teachers or adults are offering during Flex. There are “search & filter” options that provide additional viewing capabilities. The screen displays the number of times the activity is scheduled with access to a list of all scheduled dates and registration numbers.
- The “Actions” column and Preview/Edit functions are only available to Flex Admins. (Teachers and Staff role users do not see this column.) Admins can use the “Edit” button to make changes to the teachers activity without having to simulate the user.
- The Activity Directory is available to all users, including students. (The students' screen looks slightly different and contains less details.)
- Here is a video that provides an overview: Activities Directory (*Not yet updated to show that Admins can preview/edit all activities on this screen.)
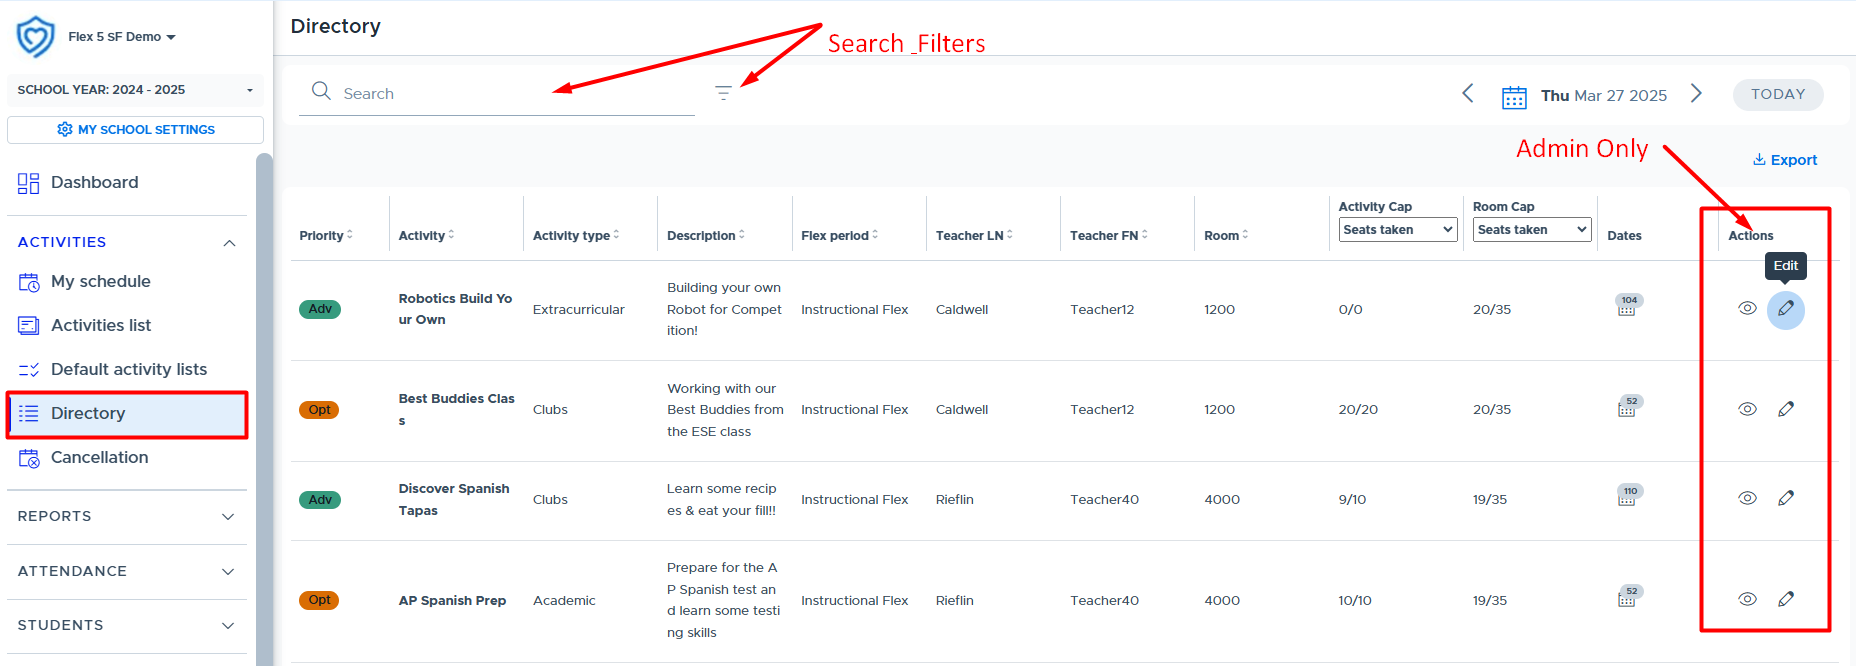
The “Dates” column provides access to the following date and registration information for the activity. This window shows a list of each date the activity was or is scheduled for during the Flex period, along with the number of registered students and the activity cap set for the activity.
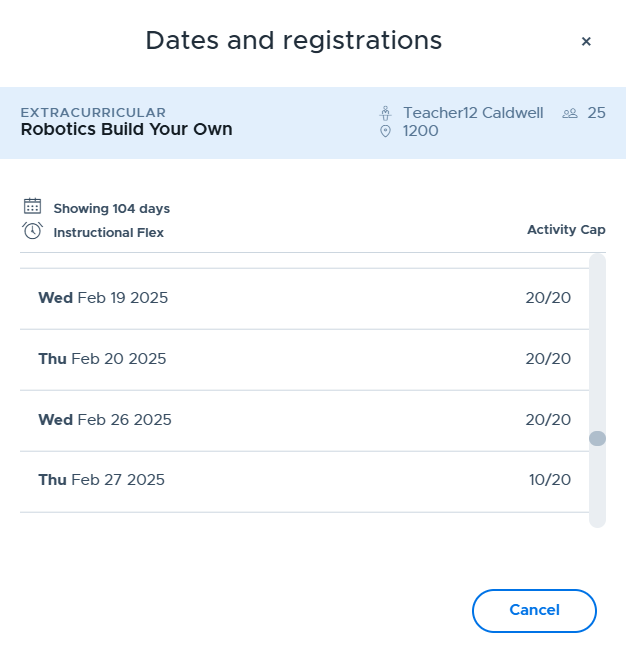
Cancellation
An Admin can “Cancel” Flex for students based on their “Grad Years”. For example, this means that Flex can be canceled for all seniors but not the rest of the high school. Admins can also cancel it for all grades or all students.
- Here is a video that provides an overview: Flex Cancellation
In order to cancel a Flex, an Admin should select Activities > Cancellation from the menu. Then click “New Cancellation” as shown below:
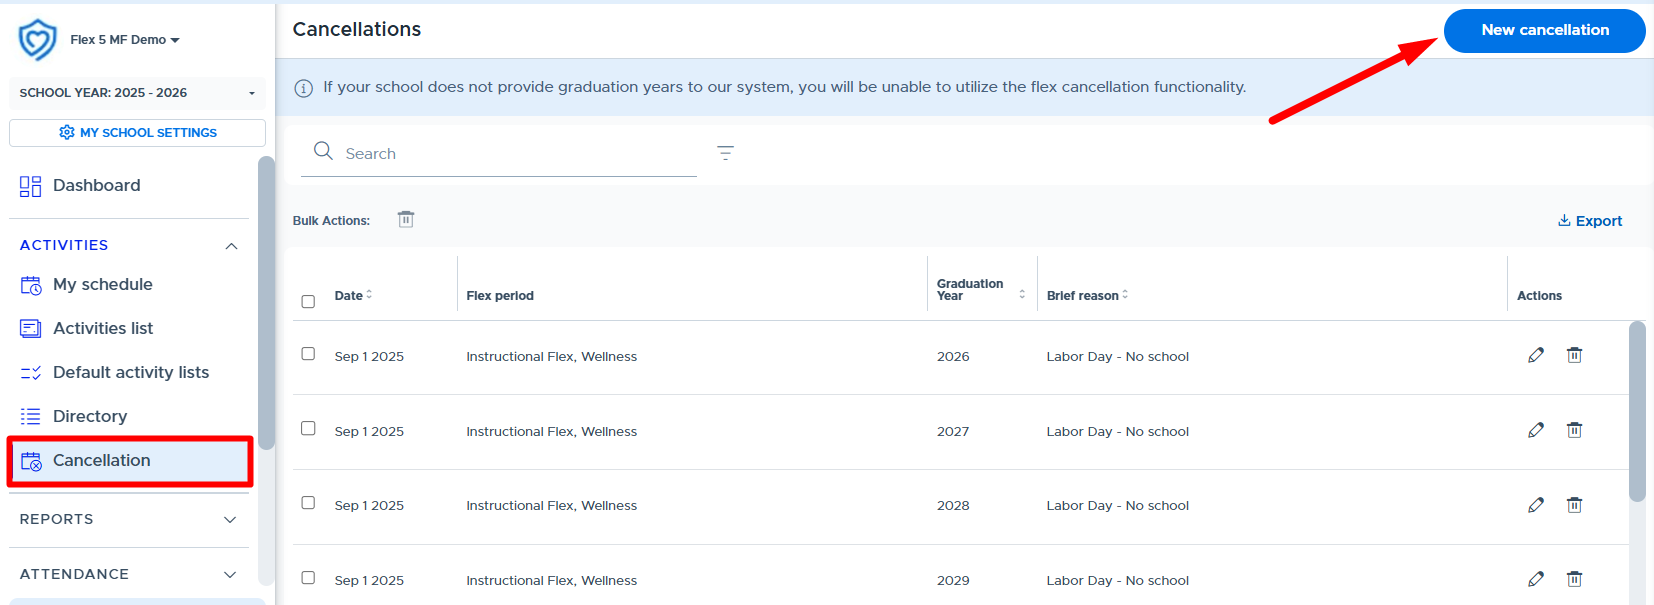
Complete the screen shown below:
|
> Click “Add” to save your changes |
|---|
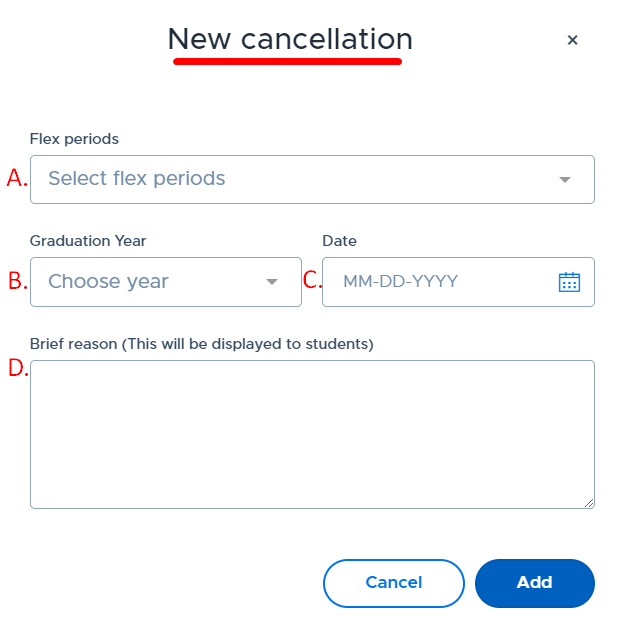
Once the cancellation has successfully been saved, the Flex cancellation is added to the main list on the “Cancellation” screen. The cancellation can be edited or deleted prior to the Flex period starting, by using the buttons in the “Actions” column. One cancellation for multiple grad years will be listed separately in the main list (see below), so be sure to edit/update each cancellation as needed.
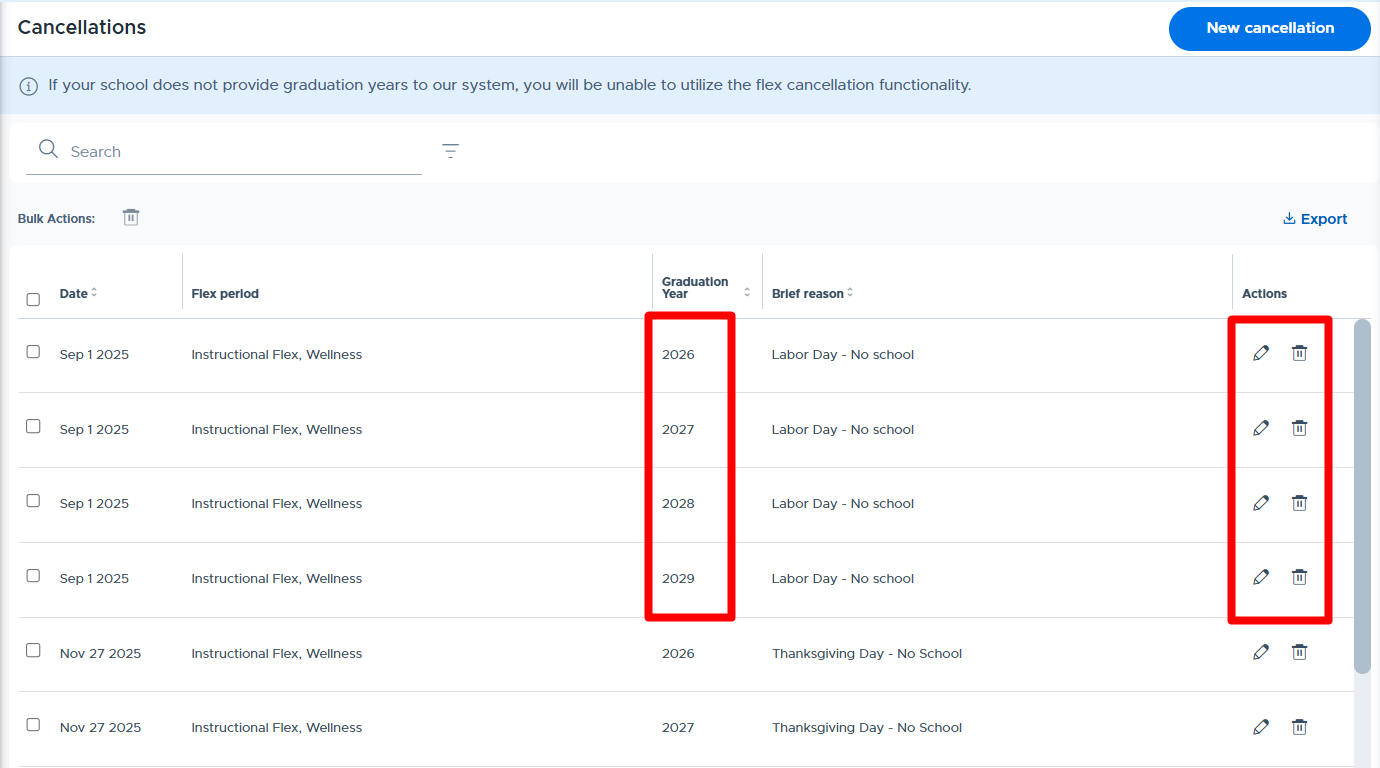
Below is what the student’s My Schedule screen looks like when a Flex is canceled:
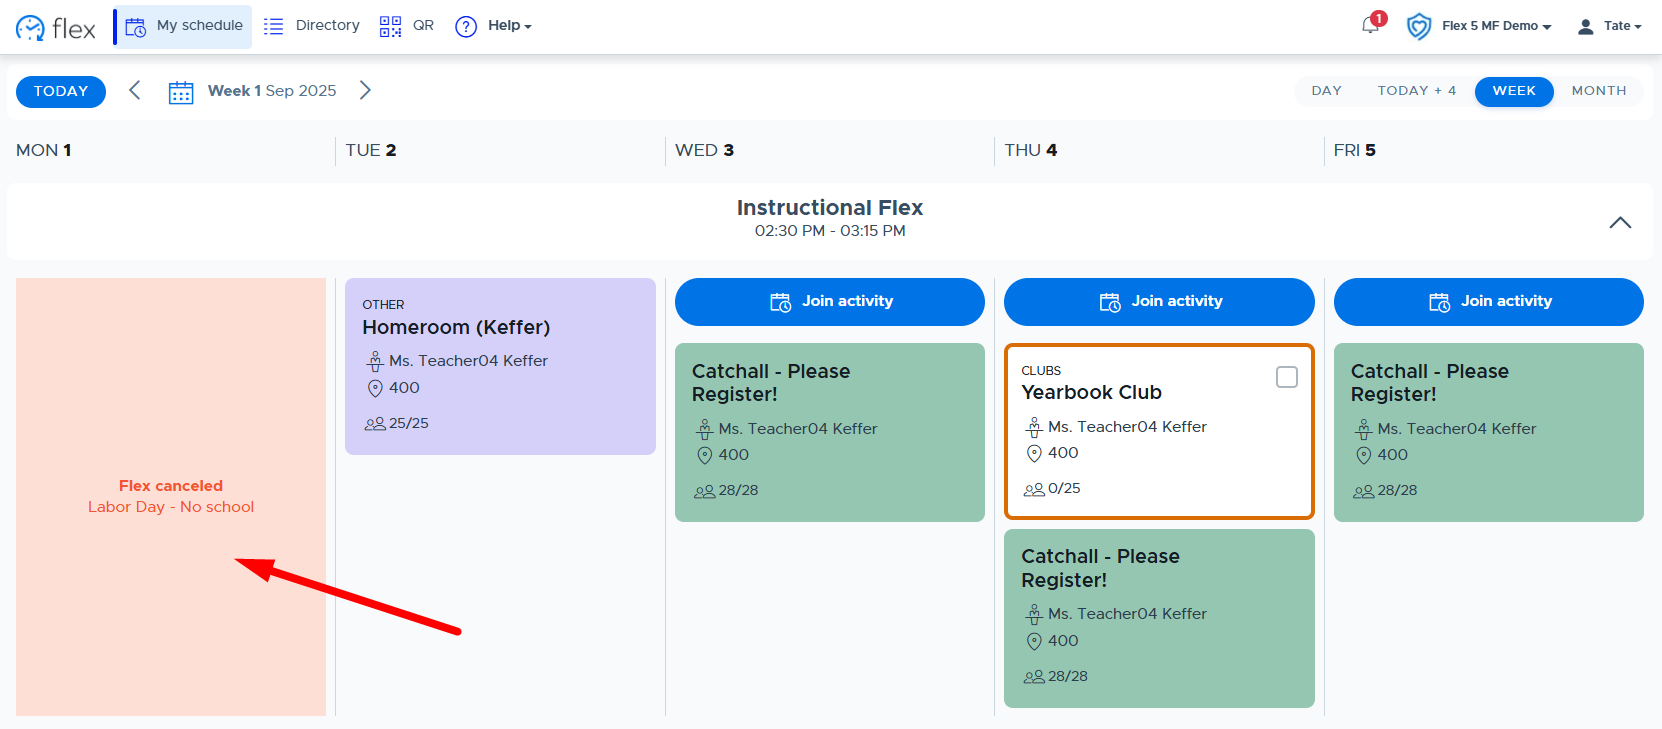
Below is the teacher’s My Schedule screen when flex has been canceled. Teachers will still be able to schedule an activity, since they may be doing this for grad years that are not part of the canceled Flex. Teachers/Staff can click on the “Cancellation View” link next to the Schedule Activity button or go to the Activities > Cancellation screen to view all canceled flex periods (and grad years).
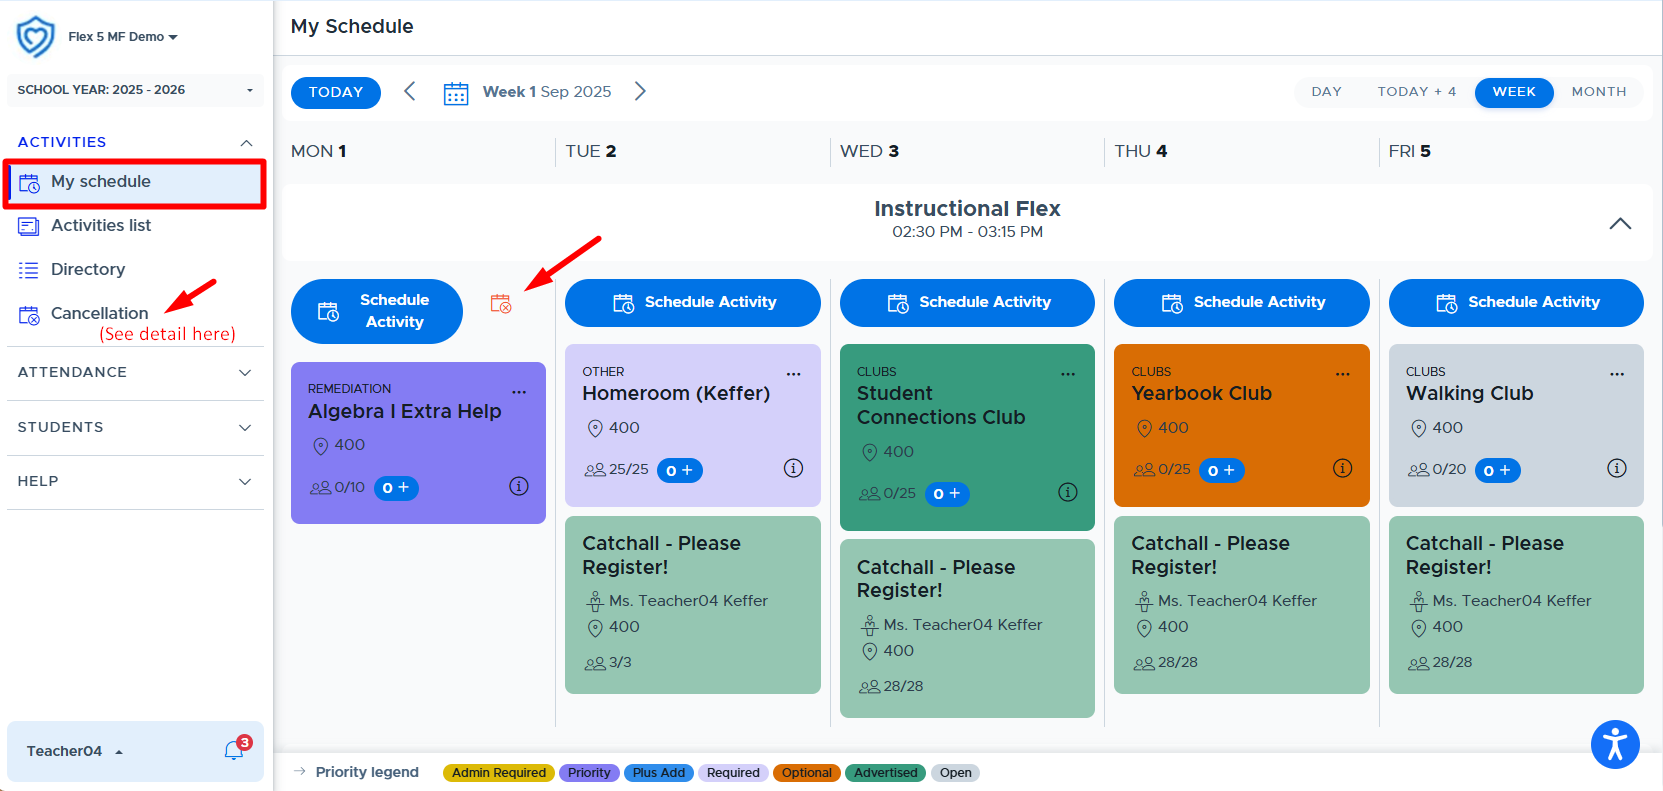
- TIP: You may also find it helpful to use the “Announcement” feature to further remind all users of the change in schedule.
If flex is canceled for a student who is included in a teacher’s mandatory activity, the teacher will see the student in the “Missing Student” section of the Attendance screen. There will be a note indicating this is due to an “Admin cancellation”. Please see the example below.

Cancellation Notifications
Adults and students (in applicable grad years) will receive “in-app” notifications when a flex period has been canceled. Adults will receive this notification if a flex period is canceled within the current calendar week (Mon-Fri). Students will receive this notification if a flex period is canceled for the current day. Below is an example of the in-app notification for adults, which can be accessed by clicking on the bell icon.

ATTENDANCE
Student Attendance
It is important for adults who are running flex activities to take attendance in the system. This will document which students attended the scheduled flex activity and which students did not. This can help schools provide necessary documentation for attendance purposes and prove that students are getting required services.
In order for a teacher, staff, or admin to take attendance in Flex for an activity being run, navigate to the Student Attendance screen for the current day’s active flex period. This can be done one of two ways:
- From the main menu, click on Attendance and Student Attendance.
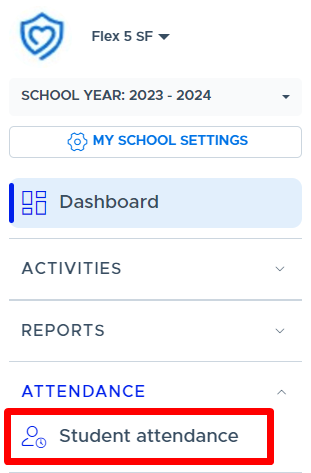
- From the My Schedule screen, click on the hyperlinked registration numbers on the activity card, as shown below. (This will take you to the Student Attendance screen and display the current flex period and scheduled activities.)
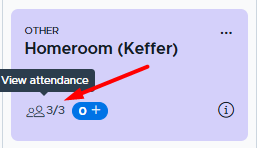
Below is the Student Attendance screen:
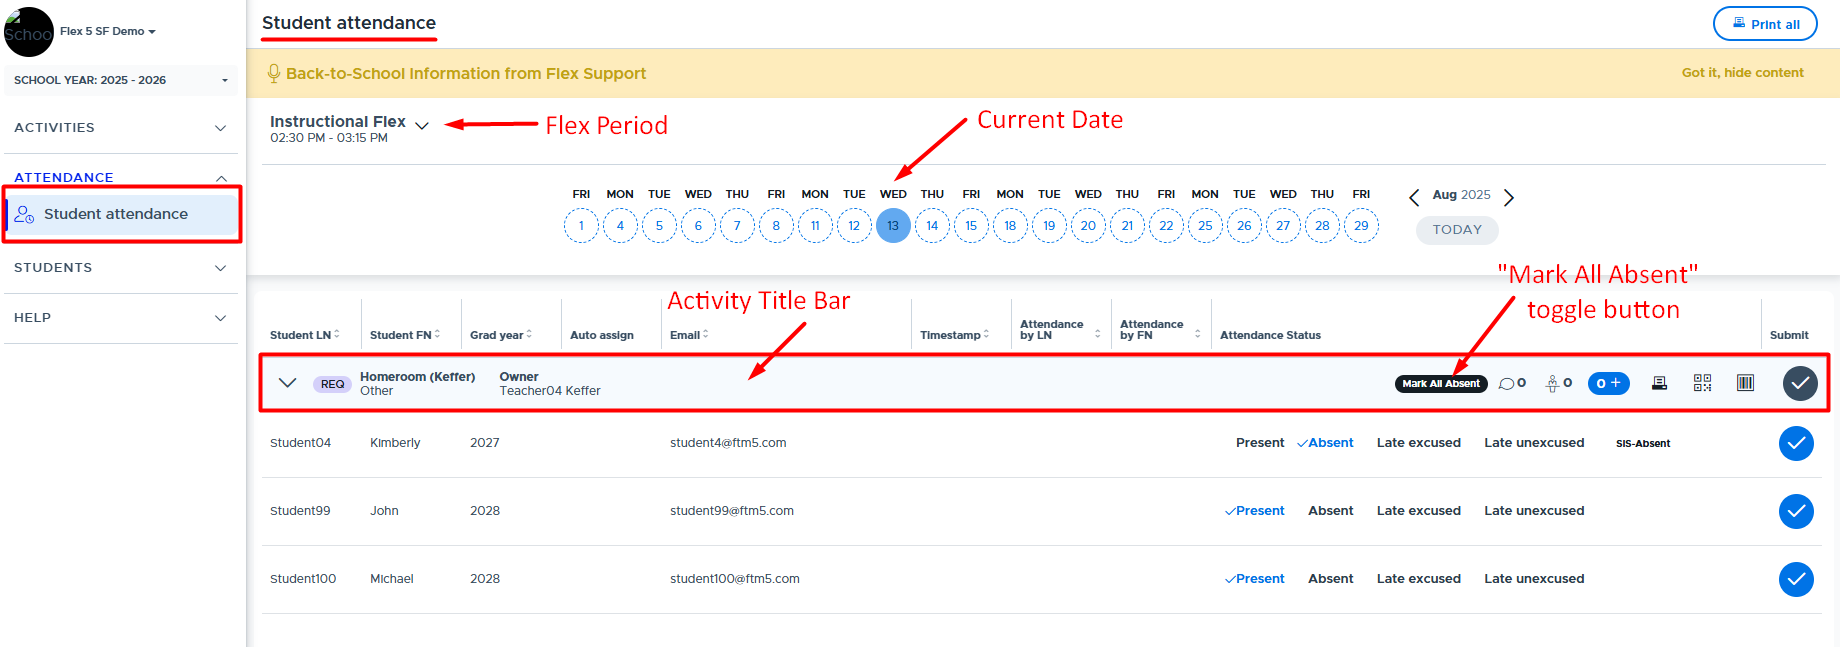
In order to take attendance in Flex, do the following:
- Select the correct option in the Attendance Status area for each student.
- “Present” will default for most students. If you prefer to start with the default as “Absent”, click the Mark All Absent button.
- If your school is importing daily attendance from your SIS, some students may default to “Absent” with a notation to the right indicating “SIS Absent”. (You can change their status if needed.)
- Once all students have been accounted for click the gray circle (shown above) to submit the attendance for all students for that particular activity.
- The system will then “Timestamp” the submission and display the name of the adult who submitted the attendance. (See below.)
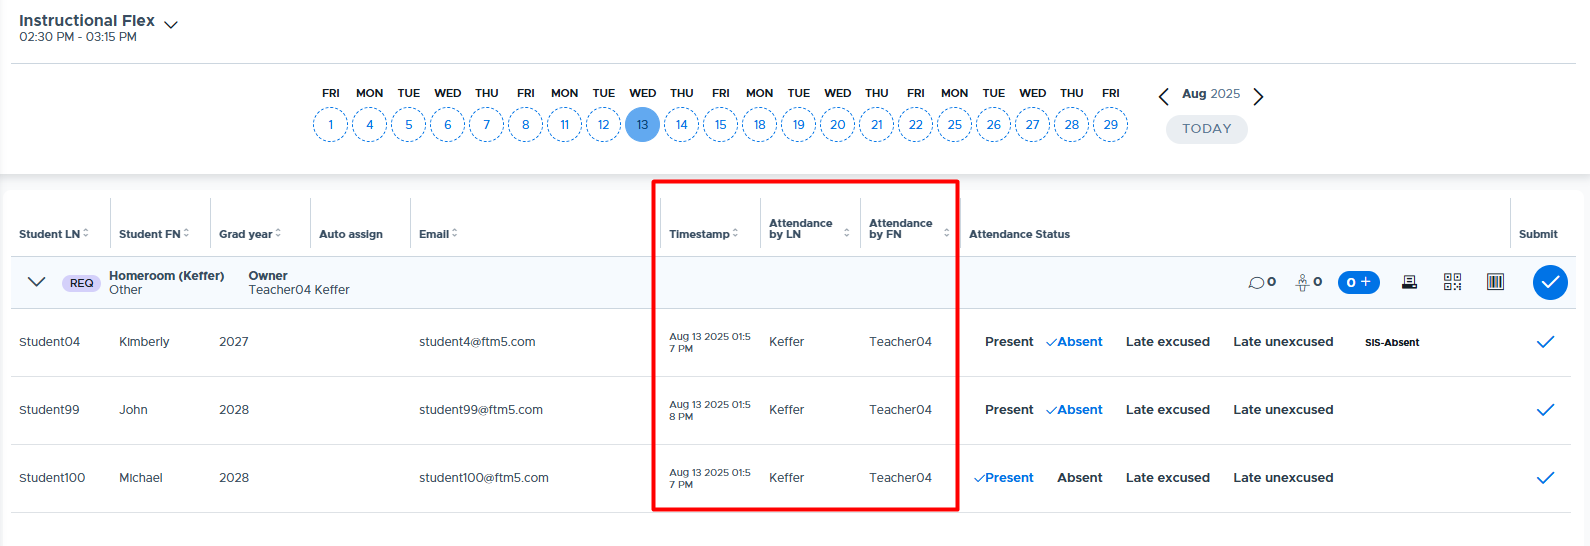
- It is possible to update a student’s attendance status and resubmit the attendance. Simply, change the selection and click the light blue circle to the right of the student record (shown below). This will update the timestamp and student’s attendance status.
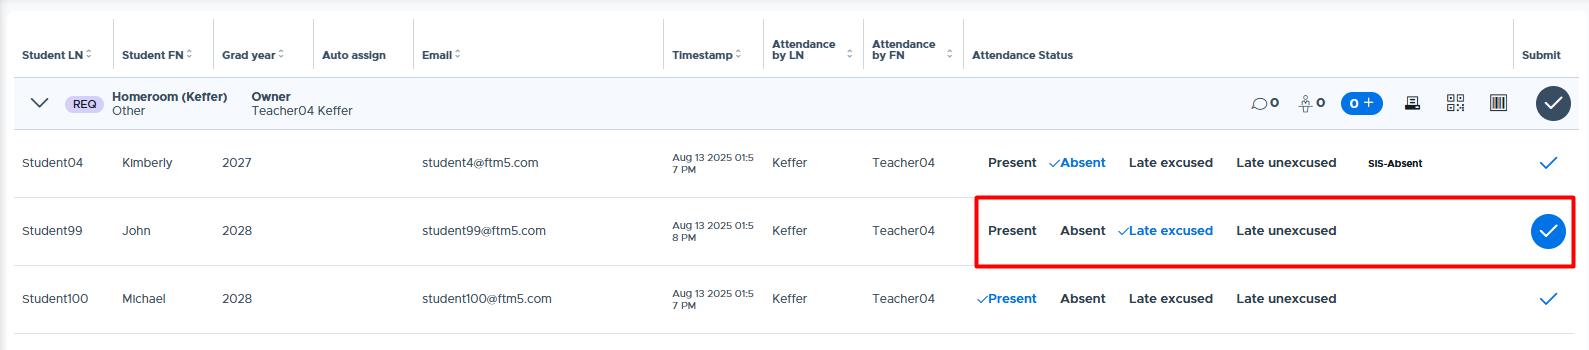
- Note: Teachers and staff role users can go back to prior dates and update the status and/or (re)submit attendance for students on their registrations lists. Teachers and staff cannot add students to the attendance list for prior dates.
- Admins can simulate teachers or staff users and plus add students, if necessary. This is referred to as “retroactive attendance”. It’s important that the attendance for the plus added student(s) be submitted in Flex. (Please see this video for more details: Retroactive Attendance.)
How importing SIS attendance prior to Flex can help.
Schools have the option to import an attendance file from their SIS (Student Information System) into Flex. When this is done shortly before the beginning of the flex period, students who are absent according to the SIS will have an indicator in Flex showing they are “SIS Absent”. The screenshot below shows how this is displayed on the teacher’s attendance screen.
Notice the default attendance status will be “Absent” rather than “Present” for SIS Absent students. This provides the teacher with a heads-up that the student will be absent for their activity and saves them time when taking attendance for their students.
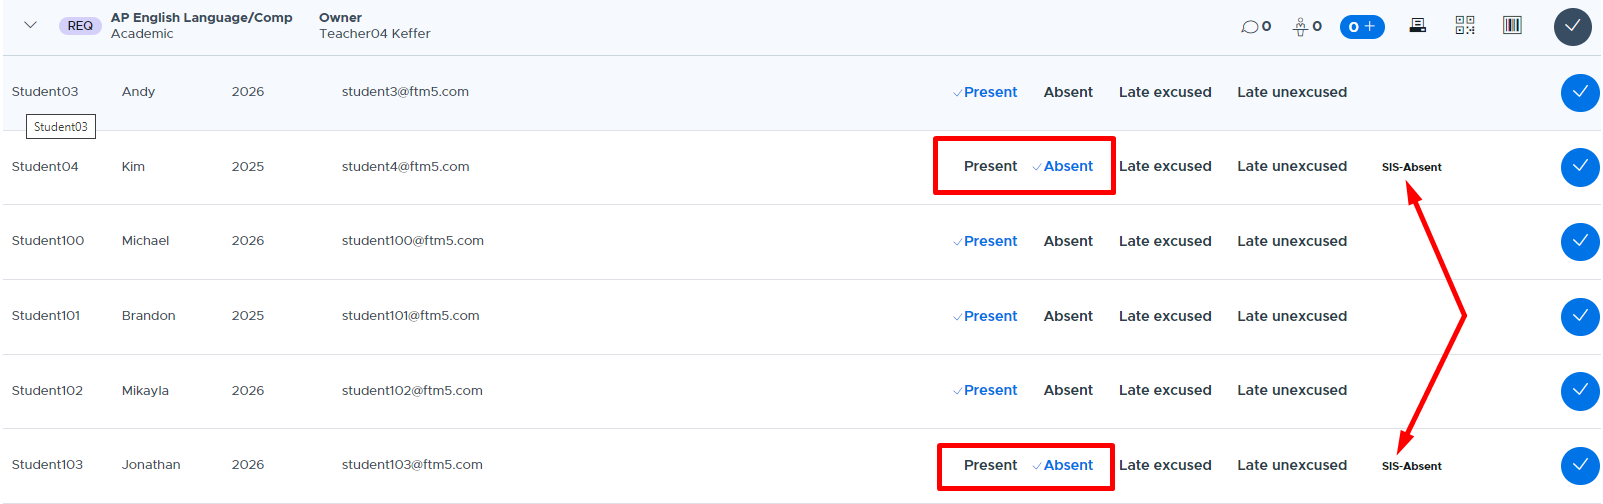
- For more information on creating and importing an SIS Attendance file, please see the following document: How to Create a SIS Attendance Import File
- Also, please see the following sections of this guide and the corresponding training videos for information on how this data is used in the Flex reports that are available to Admins.
Activity Title Bar and Icons:
Below are additional details about each section of the activity bar and the available icons.

- Clicking on this down arrow collapses the list of students registered for this particular activity. This may be helpful if there are multiple activities being run during the same flex and attendance needs to be taken for each activity.
- Activity priority level
- Activity Title and Activity Type
- Owner of the Activity
- “Mark All Absent” - toggle to change default status to “Absent”
- The number beside this bubble indicates if students have left any comments when they registered for the activity. (If it’s a mandatory activity, the student does not have this option.)
- Adults can only read these comments. They cannot respond back to the student.
- Additional adults can be added here for “Shared Attendance” purposes. Click the icon and search for the desired teacher(s) to add who will help take attendance for this specific activity.
- Students can be plus added to the activity here - if they are “available” to be added. (In other words, they are not plus added to another activity or already in a higher priority activity.)
- The printer icon allows the adult to download and print the list of students for this particular activity.
- Note: If there are multiple activities on the attendance screen, the “Print All” button in the top right of the screen can be used to print all activity lists at the same time.
- This icon provides a QR Code for this particular activity that students can scan to mark themselves “Present” in the activity.
- Please see the following document for more details: QR Code Scanning for Student Attendance
- This icon provides a window for the teacher to use a scanning device in order to scan a student’s “Barcode” (SIS ID number) in order to mark them “Present” in the activity.
- Please see the following document for more details: Barcode Scanning for Student Attendance.
- Note: This icon does not appear until the day of the activity.
- Attendance submission button. (This will submit attendance for all students registered for this particular activity.)
Missing Student Section:
This section will show any students who you are expecting to attend the activity but will not be for one of the following reasons:
- They are scheduled in a higher level priority activity (Ex: Nathan, Kim, & John shown below)
- They were scheduled in another ‘same-level’ activity and selected the other mandatory activity.
- An Admin has “manually excluded” the student because they are not expected to participate in the school’s flex period. (Ex: Tara student below)
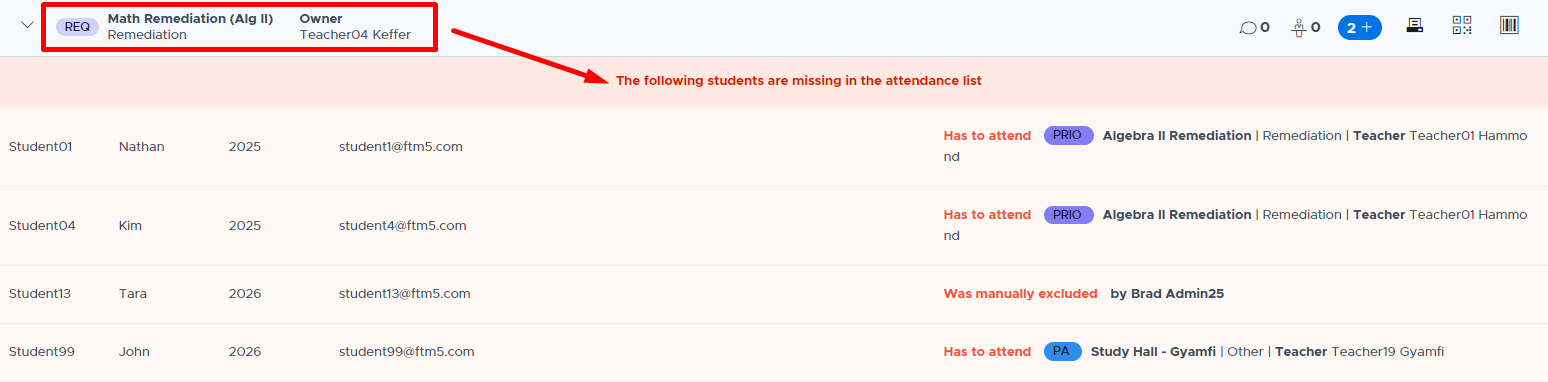
- Please see the How to Take Attendance video for more details.
STUDENTS
Student Search
The Student Search menu, shown below, provides the ability to quickly find where a student is scheduled during flex for the current day. It also provides detailed information for past and future registrations. Teachers, staff, and admins have access to the same “Student Search” Flex menu option.
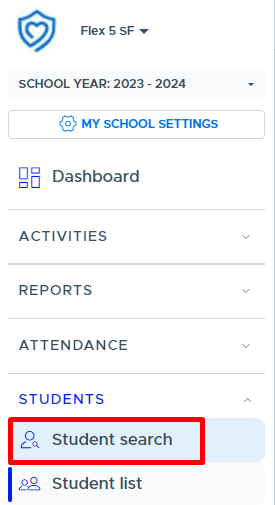
Individual Search
On the Student Search screen, the “Individual” view shows adults a list of all students for today for all flex periods. This is the one screen that shows multiple flex periods all at once - if the school has more than one flex period. This information can be exported and contains attendance information.
- This search feature helps the front office quickly know where to find students today.
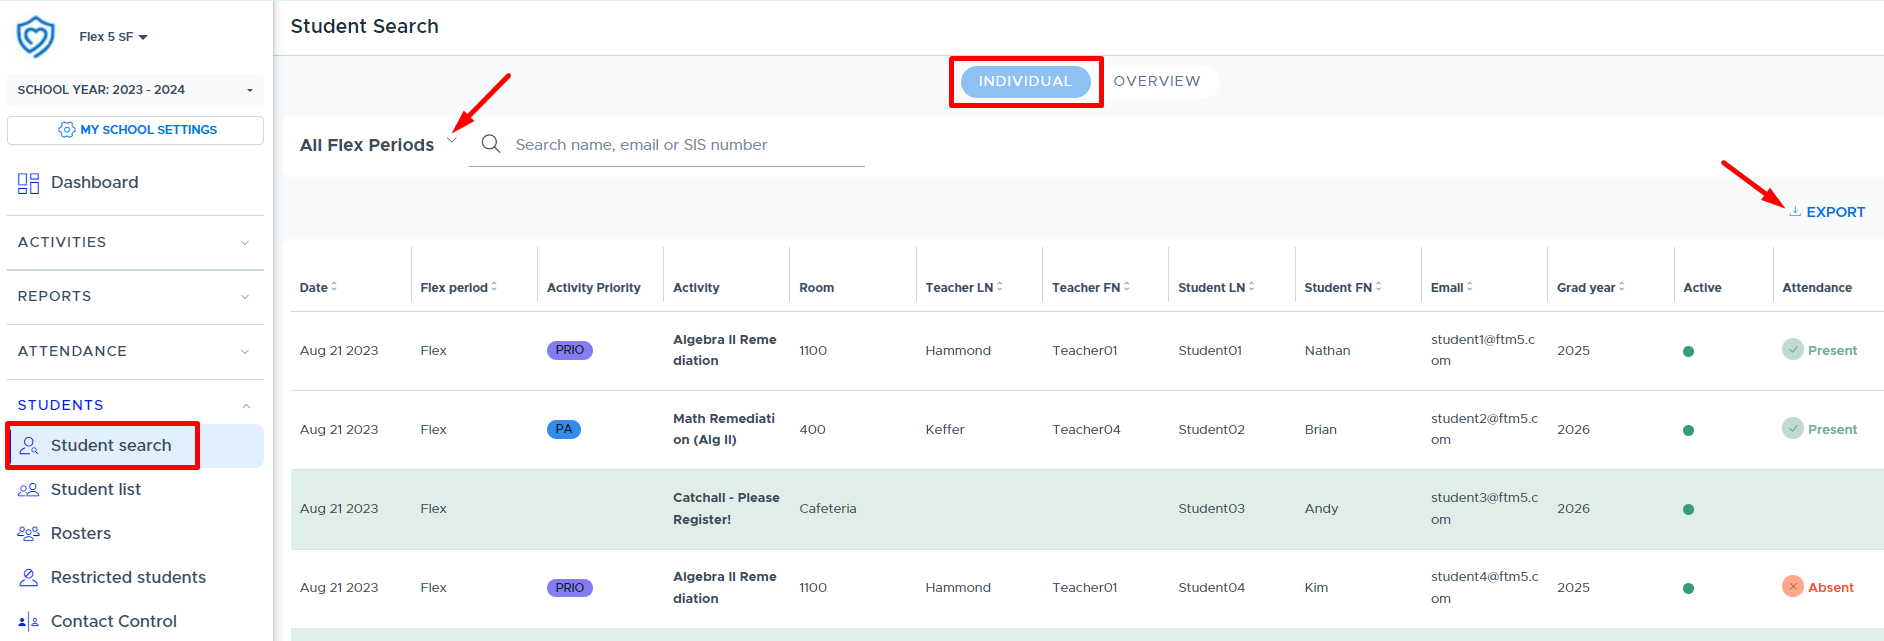
Once you search for one or more students, a “filter” button (triangle) will appear to the right. (See below.) Using the filter feature you can specify a set date range. If you use the “future” toggle, it will show today through the end of the year. Depending on the time of the year, and the number of students you are looking at, it may be helpful to set a specific date range rather than ask the system to load all information from now until the end of the year.
- This feature is great for documenting additional support hours, attendance, and other data needed for IEP plans, parents, or other circumstances.
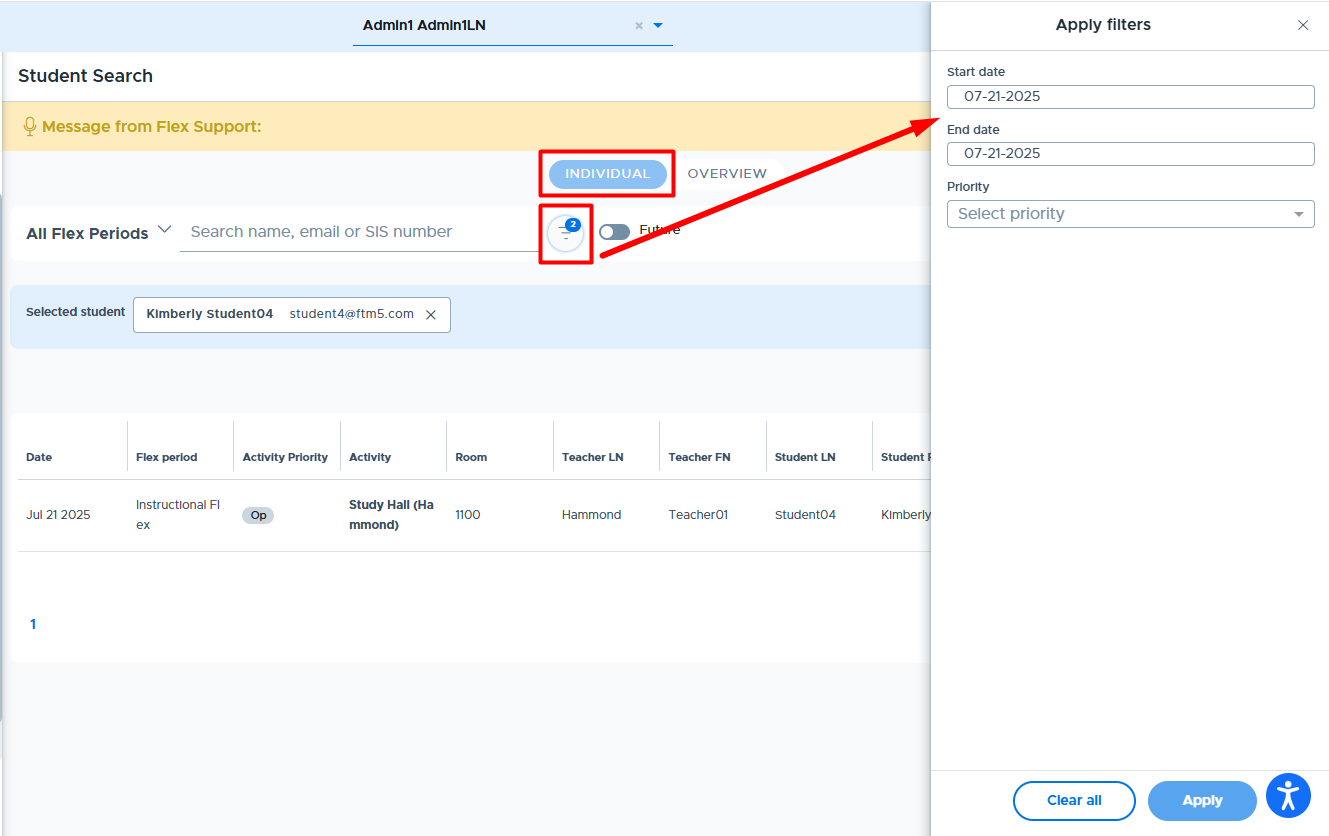
Overview Student Search
The “Overview” student search allows teachers, staff, and admin to look at 21 days worth of data at a time for one or more students. This includes 10 days in the past (denoted by the slightly darker gray header), today, and 10 days into the future (denoted by the white header). This information can also be exported. One or more students can be searched. The Overview screen shows one flex period at a time.
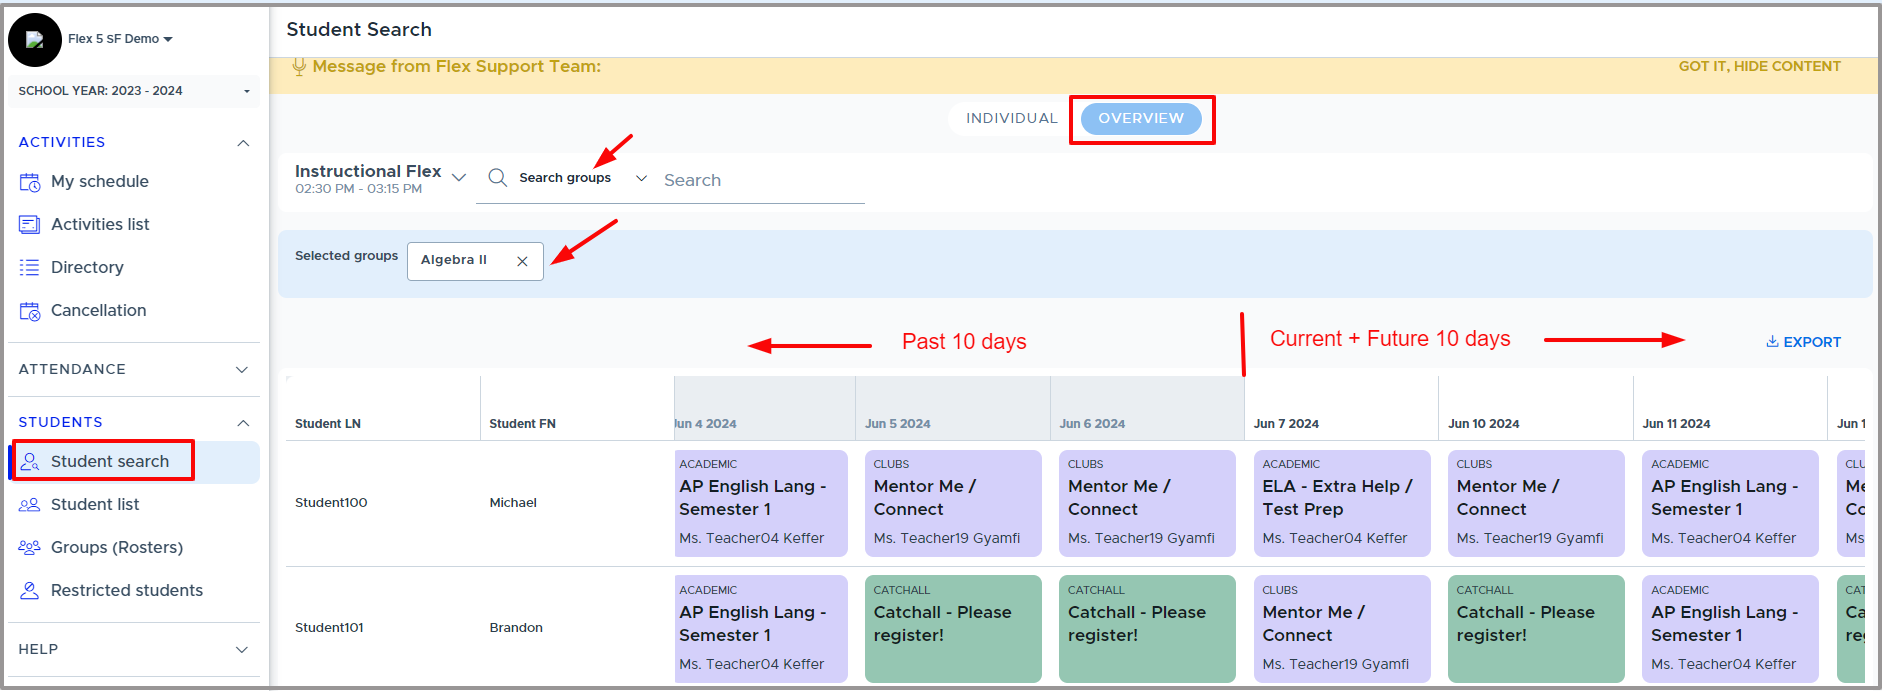
In addition to looking at students one or more at a time, a Group Overview is also available. The Group Overview allows you to look at a set group of students all at once. Click on “Search Students” and switch to “Groups”. The Group search allows the user to search using any of the groups to which they have access.
- The Group Overview allows a group of students such as IEP students, Honor students, Student Council, or Homeroom students to be reviewed all at once.
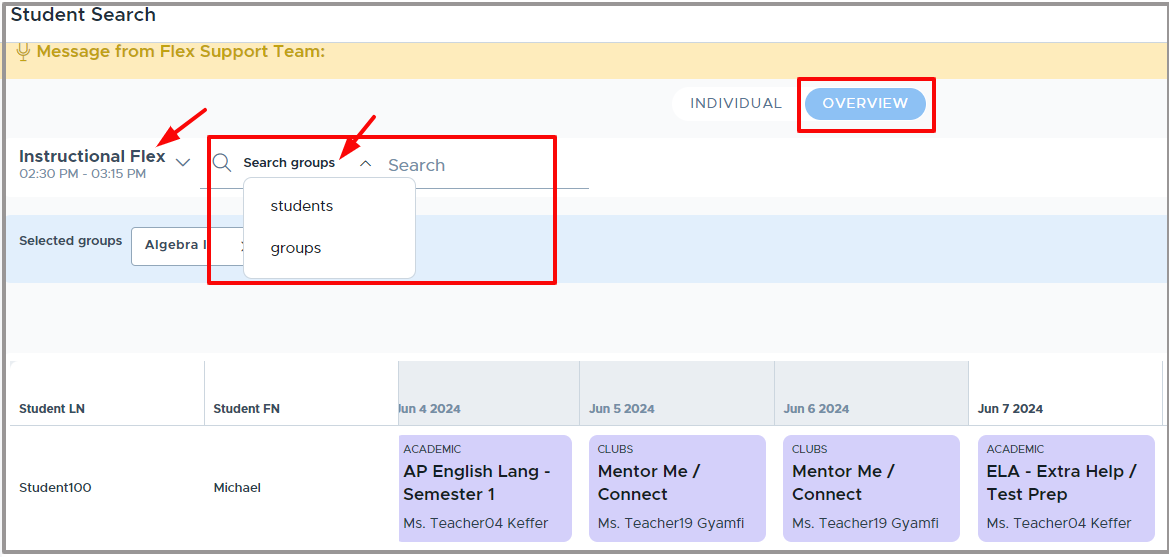
- Please see the following videos for more details:
Student List
The Student List screen provides a list of all active students in the Flex system. All adults have access to this screen but admins have some additional functionality. The advantages of this screen are simulating students (admins only), accessing active student’s email addresses, and the option to export this list to a CSV file.
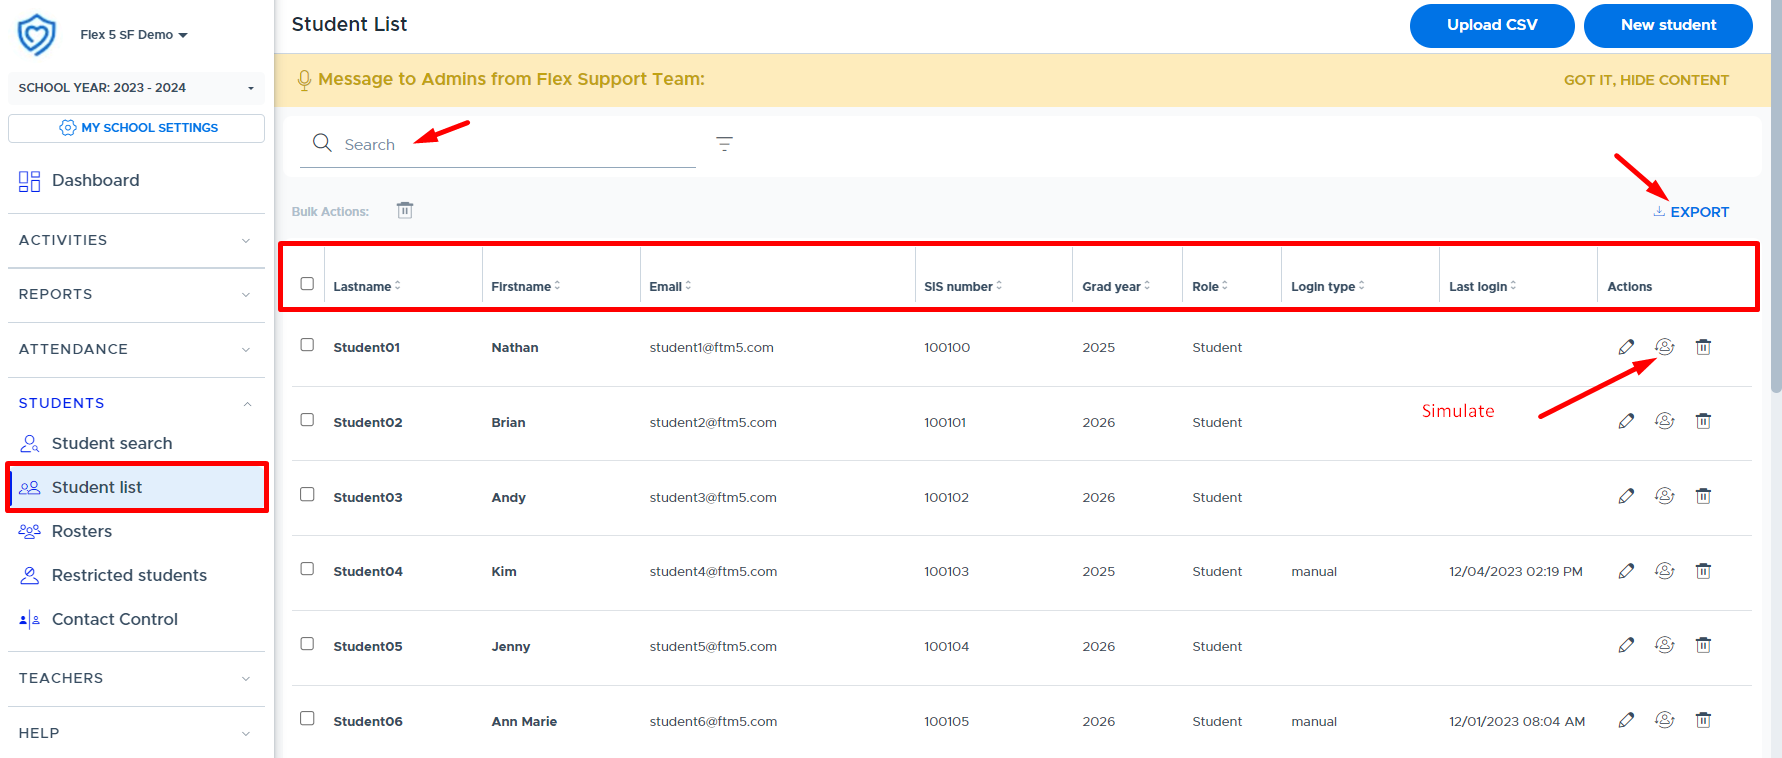
Groups (formerly Rosters)
Groups - Table of Contents: |
|---|
Groups are lists of students in Flex that adults can link to activities to let the students in the group know about a particular activity or to mandate those students to attend an activity. Groups can also be used for the student search to see what a group of students has scheduled during flex.
When viewing or using a group in Flex, it’s important to understand the Source and Access Type:
- Source - Where the group came from or how it was created
- Access Type - Who can access & edit the group
Groups screen Source and Access Type columns:
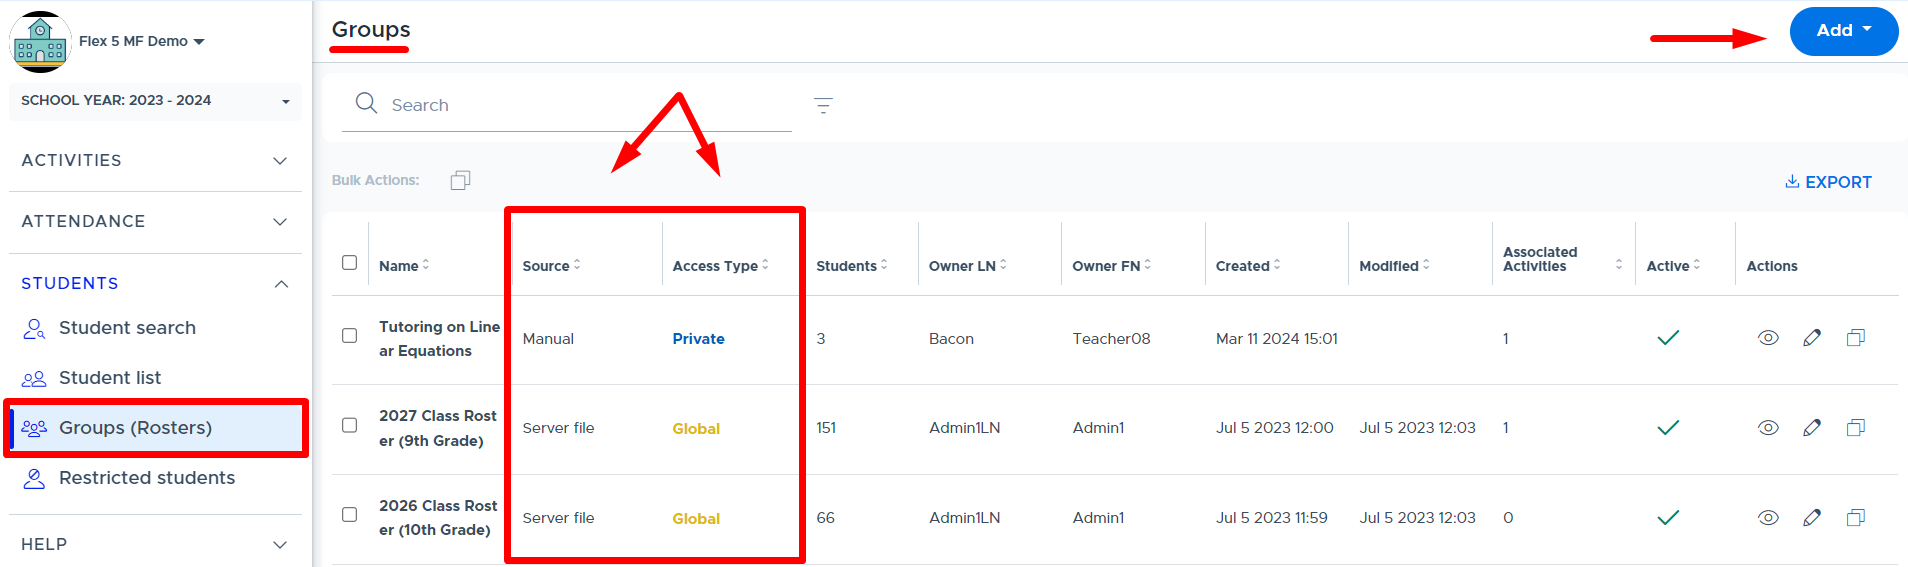
Group “Source” Options
The “Source” designates where the group came from or how it was created. Below are the definitions of each option in Flex.
- Manual: A group created by searching individual students, direct CSV file upload, or pulling in students from a pre-existing group.
- Server File: A group created by a linked server file (manually uploaded or sent via SFTP); only admins can create this type of group.
- Group of Groups: A group created by using/linking other previously created “groups”, which can be from different sources, as long as the user has access to the group. (See more information below.)
- Auto Sync: A group created by syncing Courses and/or Classes from the school’s SIS data. This is only available for clients who are connected and rostering students via Securly Sync.
- Note: “Auto sync” grade level groups are also available to ALL Flex clients but must be enabled on the System Settings screen by an admin. (See the Group Auto Sync Settings section of this guide for more details.)
Group “Access Type” Options
The “Access Type” determines who can access and edit the group. The options include: Private, Global, or Shared. All adults in Flex have access to these three options when creating/editing a group.
- Private: A group that can only be seen or used by the creator/owner of the group.
- Global: A group that is accessible to all adults in the school’s Flex system. Only the creator/owner and admins can edit the group.
- Shared: A group that is accessible only to those adults who were given access privileges. Shared groups are visible and editable for owners, designated adults, and Flex admins.
- Note: If an adult is removed from a shared group, they can continue using any activity linked to the group. They just can't use the group on a new activity or make edits to the group.
Below is the Access Type drop-down on the “New Group” and “New Group of Groups” screens in Flex:
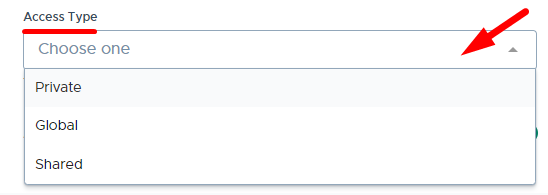
Below is where the “Shared” Access Type is selected for a group and other adults can be designated to access the group.
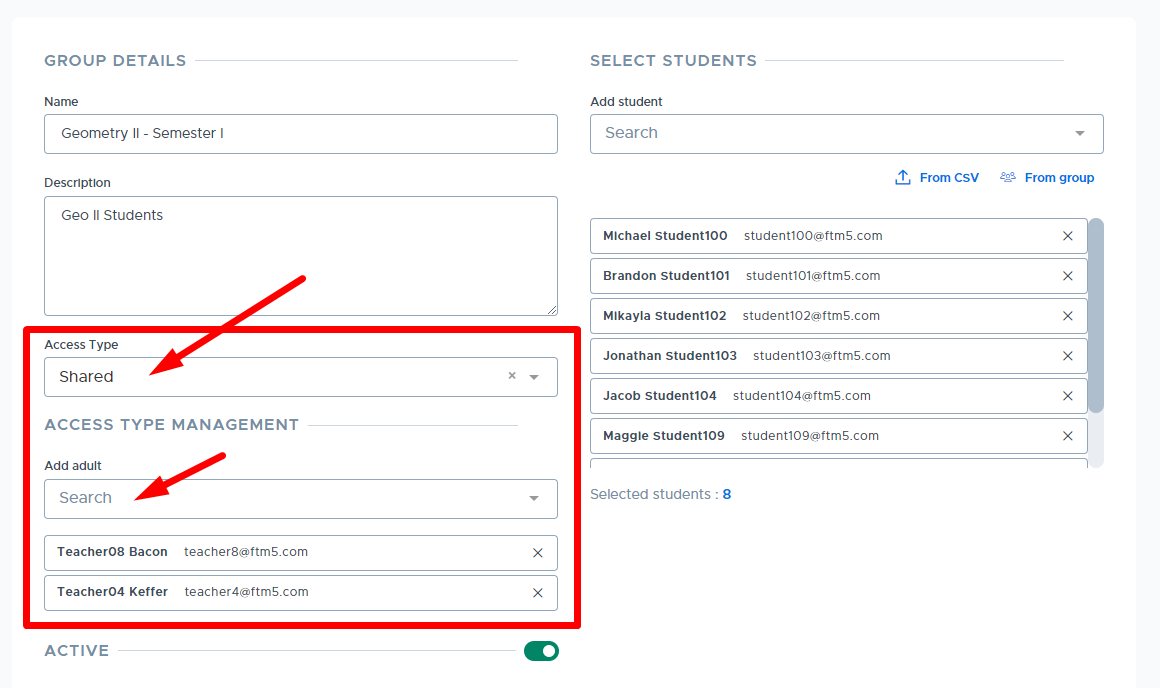
Changing the Access Type for a Group
There are no restrictions for changing the Access Type for a group. This means that anyone who has access to edit a group can change the access type.
- If changing the Access Type for a group removes an adult from having access to the group - they will be allowed to keep using any activity linked to the group. They just can't use the group on a new activity or make edits to the group.
Creating Groups
Creating a Manual Group
A “manual” group is created by searching individual students, direct CSV file upload, or pulling in students from a pre-existing group. All adults can create manual groups in Flex using any or all of the following methods:
- Searching and adding students individually
- Adding students from a pre-existing group
- Uploading a CSV file
The following videos show how to create manual groups using the methods listed above:
- Creating Manual Groups (formerly Rosters) - #1 and #2 above
- Creating a Manual Group via CSV File Upload - #3 above
Creating a Group of Groups (G of G)
This feature in Flex allows adults to link multiple pre-existing groups to create a new “Group of Groups” (G of G). This can be particularly useful when an adult is organizing an activity and wants to combine several pre-existing groups into a single “G of G” for an activity. (For example, a math teacher wants to offer a review session for three different Algebra I classes. The teacher creates a “G of G” by selecting three pre-existing Algebra I groups.)
The following video shows how to create a Group of Groups in Flex:
- Creating a Group of Groups
Here are some additional details about Group of Groups:
- All adult roles can create a G of G.
- “Group of Groups” becomes the “Source” that shows on the main Groups screen.
- The G of G can be set as shared, global, or private for the Access Type. (This will determine who can view and edit the G of G.)
Below shows the option to add a Group of Groups in Flex.
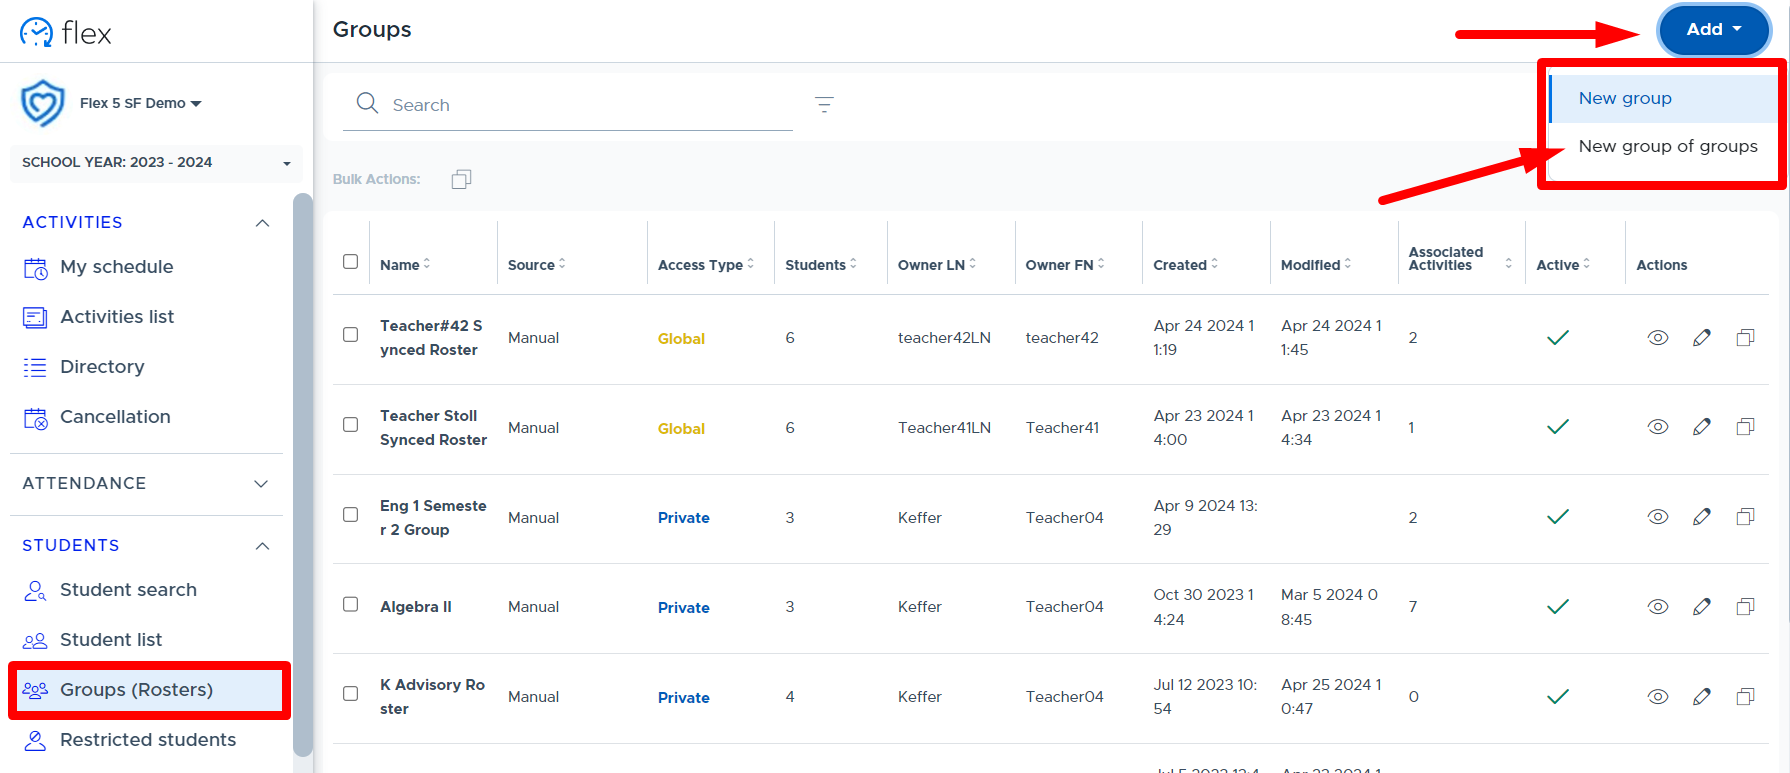
Below shows the “New Group of Groups” screen where an adult can create a G of G:
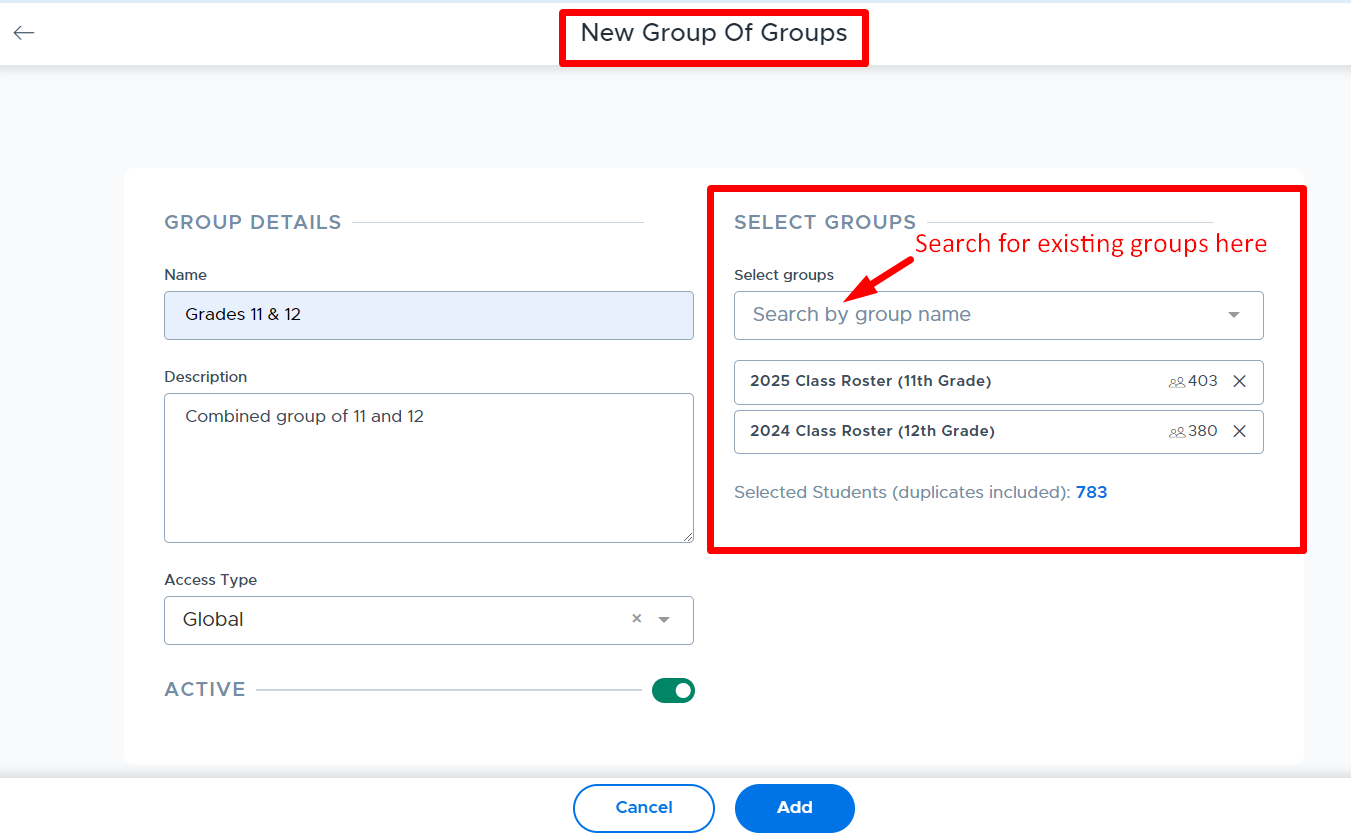
Click on a selected group to preview the students in the pre-existing group:
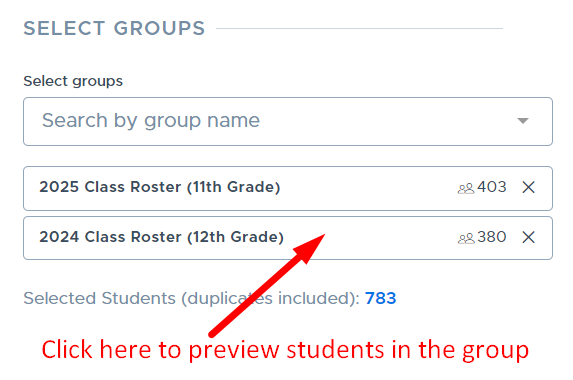
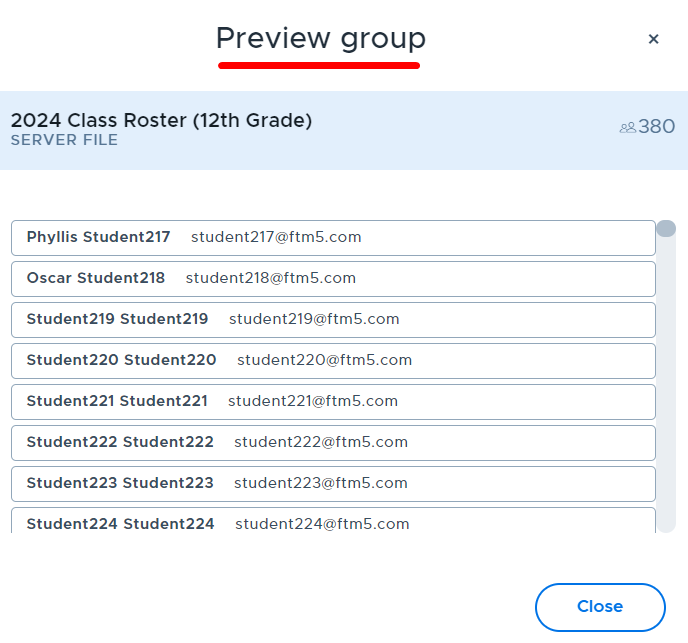
Creating a Group within an Activity
New Groups can also be created from within the “New/Update Activity” screen. (When an activity is being created and/or updated.) Below shows where this option can be accessed:
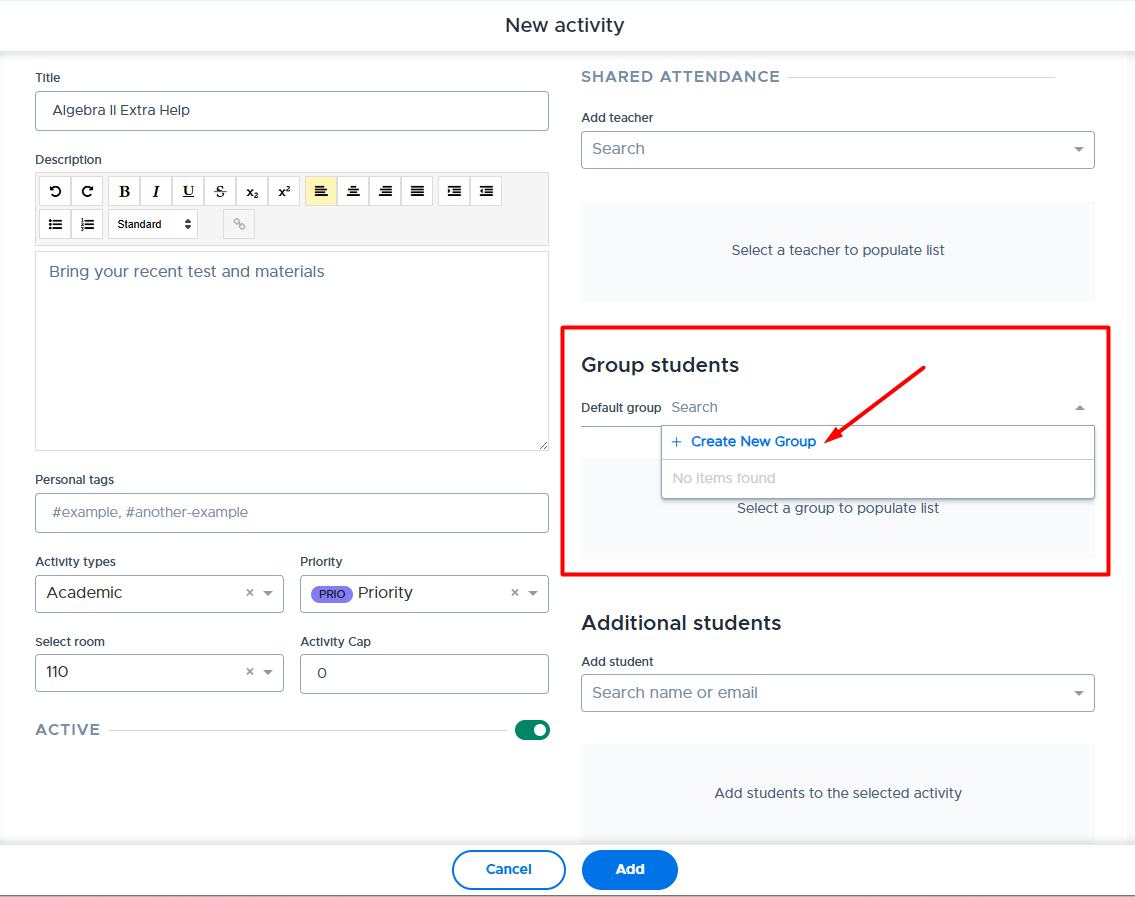
When selected, a window will appear on the right where the New Group details can be added. Once the Group information is added, the new Group will automatically be linked to the activity being created.
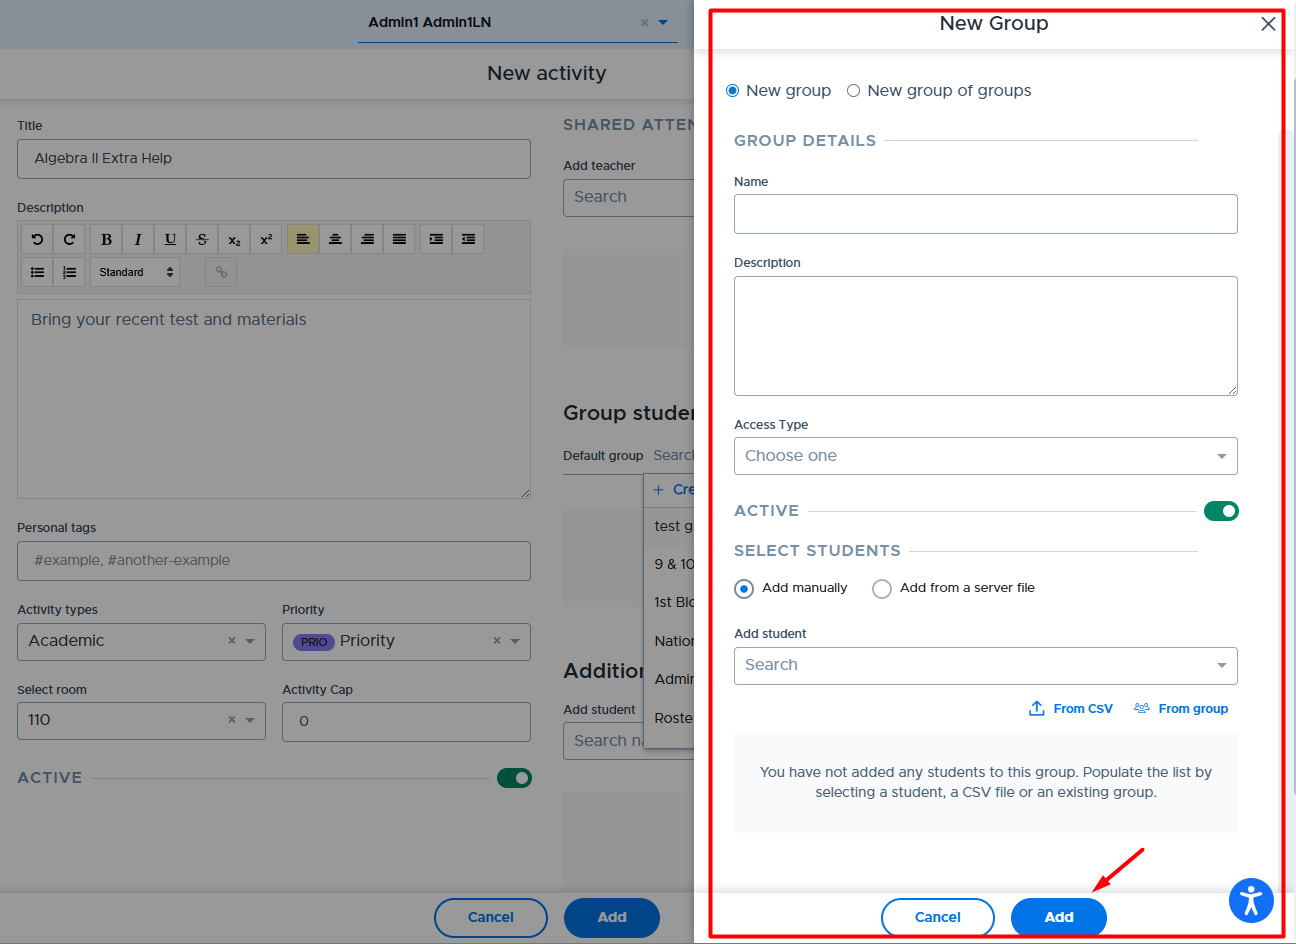
Editing Groups
The following details apply when editing manual groups and Group of Groups:
- Who can edit is determined by the “Access Type”.
- Private: Creator/owner and Flex admins via Simulate
- Shared: Creator/owner, designated adults, and Flex admins
- Global: Creator/owner and Flex admins
- Edits to a group or G of G will be applied to main activities linked to these groups and any future scheduled activities using these groups.
- If an activity is scheduled for “today”, the group or G of G linked to that activity will be updated if it’s before the school’s cutoff time.
- The group “Preview” button can be used to see and edit details about the group or G of G. This is an additional option to the edit button on the main “Groups” screen. Please see below.
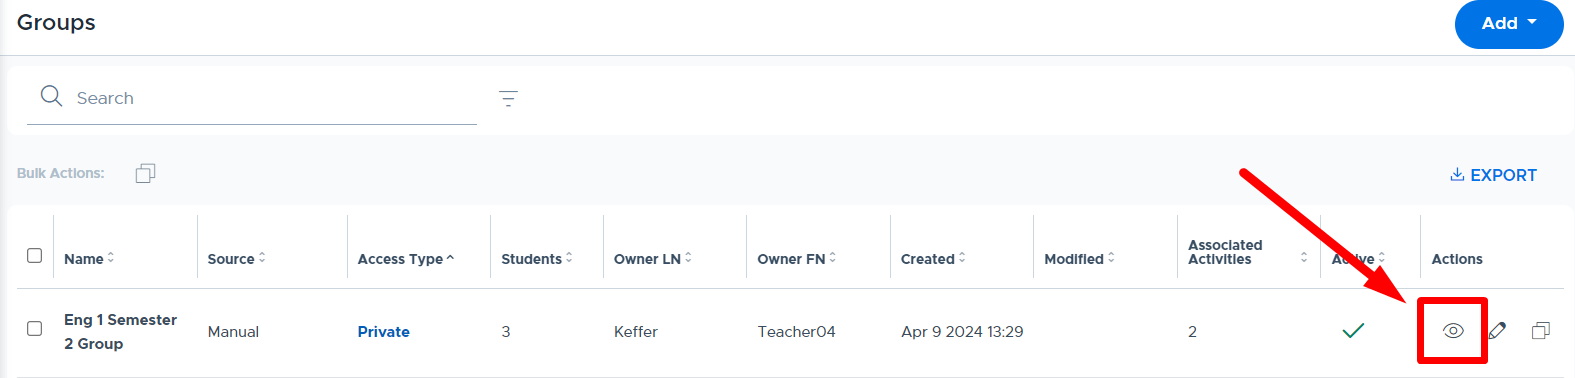
- It is also possible to modify which students in the group need to attend a particular activity by editing the activity and “deactivating” student/s. (This does not modify the original group.)
- Students can be “added” to a particular activity, and not the original group, by adding them to the “Additional Students” section.
- Please see the screenshot below and the Editing Groups training video for more details.
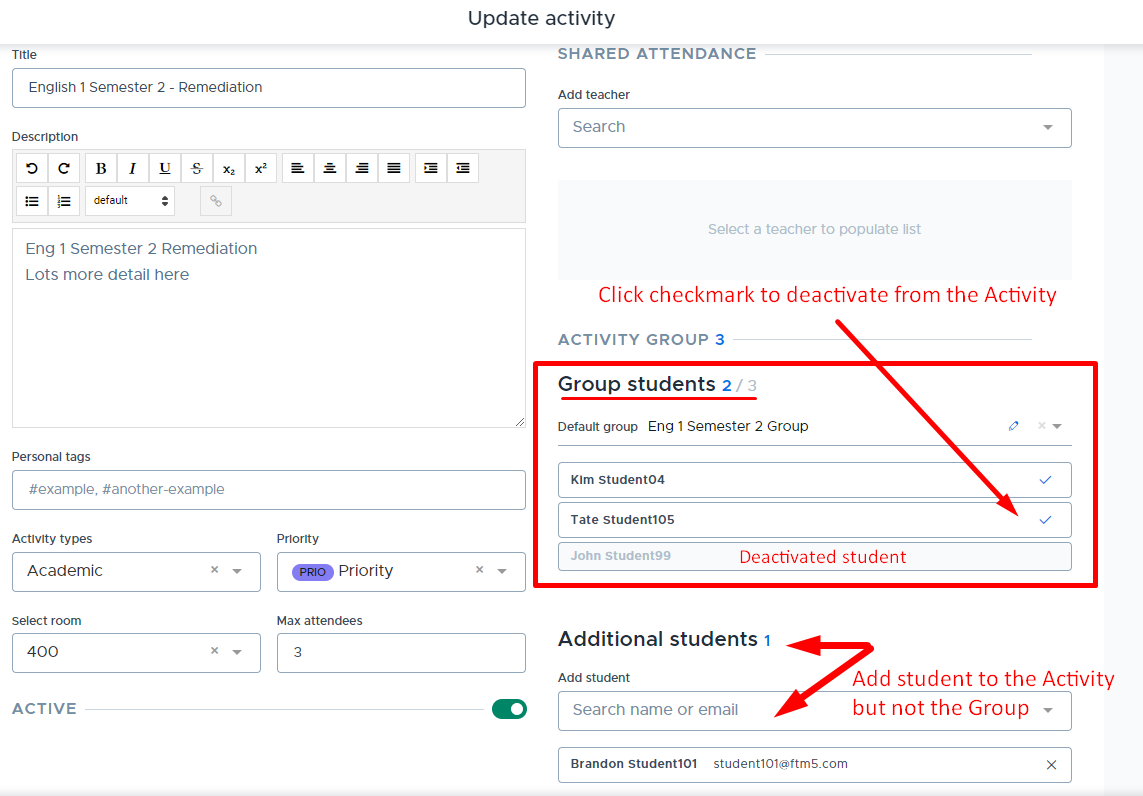
Editing Manual Groups
Manual groups can be edited using any of the three methods that are available to “create” a group.
- Searching and adding (or removing) students individually
- Adding (or removing) students from a pre-existing group
- Uploading a CSV file
When using a combination of the above methods to edit (update) a manual group, please keep in mind that when a CSV file upload is done, it will completely replace the students in the group with the students on the file. (Note: This is a change from the previous Flex functionality.) If you are pulling students in from multiple sources, upload the CSV file first, then use the other methods to add the remaining students.
The following training video covers details about editing manual groups: Editing Groups
Editing Group of Groups (G of G)
Groups can be added or removed from your G of G by selecting or deselecting them from the “Select Groups” section. Please also note:
- The G of G stays synced with the original linked groups.
- Only the linked groups can be edited within the G of G, NOT the individual students.
- Editing the student list must be done on the original group by someone with access.
- All activities associated with a G of G will receive updates from the linked G of G.
- Group of Groups cannot be added to other G of G.
Making a Group “Inactive”
Groups that are not associated with future scheduled activities can be deactivated in Flex. If an adult attempts to deactivate a group but it’s associated with an activity that is scheduled in the future, the following message will appear:
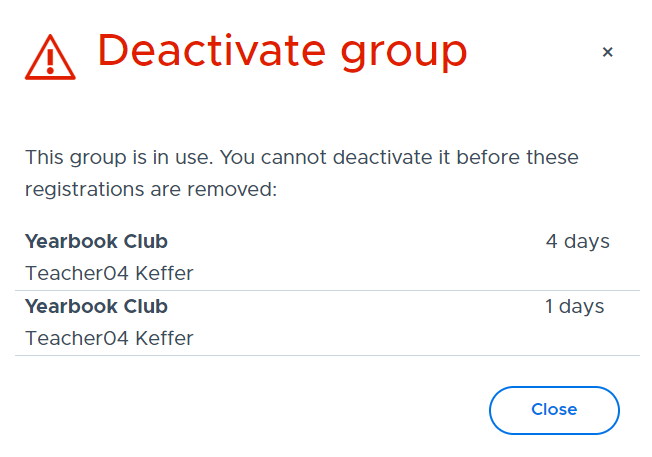
The filter option can be used on the Groups screen to view “Inactive” groups, which can be made “Active” again if needed.

Server File Groups (Admins Only)
A server file group is a group that is linked to a file that’s been uploaded in Flex to the server, either manually or via SFTP. Only Flex admins can set up these types of groups. Setting up a “New Group” using a server file can be done in 3 steps. In addition to the details outlined below, the following training video reviews these steps: Group via Server File Upload
Step 1: Create the “New Group” file in a CSV format.
- Below are examples of a “New Group” file. Notice in cell A1 that the header is studentemail with no space. The remainder of the file is simply a list of the student emails.
- Please note that student ID numbers can be substituted for the email but keep the header as studentemail. (It can be easier to grab the ID Number in some cases.)
- The file name can be whatever you like but we recommend not including any symbols.
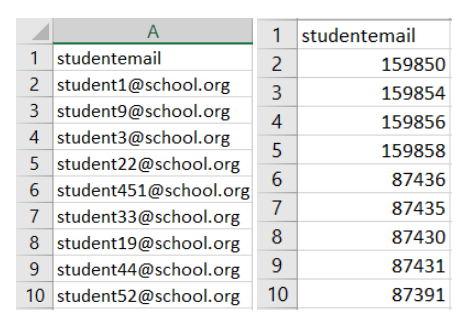
Step 2: Upload the “New Group” File. There are two ways to upload the file.
- Option 1: The file is sent via SFTP, which is often coordinated and automated by school IT professionals.
- Option 2: An admin uploads the “New Group” file manually within Flex.
Option 1: If the district is uploading the file to the SFTP server, this will be done using an SFTP client. Login credentials will be provided by Flex Support. Additionally, we will need your IP address(es) to allowlist. (Please reach out to the help desk for assistance.)
- This is the process that the district will use if they automate the creation and uploading of the group file or files. Automation is not done by Flex staff.
Option 2: To upload the file manually into Flex, admins can follow the steps listed below:
- Go to My School Settings > File Uploads
- In the upper right corner click Upload
- Select the file from your computer
- Note:If you want a sample CSV file, go to Students > Groups (Rosters) > Add (top right) > New server file upload > and there will be a link to a sample file.
4. Once the file is uploaded, it will take the server a few minutes to recognize that there is a new
file and put it in line for processing. The first time you upload the file it will remain in
“pending” status because there is one more step to complete.
Step 3: Attach the file to the “New Group” in Flex. This step should only need to be done the first time the file is uploaded. If you change the name of the file or manually edit the “New Group” in Flex, then this step may need to be redone to “reconnect” the file to the “New Group.” To create and attach the file to the “New Group,” an admin can follow these steps:
- From the main menu in Flex, go to Students > Groups (Rosters) > Add > New Group
- Complete the fields on the “New Group ” screen and select “Add from a server file ” in the Select Students section. (Please see the first screenshot below.)
- In the File name field, start to type the name of the file that you uploaded to the server under File Upload. (This step links the file to the group.)
- Then click Add.
- Depending on the size of the file and the traffic on the server, it might take some time for the file to update to the roster.
- On the Groups (Rosters) screen, the “New Group” will be listed and it will show the number of “Students” in the group. It may take some time for the “0” to update with the actual number of students from the file. (Please see the second screenshot below.)
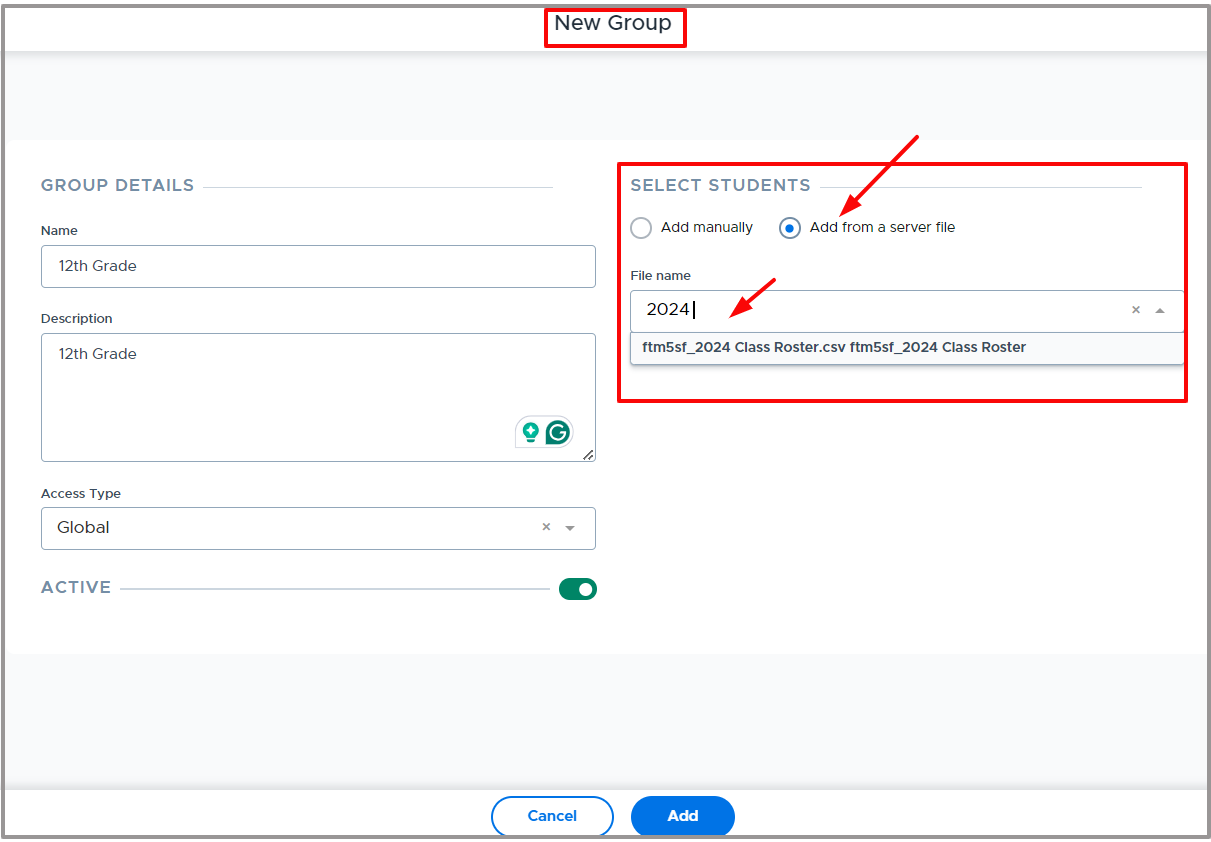
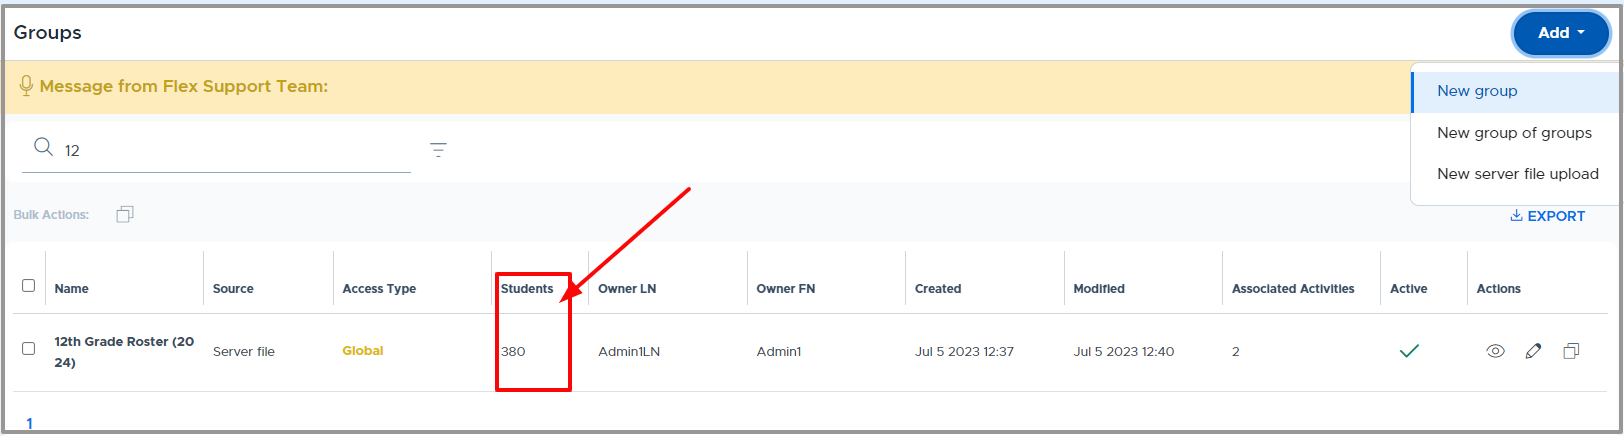
In the future when you need to make changes to the group file, repeat steps one and two. If you have not changed the file name or manually edited the group in Flex, you do not need to complete step three. The group should still be linked to the file and will update automatically. Group updates will be applied to the current day and future dates if the cutoff has not passed.
Flex clients often automate this process using SFTP in order to keep groups updated with new/active students. It is also helpful to set this up if you are using the Controlled Access Periods (CAP) functionality in Flex. (CAP provides the ability to designate which students have access to which flex periods.) Please reach out to the Flex Help Desk if you need any assistance with this process.
- Note: If grade-level groups are needed, these can be automatically created within the Flex system, without having to upload files. Please see Auto Sync Group - Grade Levels section of this guide.
Group (Roster) File Formats
Single Group CSV File Format
Any adult can create and upload a CSV file to populate a single Group. The sample file format is shown below. The file can be created as a spreadsheet and then downloaded into a CSV file format in order to import into the Flex system. The file has one column, with a column header of studentemail as shown below. List all desired student email addresses (or student ID numbers) in the column using separate rows.
- Note: The column header “studentemail” should stay the same and be used even if you are populating the file with student ID numbers.
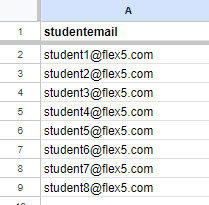
Below is an example of downloading a Google spreadsheet to a CSV file:
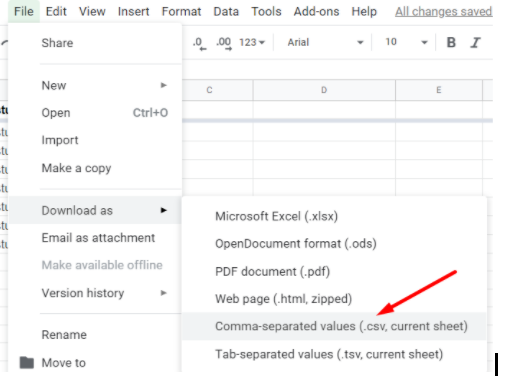
Bulk Group CSV Format (Admins Only)
The “Bulk Group/Roster” option can be used for creating multiple groups in Flex by uploading one file. This option is only available to admin users. The file must be uploaded to the server either manually through the Flex interface or via SFTP. A sample file format is shown below. Please notice that the student emails for each group are contained in one field, separated by a comma but no spaces.
- Note: Student emails can be replaced with student ID numbers, but column headers must match what is shown below.
- The file should be in CSV file format to upload into Flex.

The file can be uploaded by an admin in one of the two following places in Flex, which are both shown below:
- My School Settings > File Uploads > Upload
- Main menu > Students > Groups (Rosters) > Upload CSV
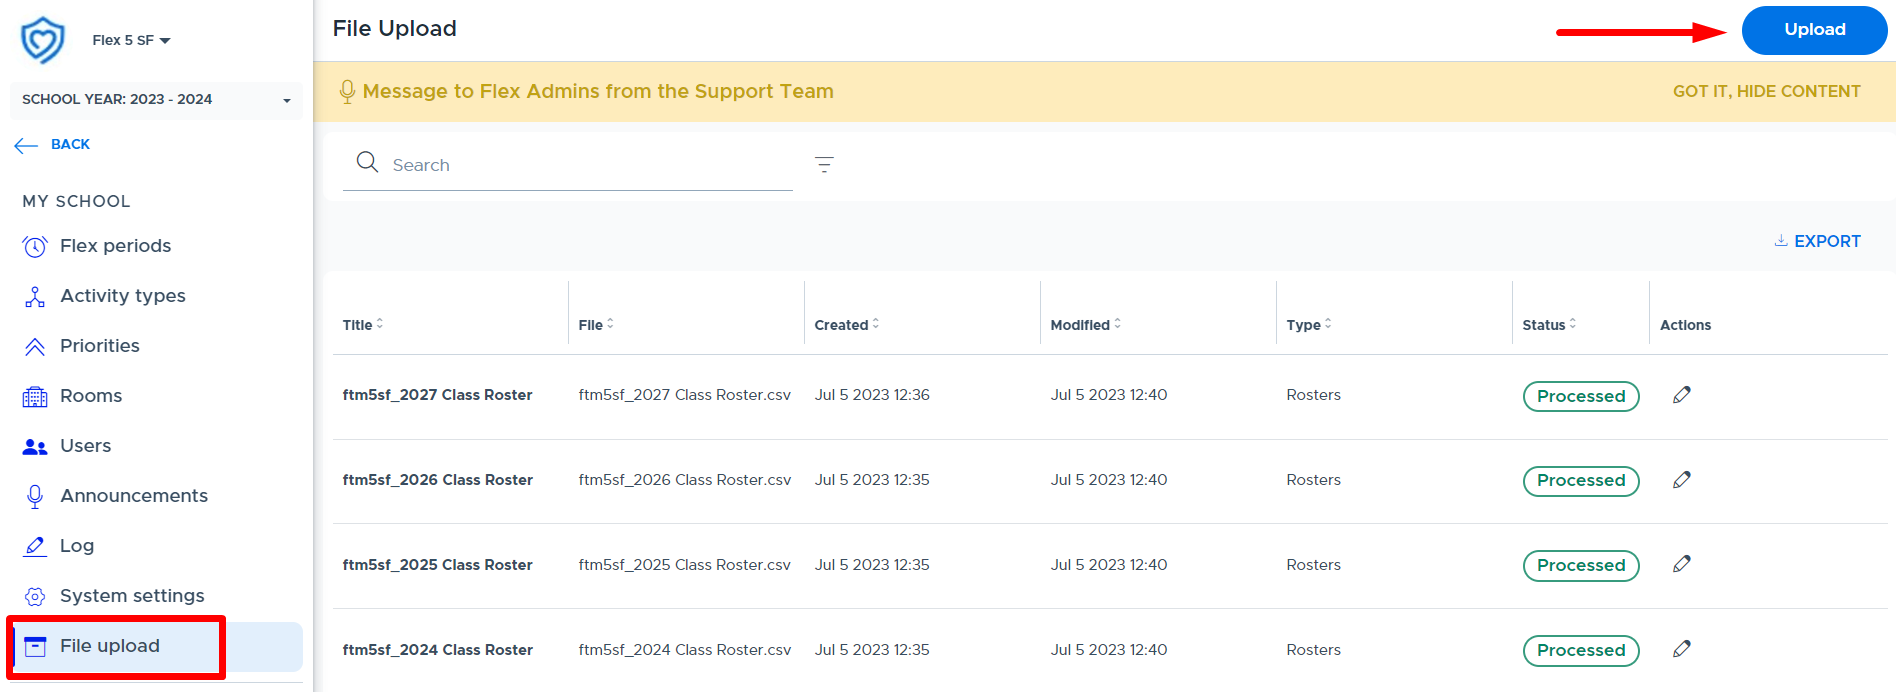
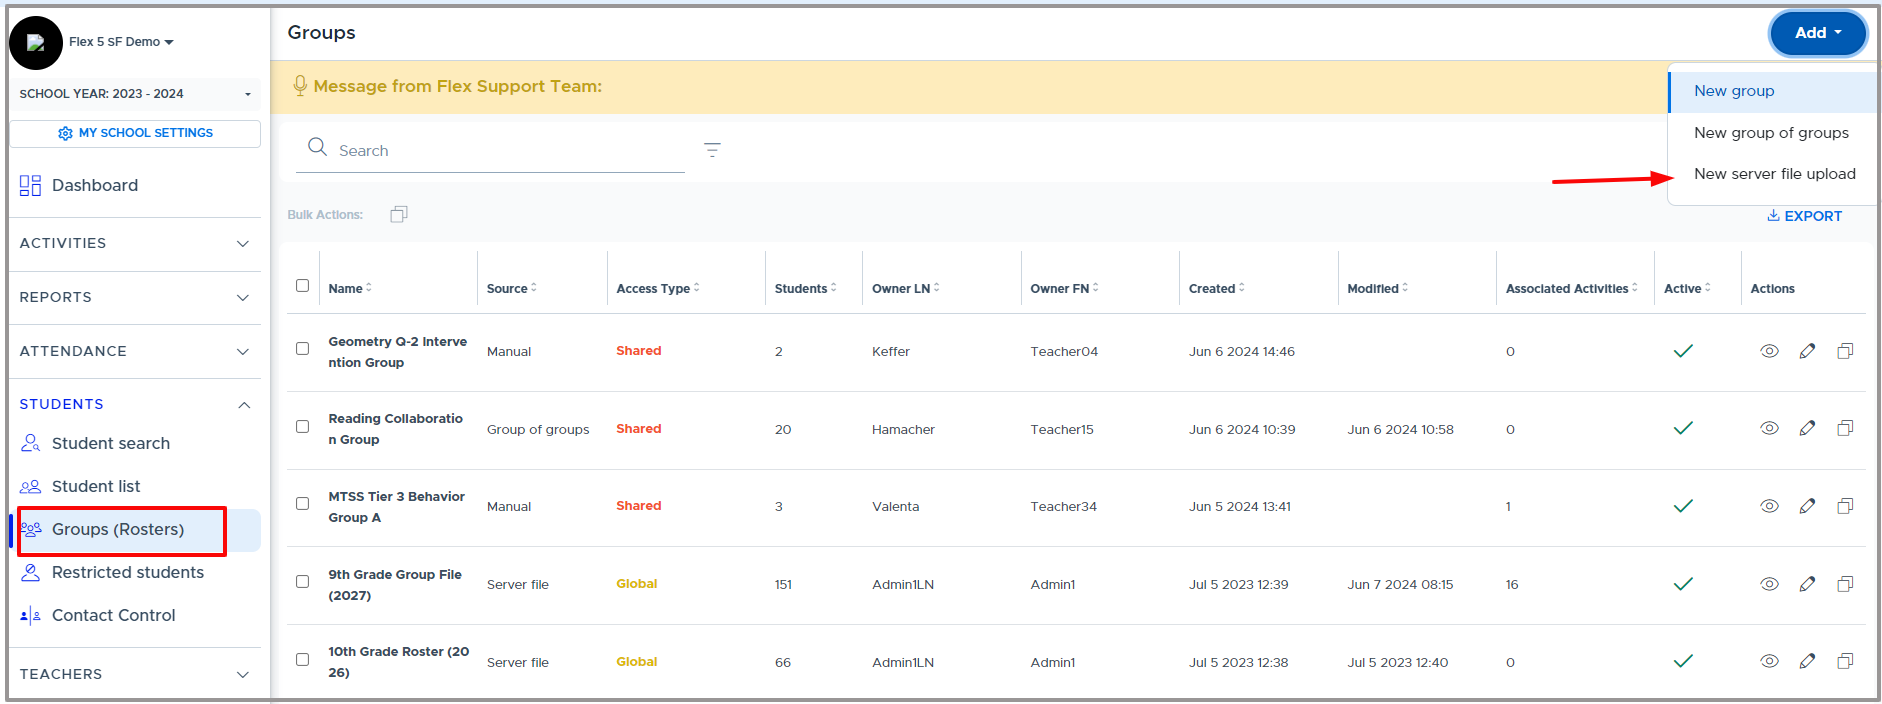
Once the file is uploaded and the status shows “processed”, which can be seen on the File Uploads screen, you should see EACH group from your file listed on the Students > Groups (Rosters) screen. (It may take some time for all of the students to populate the new groups. This can also depend on the number of groups included in your file.)
When updates are needed, it’s best to make the adjustment in the file and upload the same file using the same name. If you edit Group names, it will create a new Group in Flex.
Besides the file format, the difference between a bulk group file and an individual group file is that once uploaded - the bulk group files are already set up in the “Groups (Rosters)” screen. Individual group files still need to be attached to a group in Flex. Sometimes due to file formatting, single group files are easier for district IT to create.
Restricted Students
Admins, Staff, and Teachers who run Flex activities can temporarily restrict a student from attending their “choice” activities. Adults have the option to set a restriction for 1-4 weeks.
- Here are two videos that provide details about Student Restrictions:
- How to Set up Student Restrictions (All Adults)
- Student Restriction Settings (Admins Only)
Admin Settings
Please see the Student Restriction section of this guide for details about the admin settings and options related to restrictions.
“Principal” Designation for Admins
In order for an admin to see all student restrictions, related comments, and receive related notifications, they must be designated as a "Principal" in their user record.
- This is designed to help minimize the notifications going to all admin-role users in the system and help target only those admins with disciplinary responsibilities to receive notifications about student restrictions.
- Below is where the “Principal” designation can be turned on for a Flex admin. (This is on the My School Settings > Users screen.)
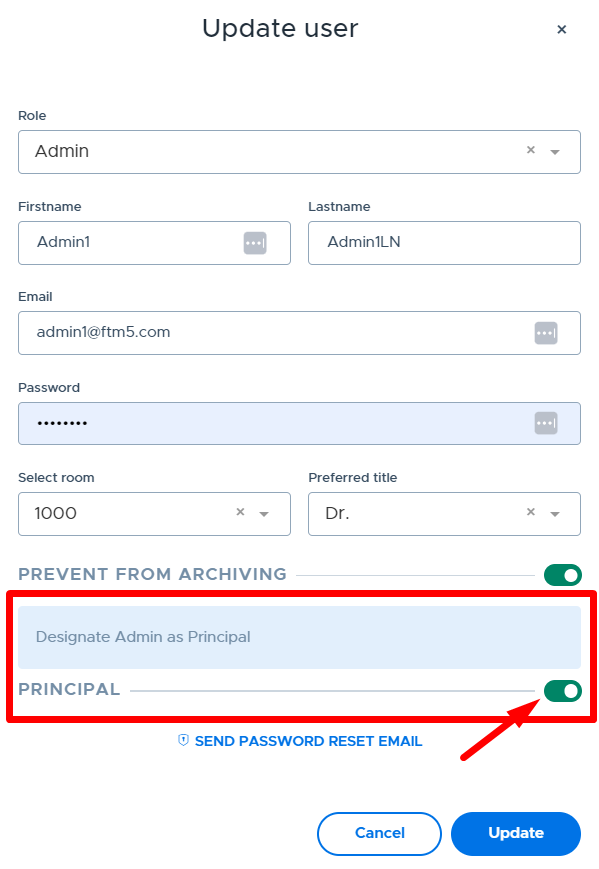
Creating & Managing Restrictions
Below is the adult’s “Restricted Students” screen. From this screen, adults can set up a “New Restriction” for their choice activities, view & manage restrictions they have imposed, and admins (who are designated as “Principals”) can see details about all Student Restrictions.
Principals and the adult who set the restriction can view and add notes/comments to the restriction from this screen. They can also lift the restriction early if desired. An active green circle will appear in the “Active” column if the restriction is currently being applied.
- Tip: Admins who manage behavioral referrals from a teacher can simulate the teacher and set up the restriction on behalf of the teacher as part of the consequence for the referral.
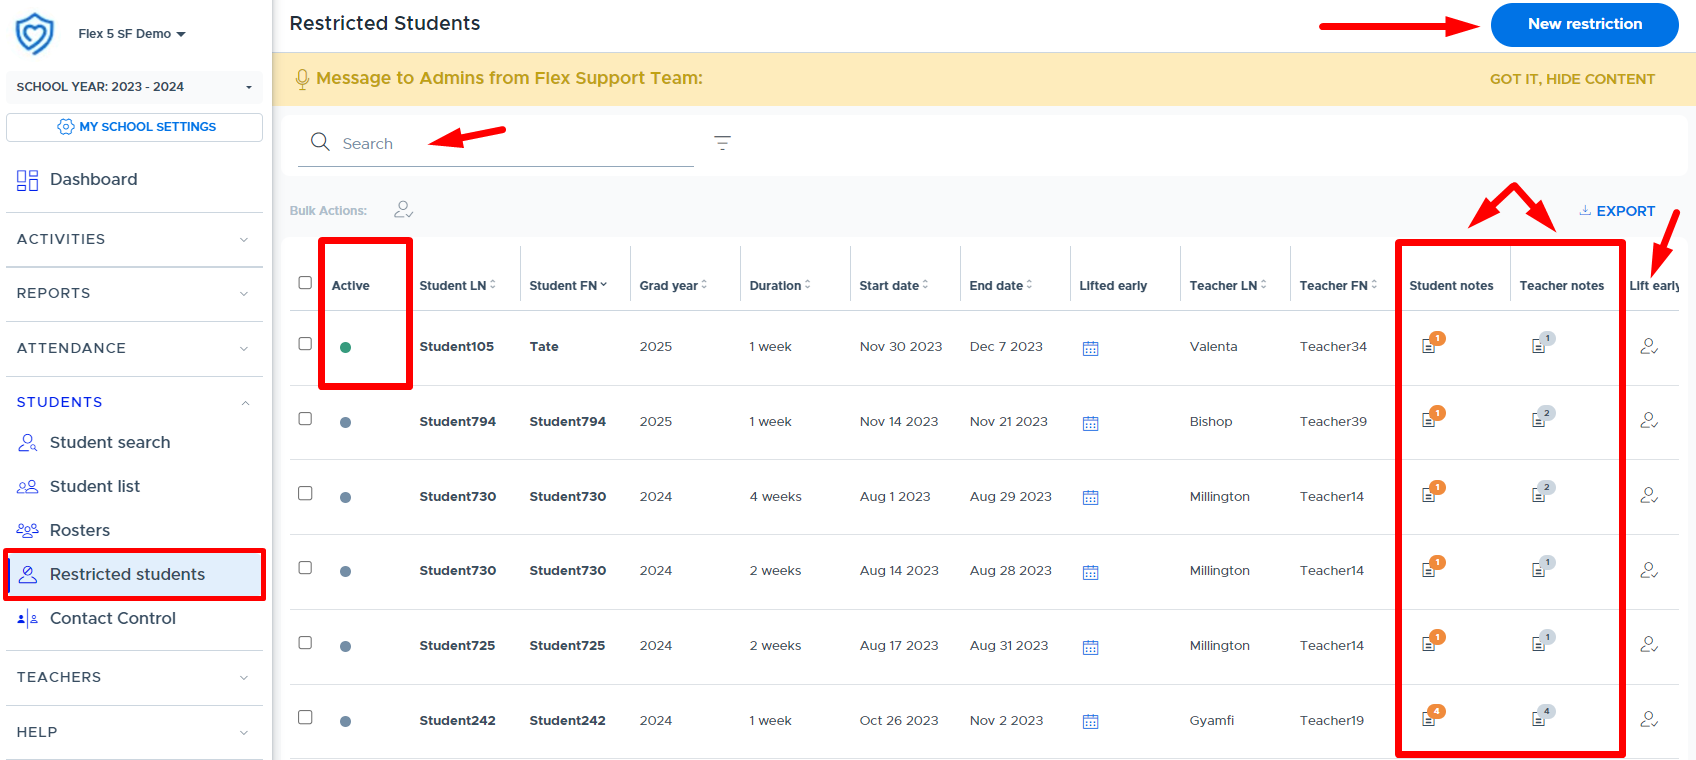
Below are some additional screenshots showing the notes/comments options related to Restrictions.
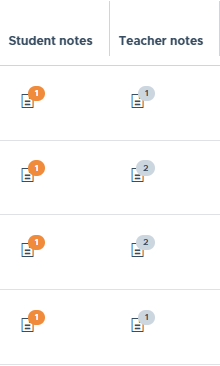
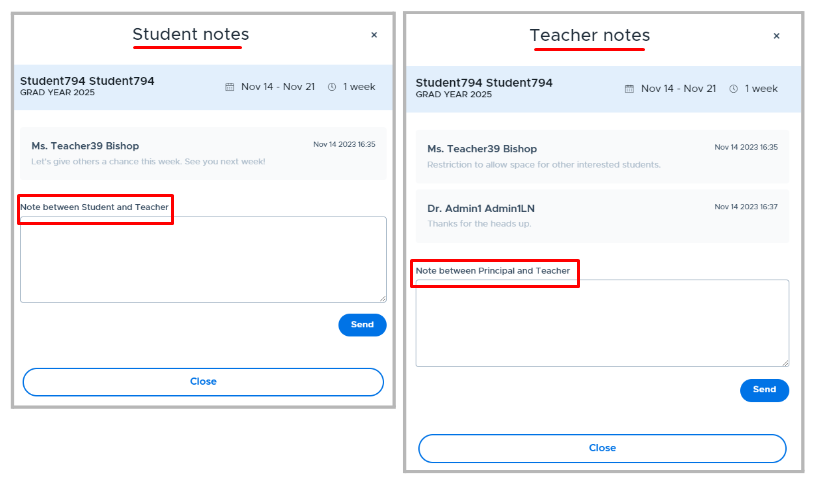
Restriction Notifications & Messages
When an adult sets a student restriction, a system “in-app” notification will be sent to the student to let them know about the restriction. The in-app notification will put a number by the bell in the top right corner of the student’s Flex screen, as shown below. Students can click on the bell to see new in-app notifications.

Below is an example of the in-app notification that the student will receive when a restriction is imposed. The student can click “View Restriction” in order to see the details which are located on the student’s Flex profile screen. (This is where the student can add a note back to the adult.)

Student Profile Screen: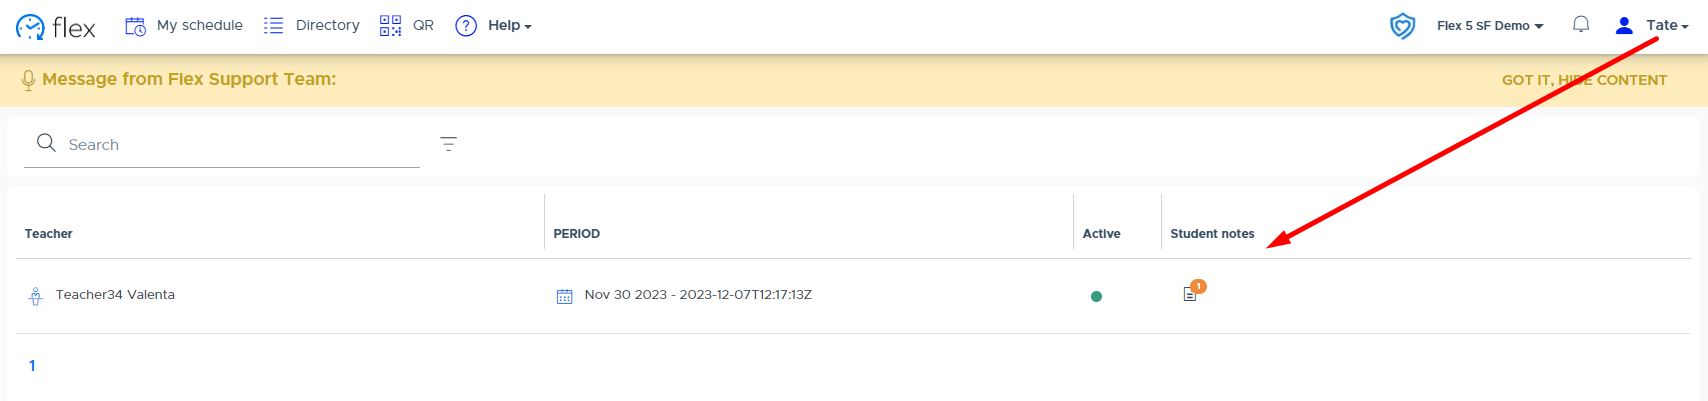
Below is an example of the adult in-app notification when a restriction comment has been added. The adult who imposed the restriction, designated “Principals”, and the restricted student will receive notifications when restriction comments are added that pertain to them.

The tables below show the “trigger” events related to student restrictions that prompt a system in-app notification:
Restriction Notifications for Students:
Trigger Event | Description |
|---|---|
Restriction Imposed | Notification will be sent to a student when an adult sets a restriction on them. |
Restriction Lifted | Notification will be sent to a student when an adult removes a restriction early. |
Restriction Comment Added | Notification will be sent to a student when the adult, who imposed the restriction, or a “principal” adds a comment to the restriction for the student. |
Restriction Notifications for Adults:
Trigger Event | Description |
|---|---|
Restricting teacher/adult adds a comment for the student | When an adult sets a student restriction and adds a comment in the “Note to Student” field or replies back to a student comment, the student and all “Principals” will receive a notification. |
Restricting teacher/adult adds a comment for the “Principal” | When an adult sets a student restriction and adds a comment in the “Note to Principal” field or replies back to a comment, all “Principals” will receive a notification. |
Restricted student adds a comment for teacher/adults | When a restricted student adds a comment for the adult who restricted them, the adult who set the restriction & all “Principals" will receive a notification. |
“Principal” adds a comment to a restriction | When a “Principal” adds a comment for the adult who set the restriction, the adult who set the restriction and all “Principals” will receive a notification. If a “Principal” adds a comment for the restricted student, the restricted student and the adult who set the restriction will receive a notification. (All principals do not.) |
Student View of Restrictions
Lastly, when a student attempts to join an activity in which they have been restricted, they will see the following message appear on their Flex screen:
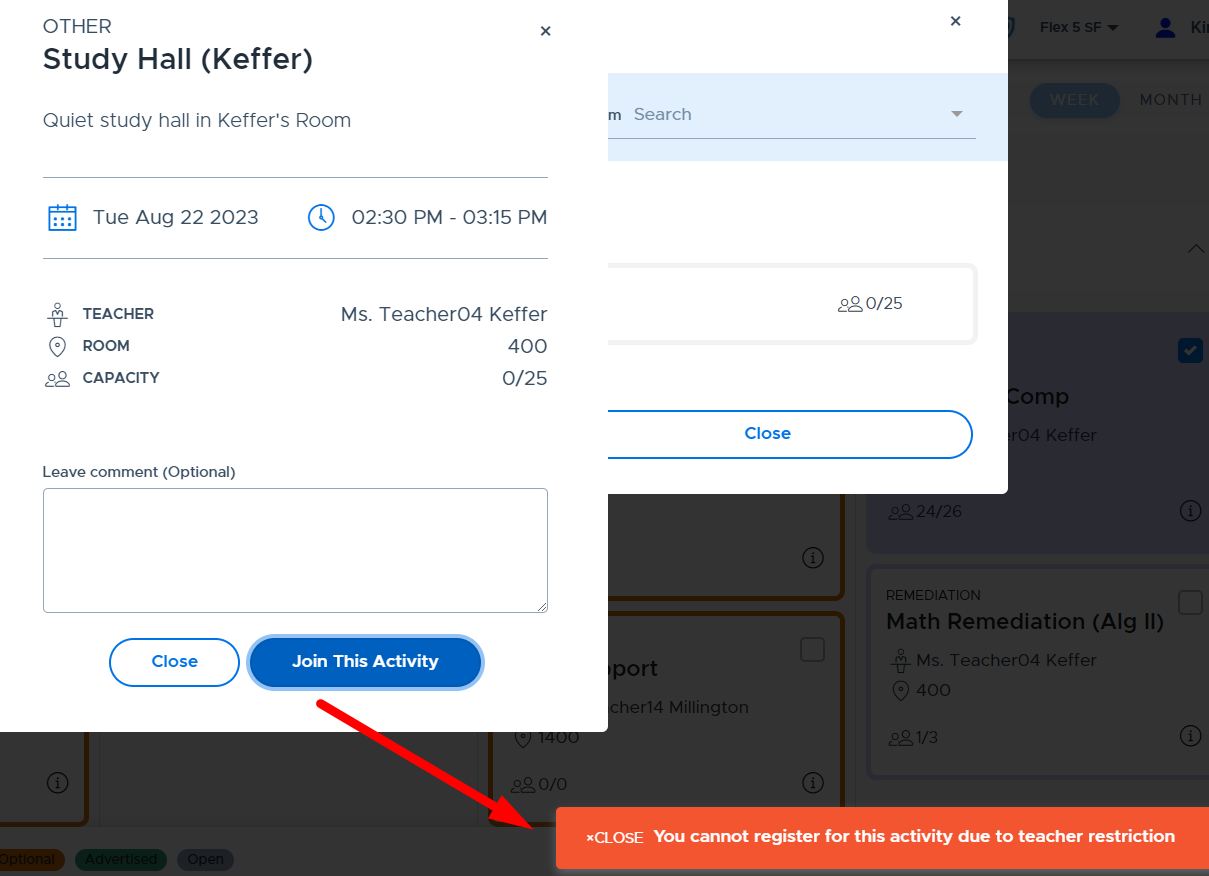
The student can see information about their restriction(s) by going to their Flex “Profile”, which is shown below. From the Profile screen, the student can click “See all” to see details about their past/present restrictions and comment back to the teacher, if desired.
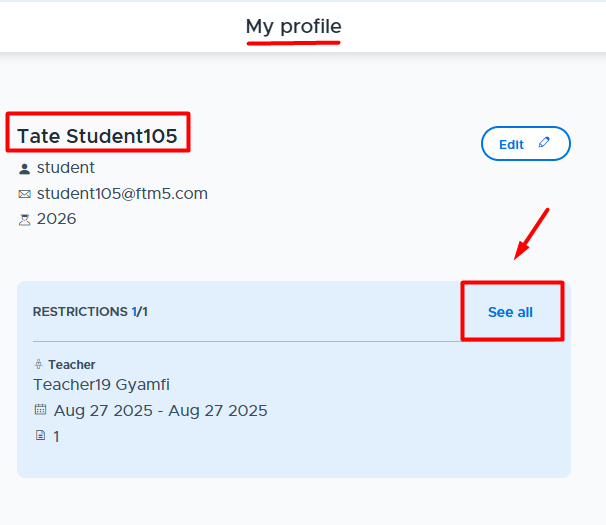
The student must click on the “Notes” column to see the notes from the teacher and respond if they desire.
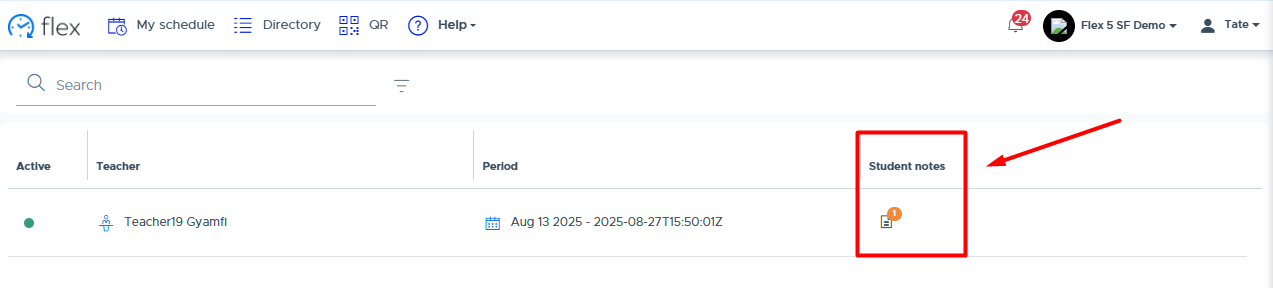
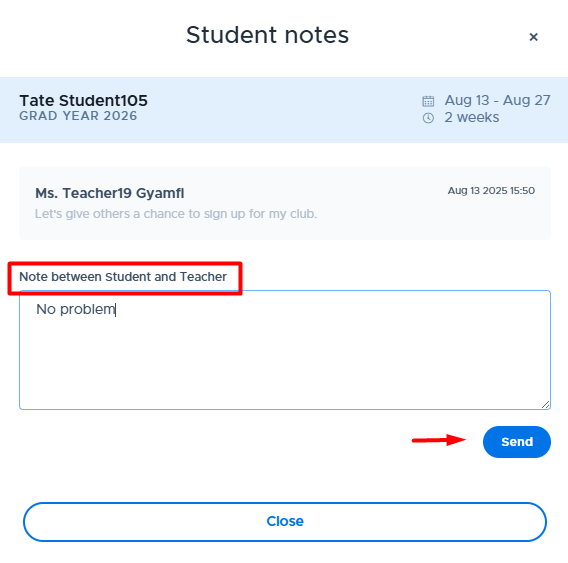
If the admin has the restriction setting toggled “off”, so that an adult cannot set a restriction without the student being present in one of their activities in the last 3 days, the teacher will receive the following message when trying to restrict a student they have not marked as present recently.
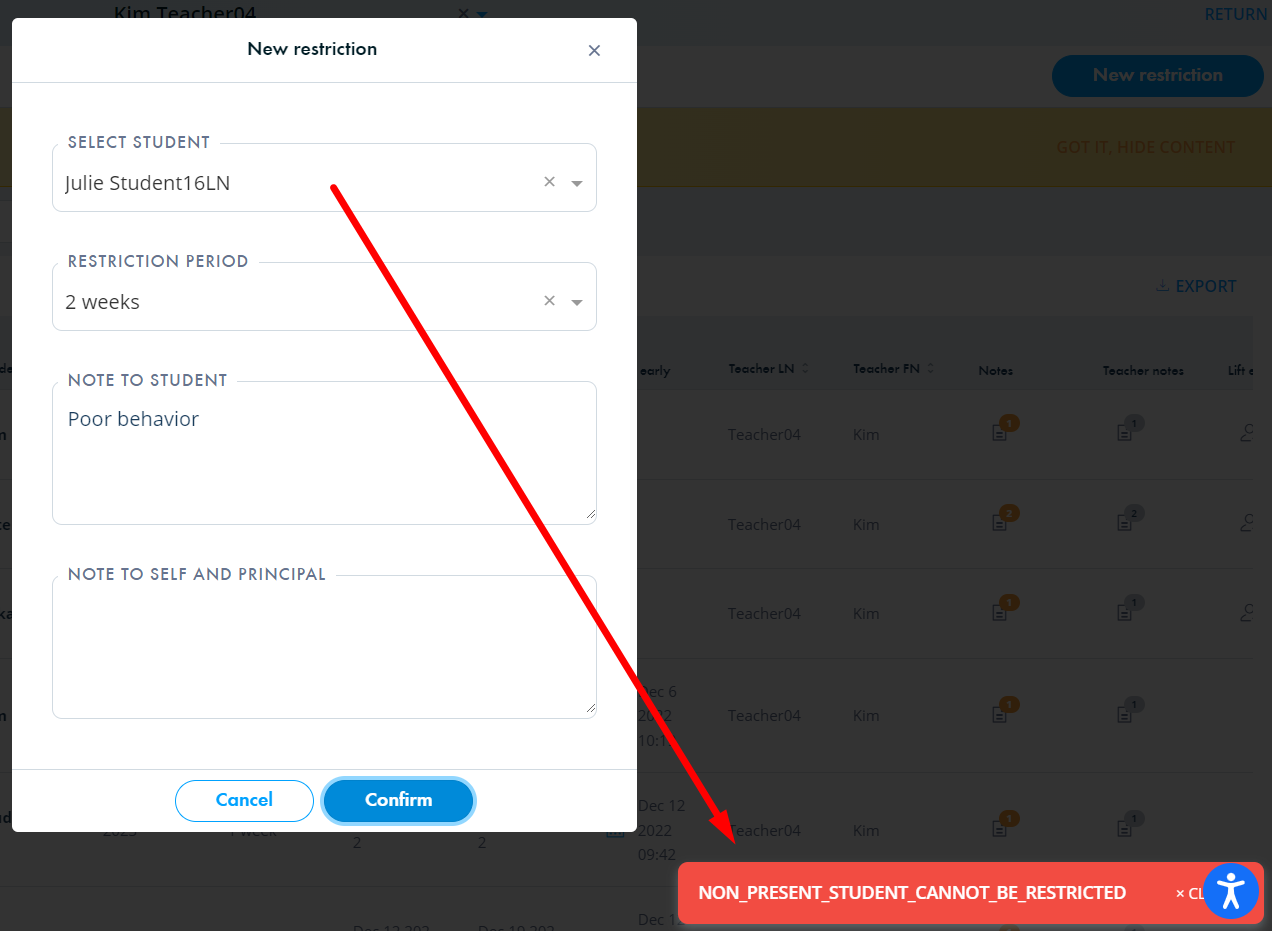
Preference List
This “Preference List” menu is available to all adults (only in schools using Autoassign) and will show the contents of the “Preference List” file that your school has uploaded and linked to your flex period(s). Some schools may have a blank Preference List and will not see any student/teacher pairings because of this.
This screen allows adults to view and manage the student/teacher pairings that the autoassign algorithm uses. This includes adding new records, removing records, and adjusting the priority or “weight” given to a particular student/teacher pairing for Autoassign purposes.
Below is the “Preference List” screen in Flex, which is located under the Students menu.
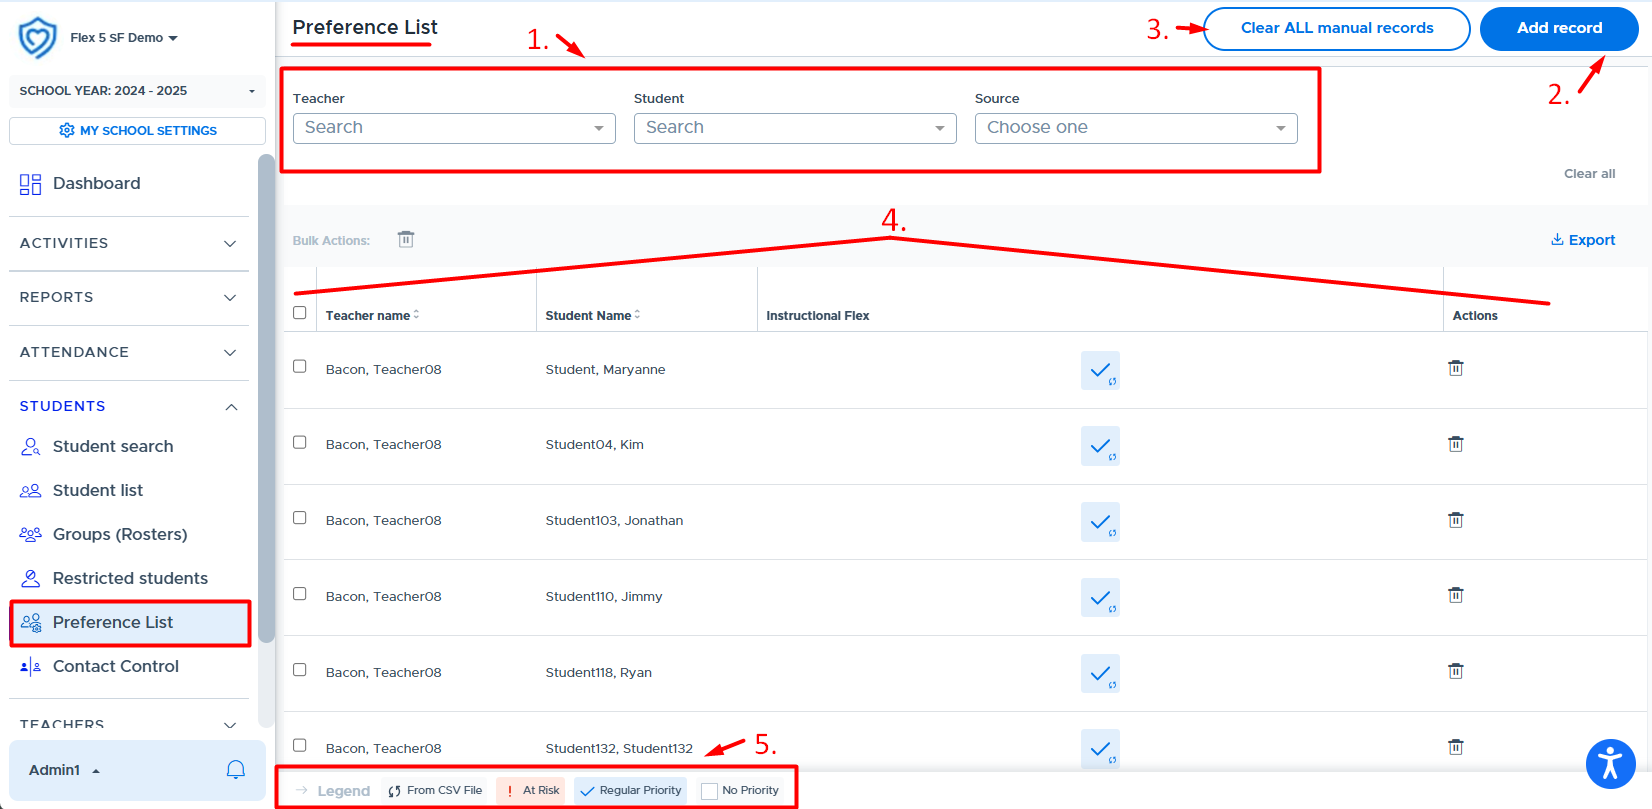
This screen consists of the following:
- Filter search options: Teacher, Student, and Source (manual or file)
- Add record: Used to add a new “manual” student/teacher pairing to the Preference List.
- Clear ALL manual records: Used to remove “manual” pairings across all flex periods and preference lists.
- Admins & Staff have access to remove ALL “manual” pairings by clicking this button.
- Teachers can only remove their own “manual” pairings by clicking this button.
- The delete/bulk delete action can also be used to remove selected pairings, both manual and from a CSV file.
- Main Screen:
- Teacher name / Student name: Last Name, First Name
- Flex Period(s): All active flex periods enabled with Autoassign will appear here and list the student/teacher pairings from the linked Preference List.
- Priority Box: For each pairing and flex period, a “priority” can be designated that will be used when the Autoassign algorithm runs. (See below “Legend” section for more details.)
- This box will also include a symbol showing if the pairing was added to the Preference List from a CSV file upload. If the symbol is not there, the pairing was added manually.
- Actions: Delete icon which can be used to remove a pairing.
- There is also a “bulk delete” option if multiple selections are made.
- Legend:
| This symbol means the pairing was added to the Preference List from a CSV file upload. |
|---|---|
| When a student is marked “At Risk” their weighting is elevated in the Autoassign algorithm to increase their chances of being placed with the teacher to whom they are paired. (Typically, marking a student "At Risk" will not elevate them above placement in an Optional activity where they are in the linked Group.) |
| This is the default ‘priority’ or weight given to a student placement when the Autoassign algorithm runs. (All students included on a CSV file Preference List will default to this priority.) |
| Selecting this option removes the pairing from the Preference List. (It can be re-added manually or by uploading a file that includes the pairing.) |


How to Add a Record (Student/Teacher Pairing)
To add a manual pairing, follow the steps below.
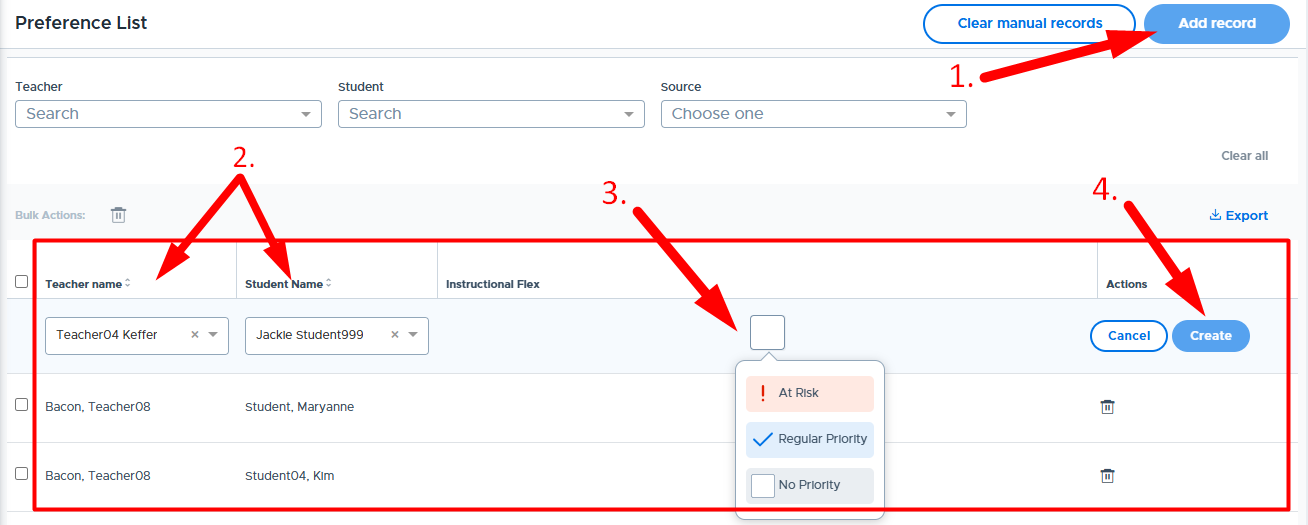
- Click “Add record”.
- Search and select the desired teacher and student.
- Select the desired priority: At Risk or Regular Priority (See table above for descriptions of each.)
- Note: No Priority is available here in case you need to use this option when managing multiple flex periods.
- Click “Create”.
- The green “Record added successfully” message should appear. (See example below.)
- New records will be displayed at the top of the list until the screen is refreshed.
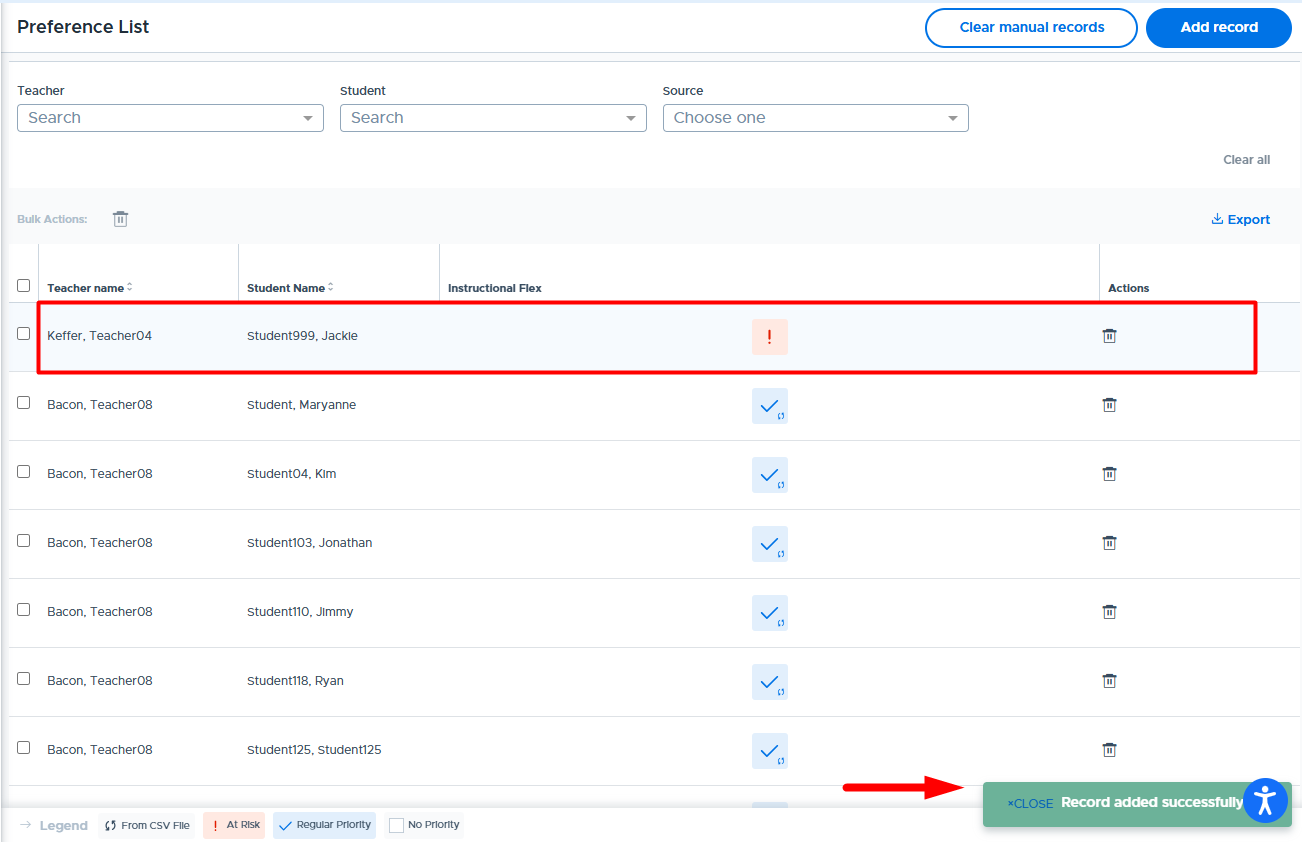
How to Change the Priority Weighting
To change the priority weighting on any student/teacher pairing, follow the steps below.
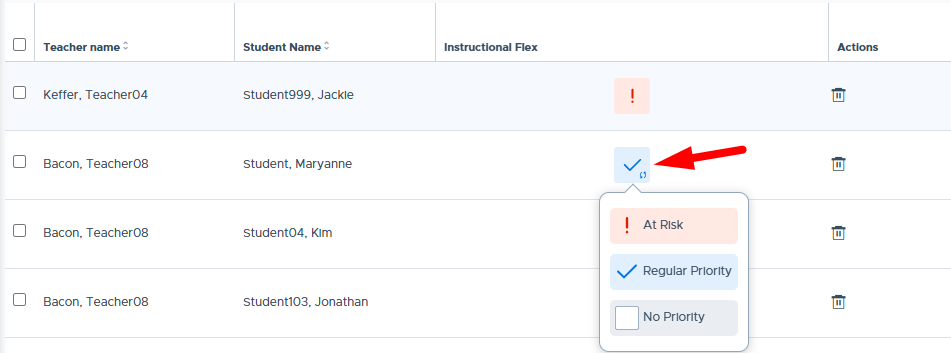
- Click the priority box for the desired record and select the new priority.
- It is also possible to doubleclick on this box to toggle to a different priority.
- Note: Selecting No Priority will remove the record from the Preference List.
- Once the new priority is selected the area will be highlighted in yellow, as shown below.
- Click “Save Changes” when done.
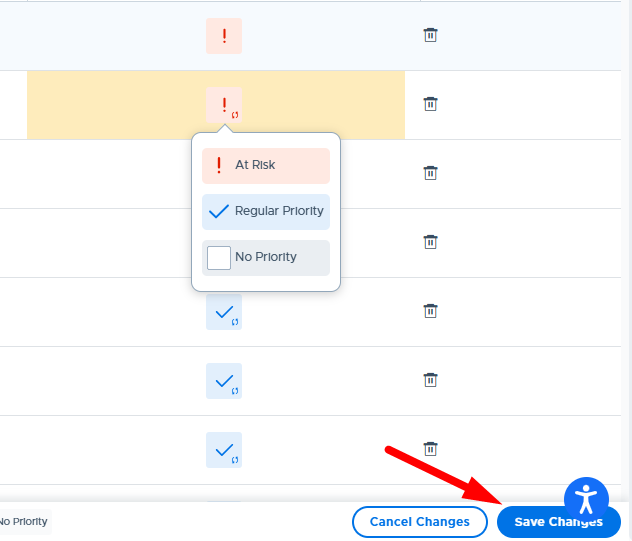
How to Remove Records
Removing or deleting records will remove the pairing from the Preference List, which means the Autoassign algorithm will no longer use this pairing as a “preference” when placing unassigned students into available seats. If an accidental removal takes place, the record can be added back manually or by reloading the Preference List CSV file. Below are the options for removing records from a Preference List.
Using the “Clear ALL manual records” Button
When an Admin or Staff role user clicks the “Clear ALL manual records” button, this will remove ALL “manual” pairings that have been added across ALL flex periods and Preference Lists. (This feature might be used at the beginning of the semester or quarter when grades reset.) Below is the message the user will receive:
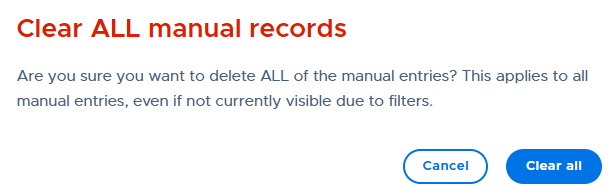
When a Teacher clicks the “Clear your manual records” button, this will remove ALL “manual” pairings that have been added that include them. (These will be removed across all flex periods and Preference Lists, if there are more than one.) Below is the message the user will receive:

If a filter search has been done, using Teacher, Student, and/or Source, the “Clear all manual records” button will still apply to ALL “manual” records, not just the ones being displayed based on the search.
*Please exercise caution when using this button*
Using Delete & Bulk Delete
It is possible to delete any record by using the Delete option in the “Actions” column or by selecting multiple records (using checkbox on left) and clicking the Bulk Actions Delete. (Note: Teachers can only delete records to which they are associated.)
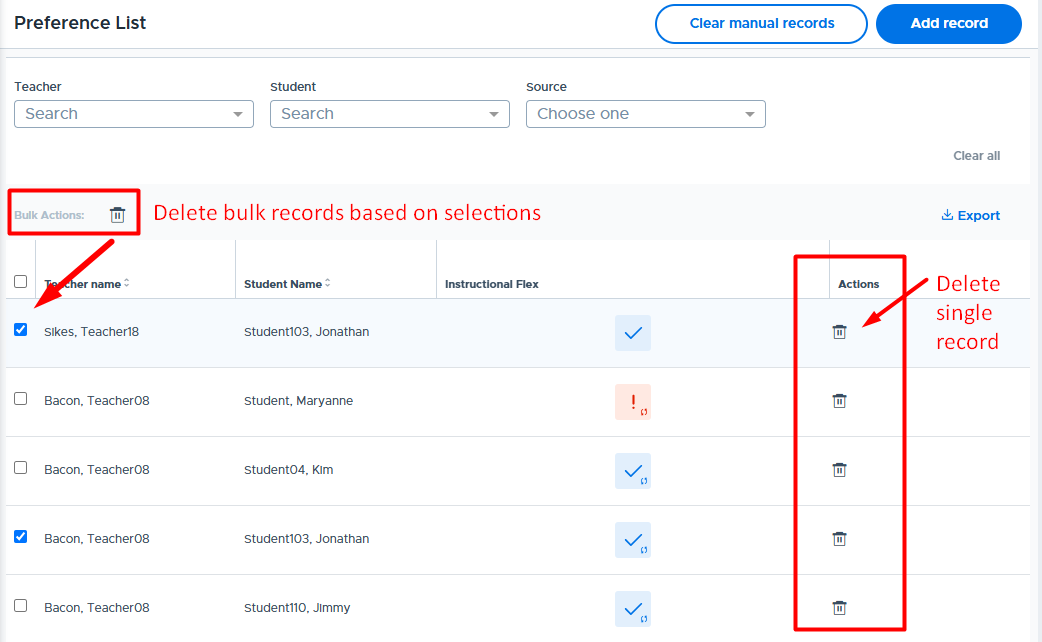
Uploading a New CSV File (Preference List)
If the current Preference List CSV file is replaced through uploading a new CSV file, the system will remove the student/teacher pairings from the old file and use the pairings in the new file. In other words, the new file overwrites the old file when linked and saved in the Flex Period settings.
- Any pairings that remain the same between the old and new file, and the priority weight was increased to “At Risk”, will keep this elevated status.
- “Manual” pairings will remain intact when there is a new file uploaded.
- If a record was manually added but then included on a CSV file upload, the record will be updated to show “From CSV File”.
- If a pairing was marked “No Priority” but included on a new file upload, this pairing will be added back.
- Note: Only Flex Admins can upload/reload a Preference List CSV file.
Preference List UI with Multiple Flex Periods
If your school runs multiple flex periods, all periods that have “Autoassign” enabled for catchall will be displayed on the Preference List screen. As you can see below, it is possible to have different priority designations in each flex period for the same student/teacher pairing.
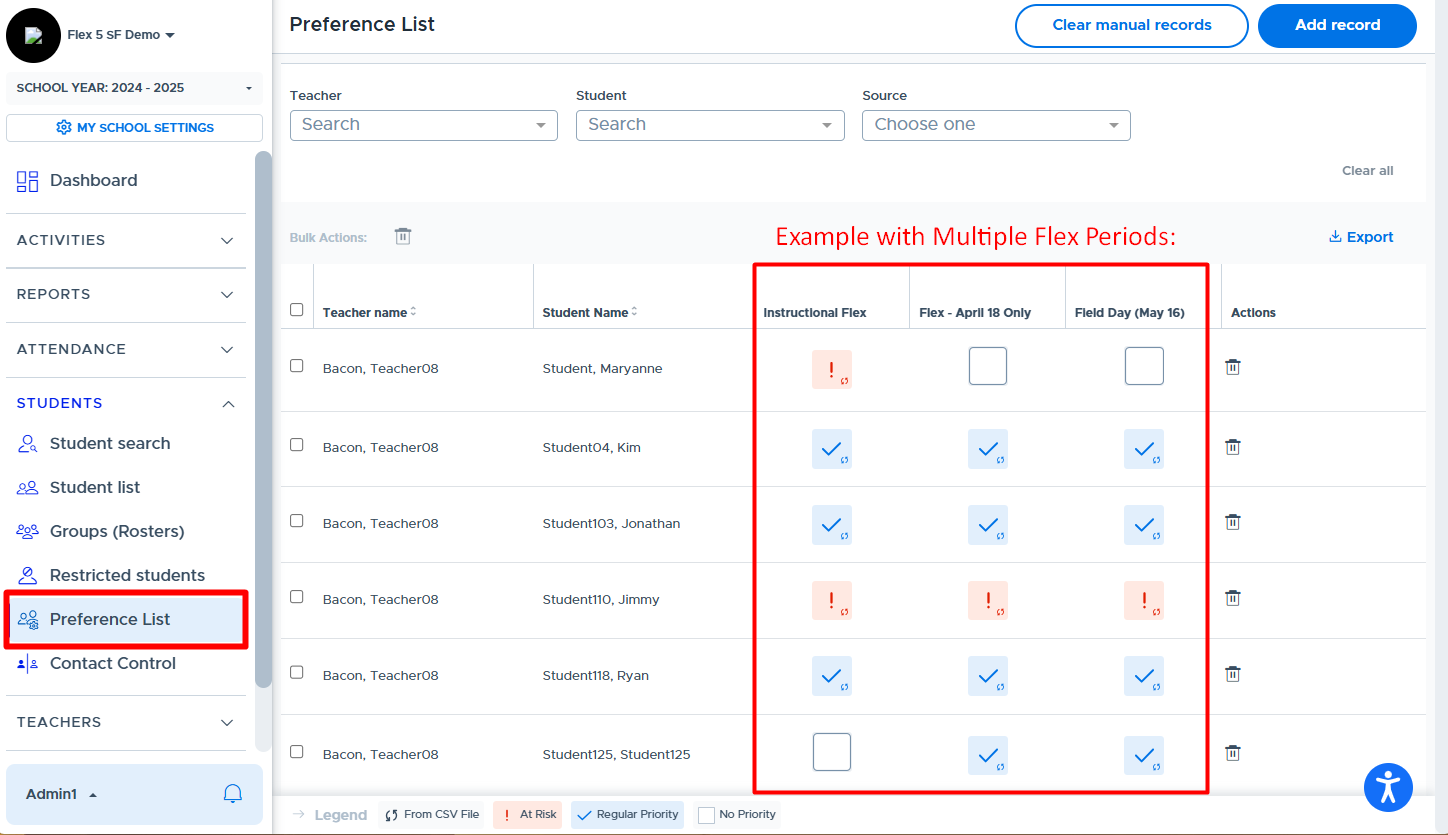
Contact Control
The Contact Control feature in Flex is designed to provide Admins with the ability to block pairs of students from registering for the same “choice” activity during Flex. This might be used in bullying situations, to hinder a romantic pair from meeting up, or to aid in keeping students apart who have a no-contact contract.
Currently, this feature only blocks pairs of students from registering for Open, Advertised, and Optional activities (ie. choice activities). It does not block them from being added to mandatory activities by a teacher.
- Here is a video that provides an overview: Contact Control (Blocking 2 Students)
To set up a Contact Control pairing, follow these steps:
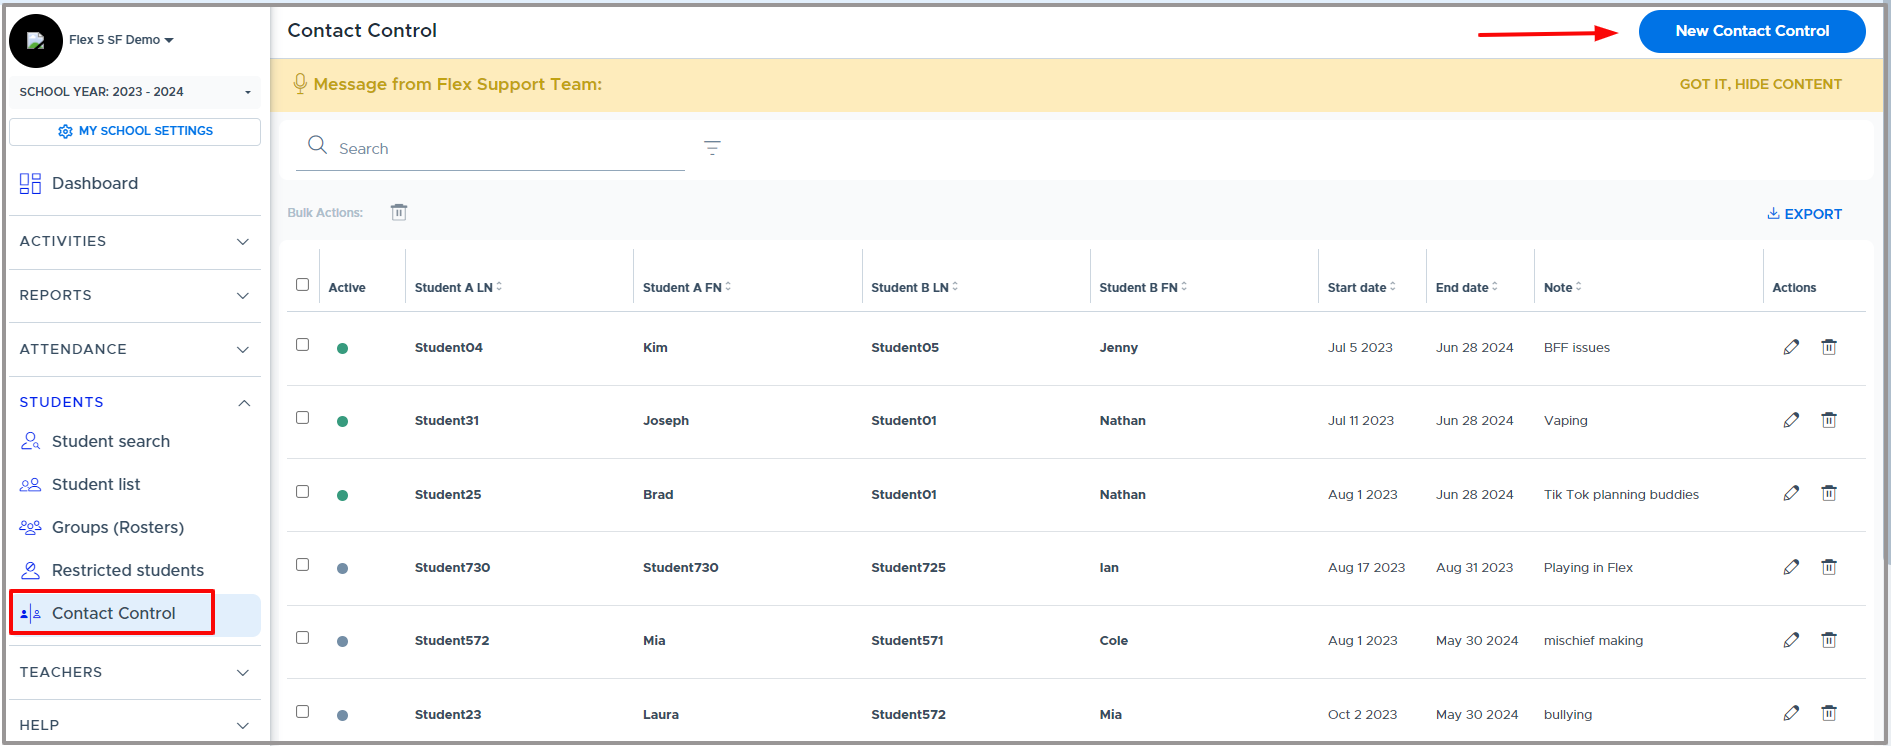
- Search/enter the two students' names, the Start and End dates, and a Note, if desired. (This is for your internal documentation only - and is not visible to teachers or students.)
- Click “Add”.
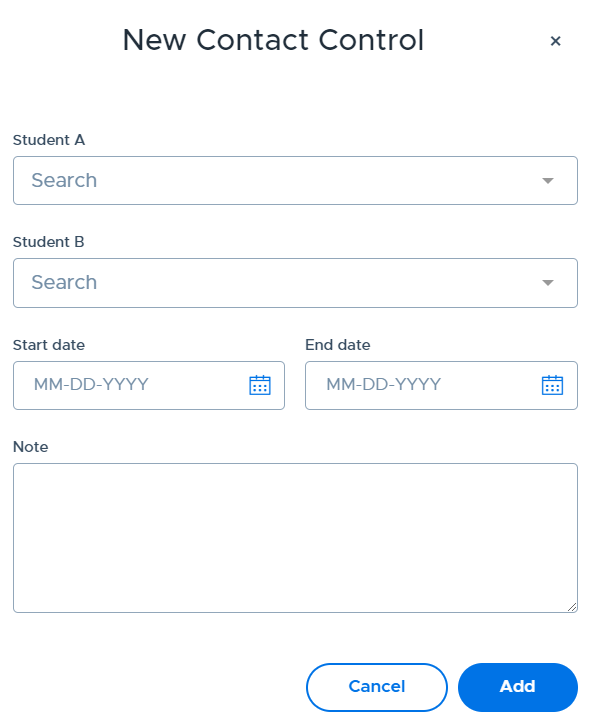
The Contact Control pair will appear on the main Contact Control screen, as shown below.
Click the pencil to edit and the trash can to delete, which can be found under the “Actions” column.
When deleting a Contact Control, it will remove all records of the block. If you would like to keep the documentation, simply adjust the end date to today or yesterday. That will stop the block but keep the record.
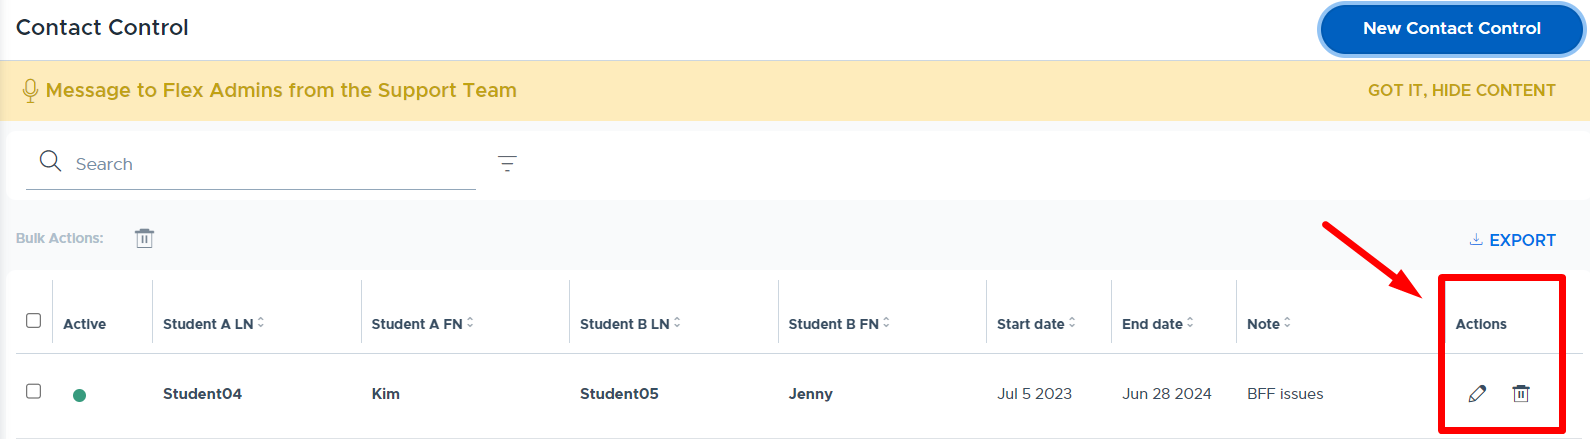
Below is an example of what this will look like in the system for each student who has been included in the Contact Control pairing.
- Student A has joined “Open Office Hours” on Tuesday.
- The next image shows what happens when the Contact Control partner (Student B) tries to sign up for the same choice activity. The second student (B) will receive the red message shown below, if their Contact Control partner is already registered for that activity.
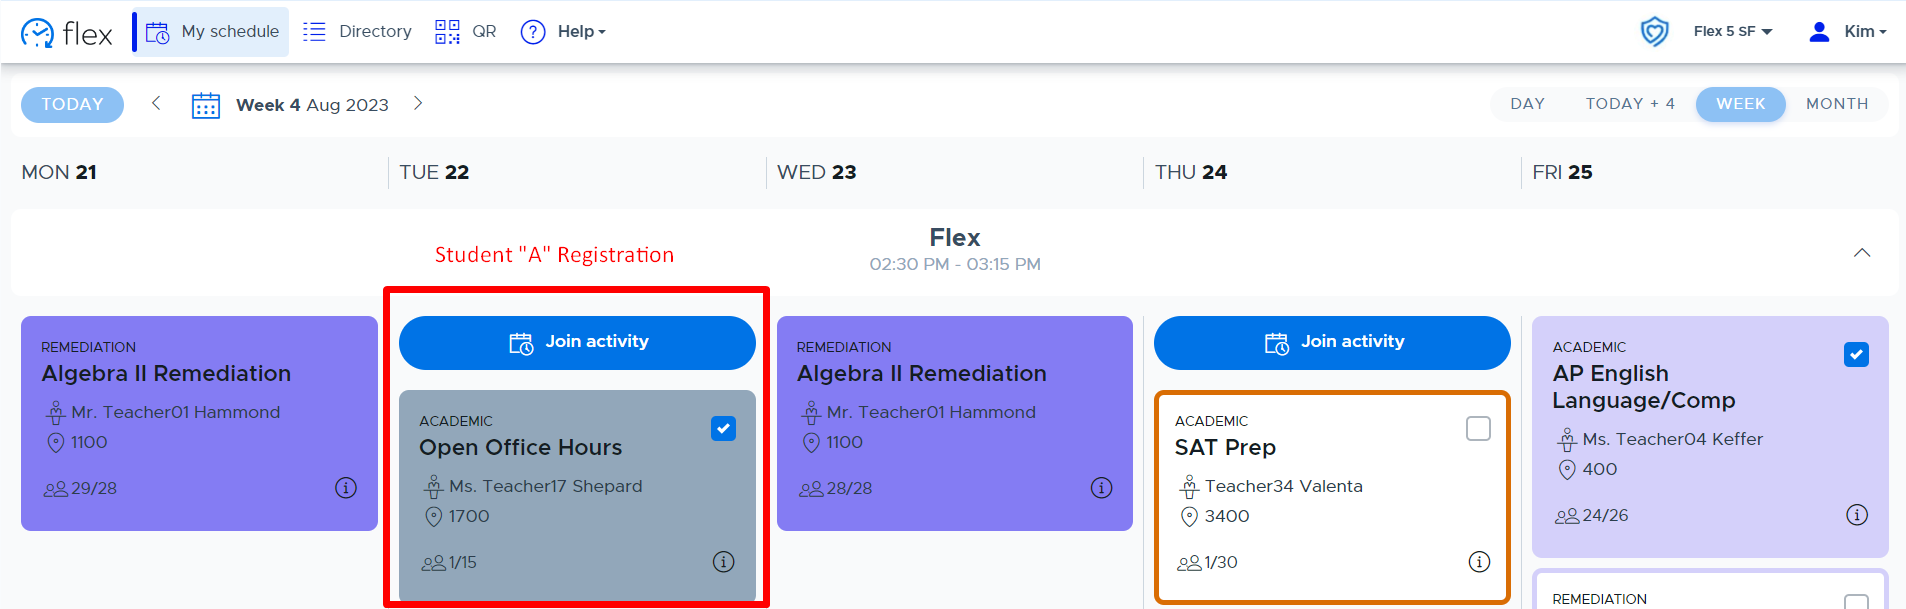
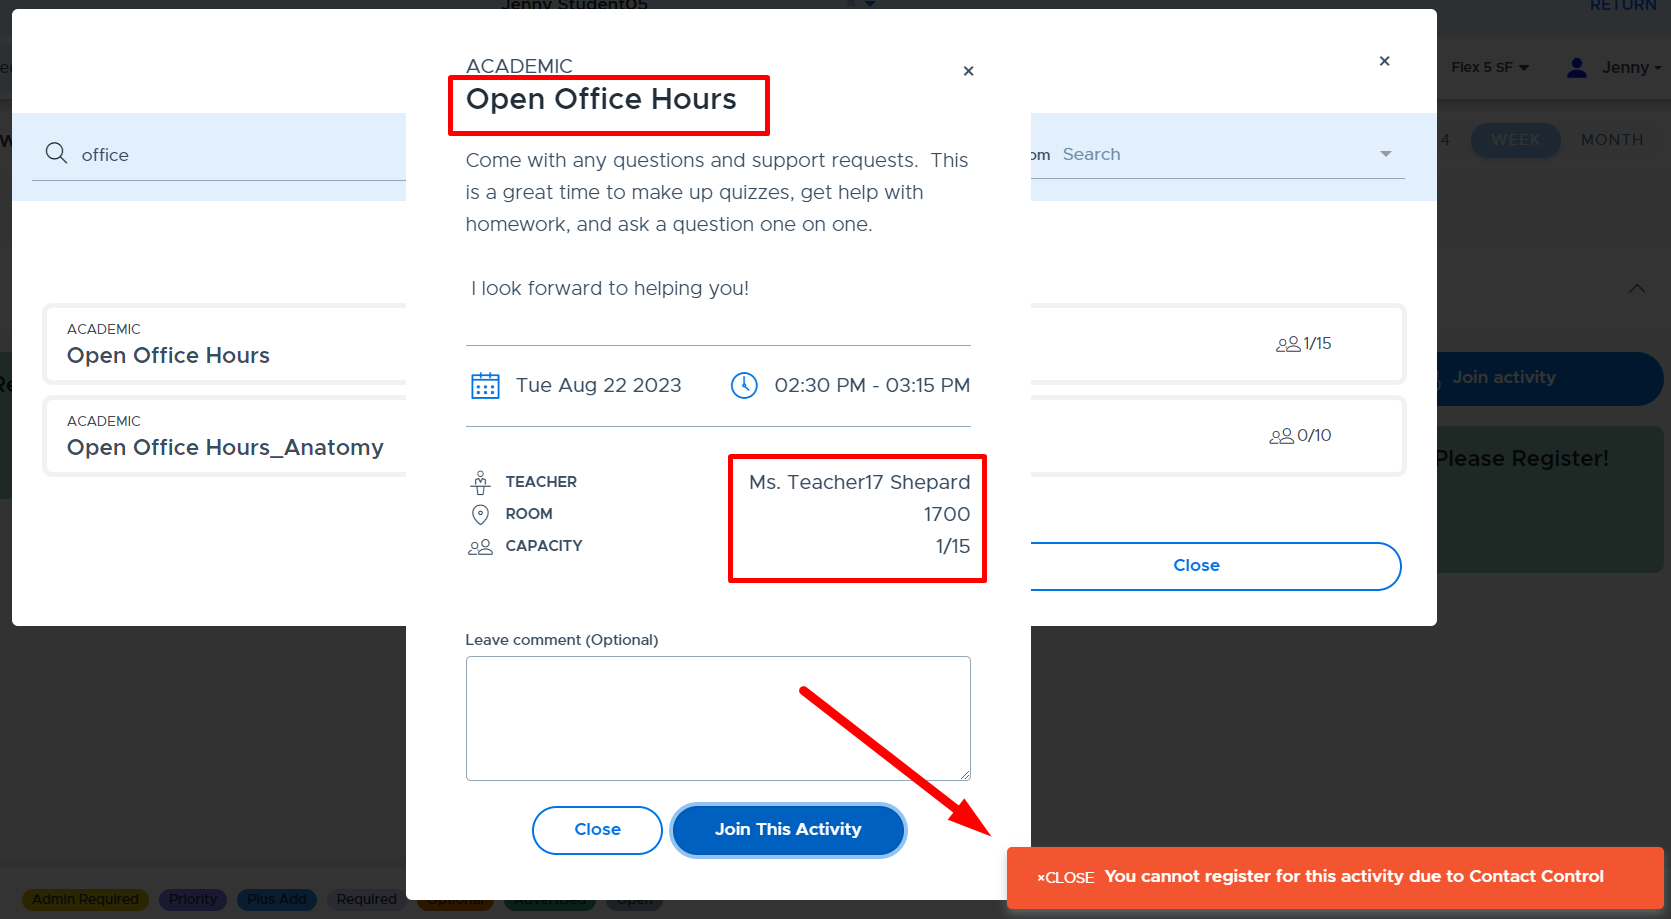
TEACHERS
Teacher List
The “Teacher List” screen provides a list of all active “teachers” in the Flex system. This list does not include adults with the admin or staff role in Flex. Only admin users have access to this list. The screenshot below shows what is displayed for each teacher. It is possible to search and export this list. (Note: The format of the exported file does not match the required format for the “CSV user file” upload.)
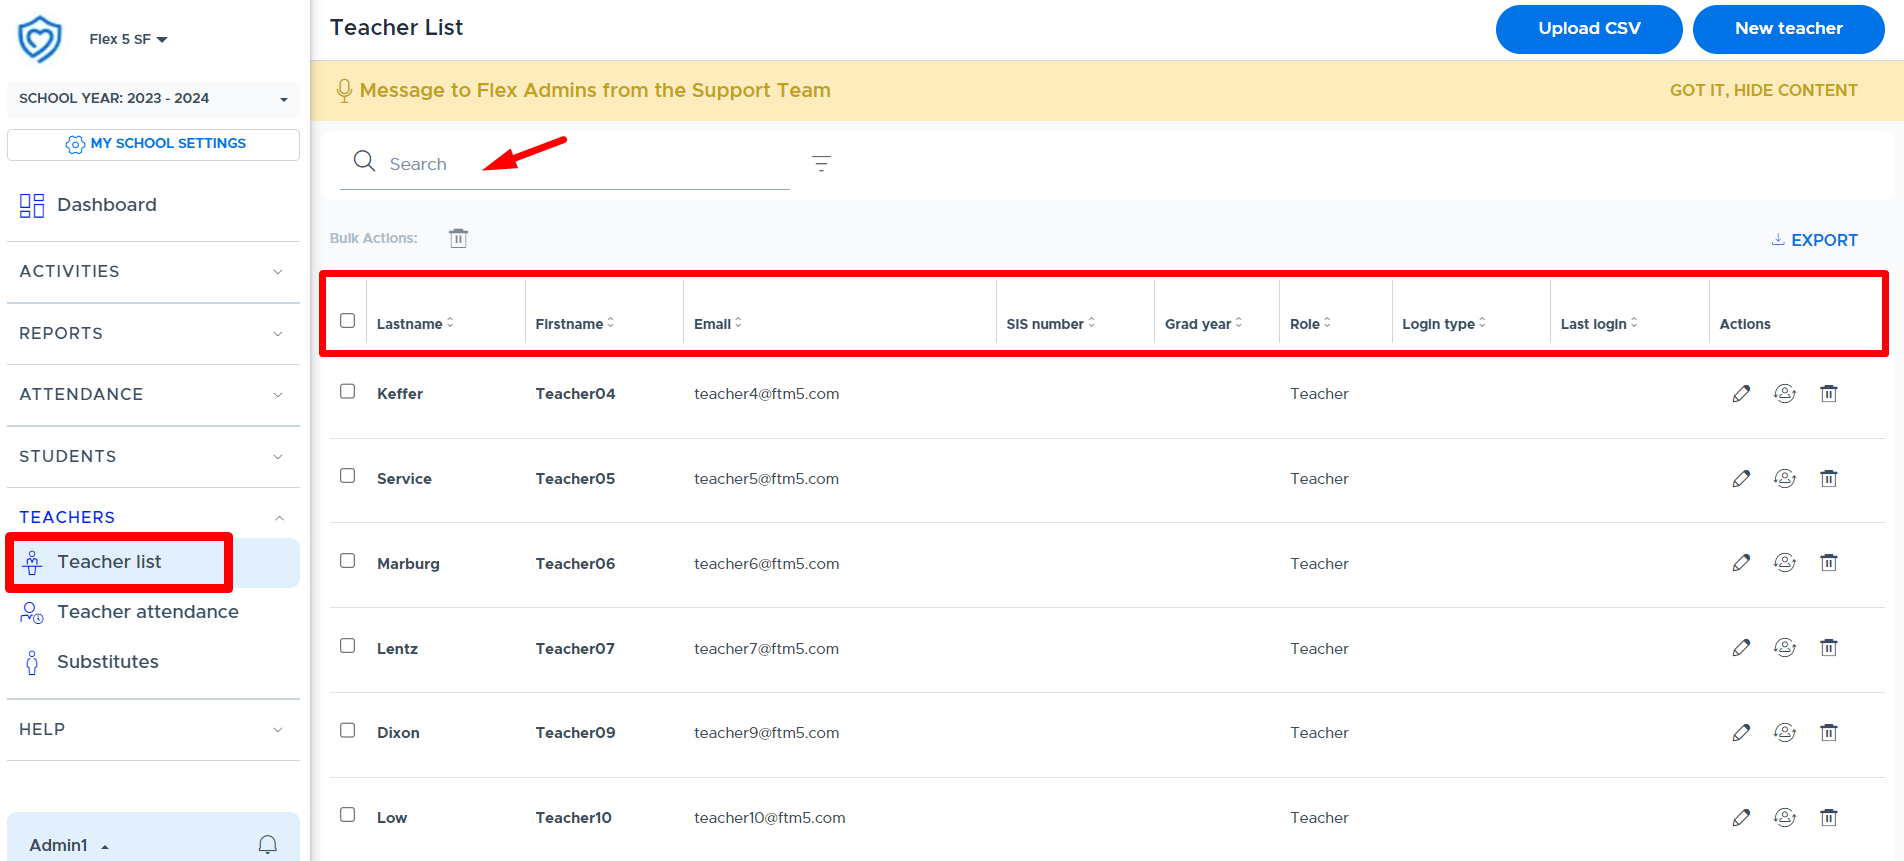
Admins can also do the following from this screen using the buttons in the “Status” and “Actions” columns, shown below.
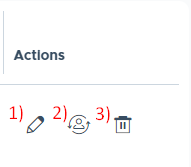
- Pencil / Edit Icon: Use the edit icon to access user details and make edits as necessary. Please keep in mind that if the user you are editing is part of a 3rd party sync, edits you make to fields other than the “Role” , will be overwritten the next time the system syncs. If your school provisions users via CSV user file, the edit must also be made in the file or it will be overwritten with the next file upload.
- Simulate Icon: An admin can simulate a teacher by clicking this simulate icon. This will take the admin into the teacher’s Flex system.
- Trash Can (Archive): It is possible to “archive” or remove a teacher from the system using the trash can icon. Please see the "Removing (Archiving) Users" section of this guide for more details.
Teacher Attendance / Substitutes
There are several different options for addressing Substitute Teachers.
The Flex system provides functionality to give a Substitute Teacher temporary access to the system in order to take attendance for an activity originally scheduled by the absent Teacher. Below are detailed instructions that review this process and videos that review and demonstrate this process. In addition, there is an instructional video for Substitutes that guide them through logging into Flex and taking attendance. Please feel free to share this with your substitutes.
- Overview for Flex Admins - Substitute Process Overview
- Video for Substitutes - Instructions for Taking Attendance
To start the process, an Admin (or Staff user) will need to select Teachers >Teacher Attendance from the menu. On the day of the Flex, before cutoff, select or check mark each Teacher that is absent that day, as shown below. Then click the “Submit Attendance” button in the bottom right corner.
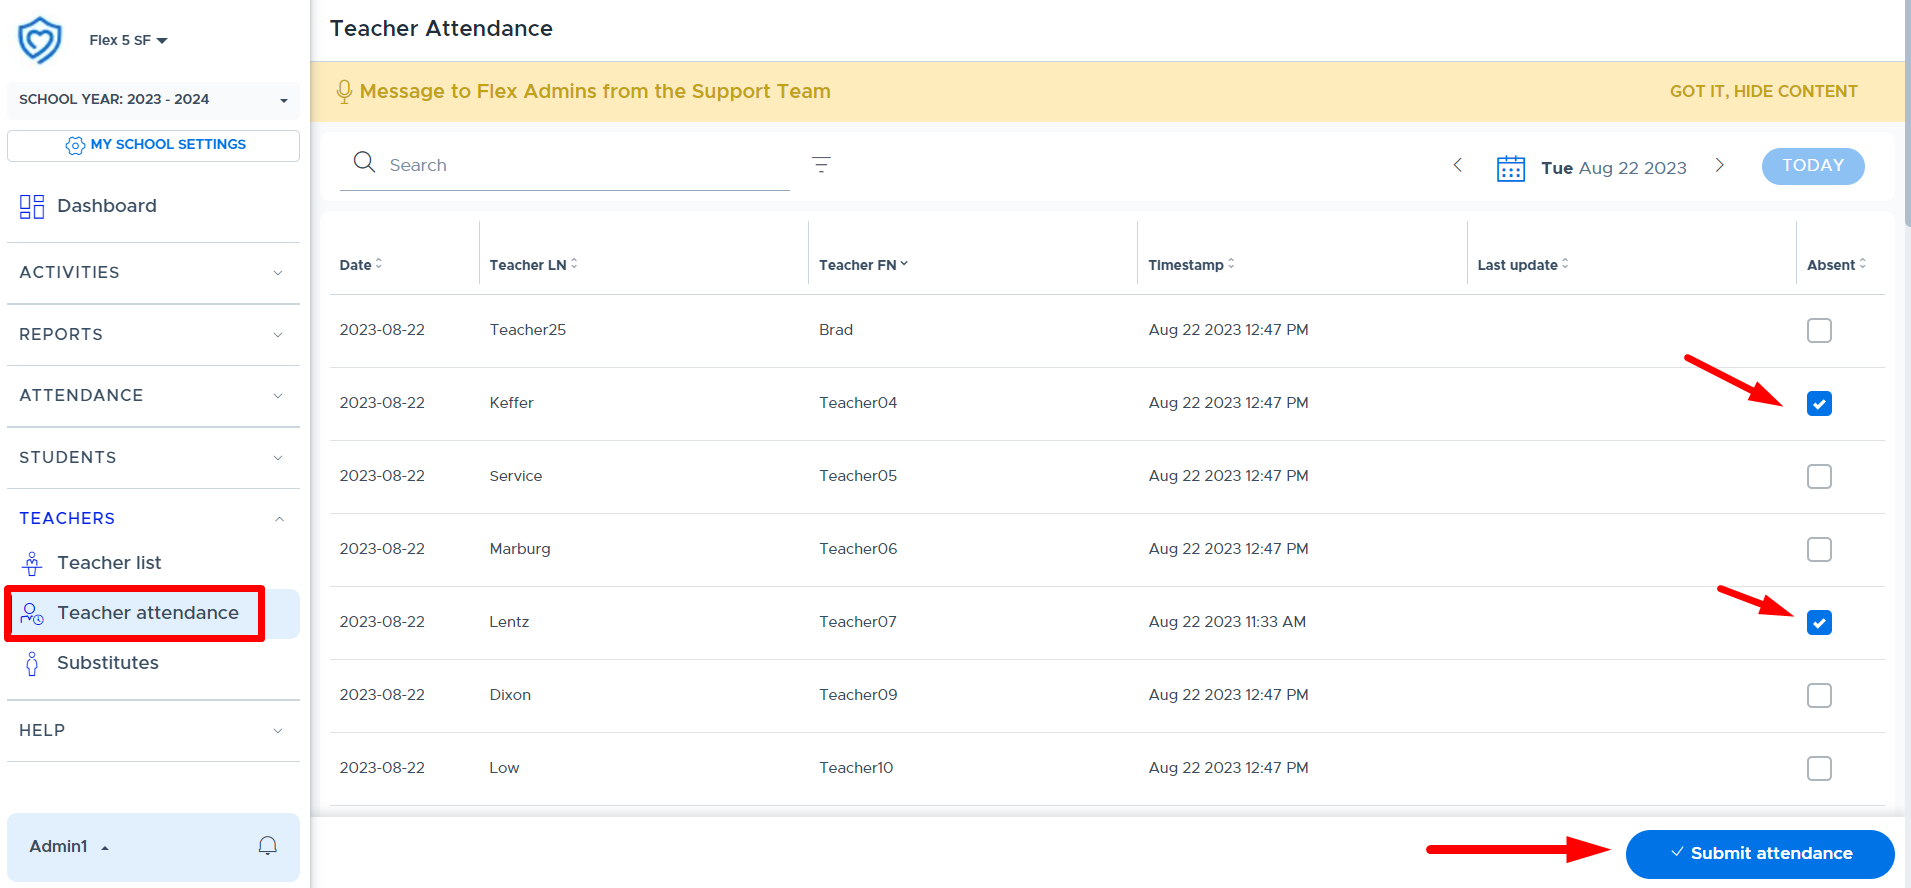
The system will then show a timestamp for when this attendance was taken:
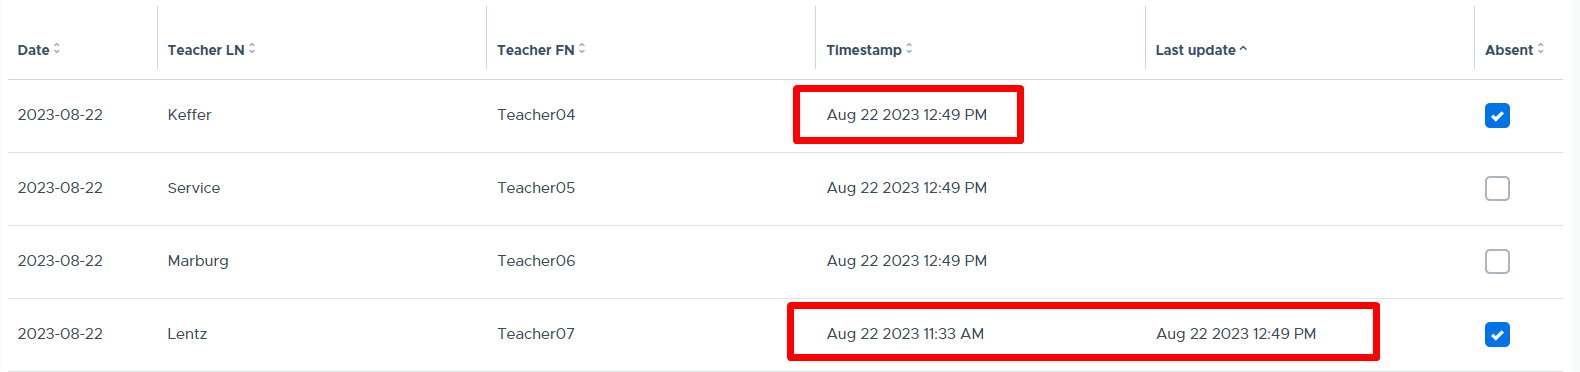
After marking the teacher absent, the next step is for the Admin to select Teachers > Substitutes from the menu, as shown below.
This screen will display the activities that were scheduled for TODAY by the Teachers marked absent in step #1. It is important to review the “Substitute Plan” column to confirm which option should be selected:
- Run with Substitute
- Cancel with Substitute
Please note that if “Cancel with Substitute” is selected and you proceed, the activity is completely canceled and removed from the student’s calendar. Students will receive the following in-app notification about when this happens:

The default option that shows in this field is driven by what was set on the “Activity Type” menu. Once the Substitute Plan has been confirmed/selected for each activity, then click “Confirm substitute plans”.
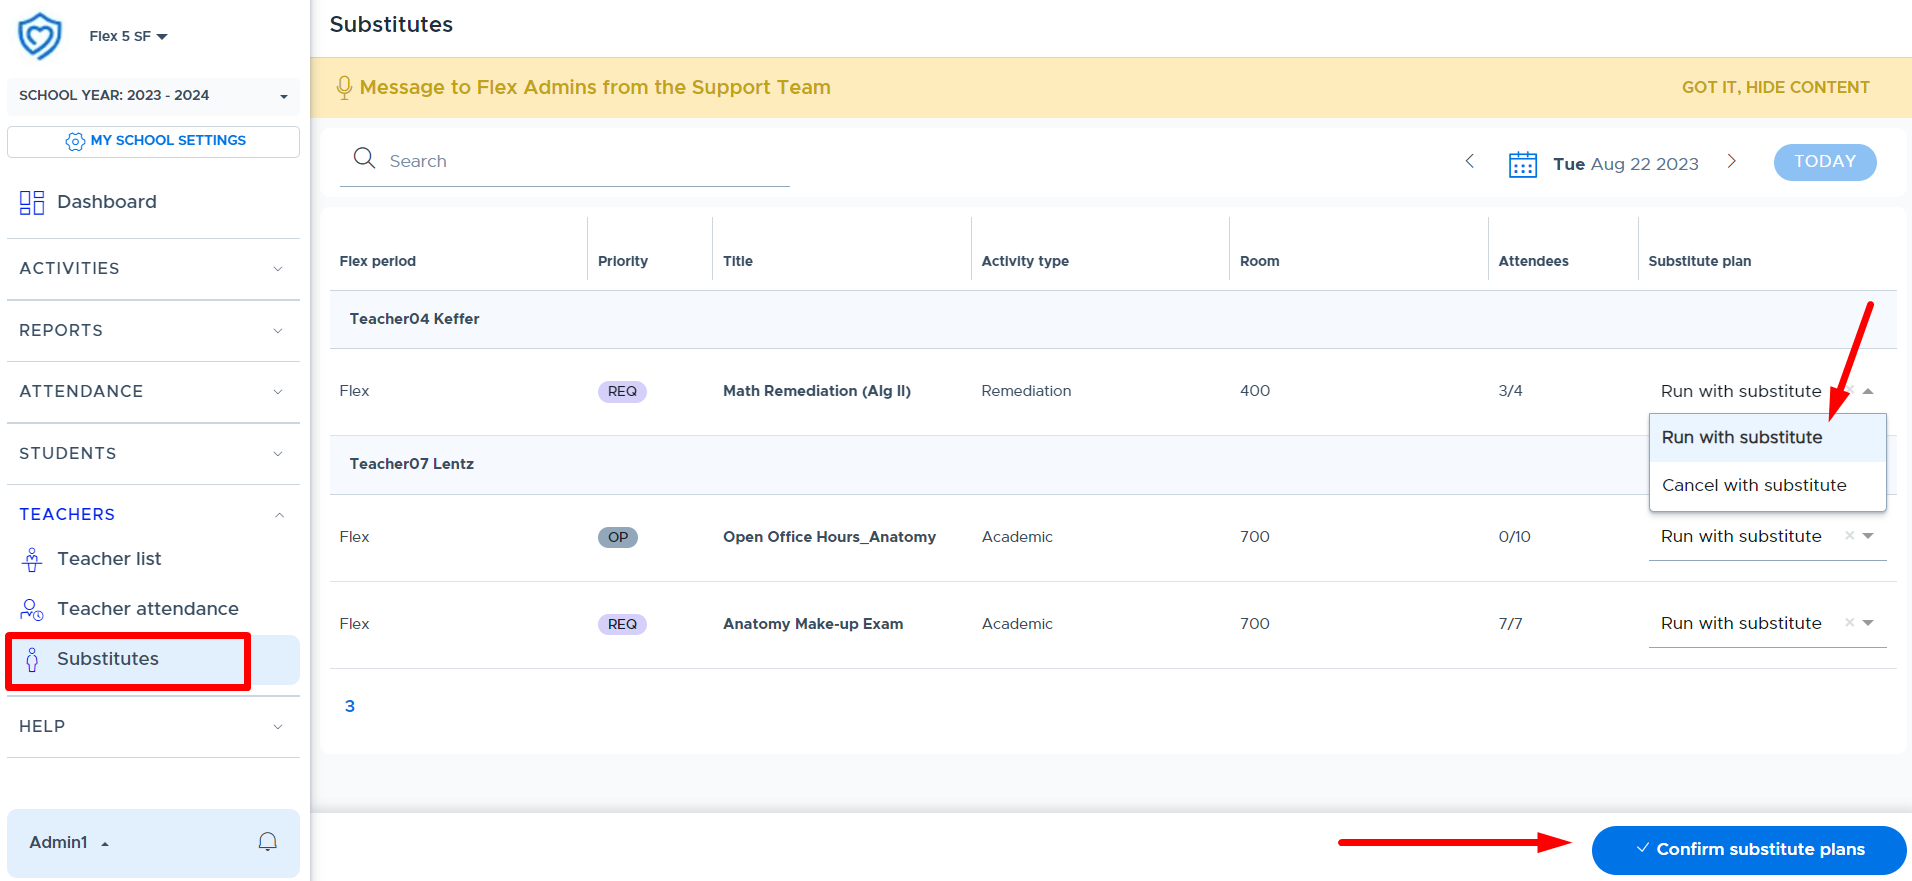
Once the plan(s) has been submitted the screen will update and provide access to the “Download credentials” button for each teacher that is absent. (Please see below.) This produces a separate PDF document in a new web browser window that can be printed and given to the Substitute Teacher. This will generate temporary credentials for each Substitute that will be running an activity session and need to take attendance in Flex.
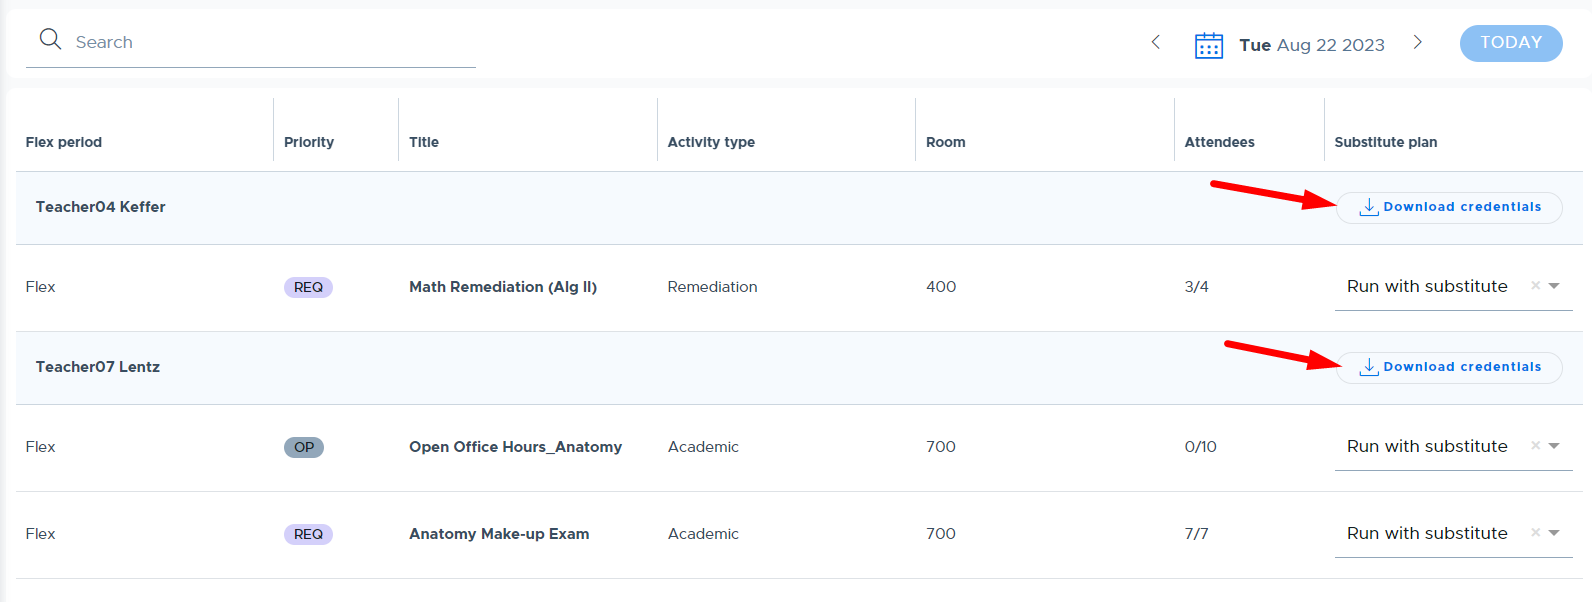
Below is an example of these instructions. Also, as mentioned earlier, there is a video specific for Substitutes that reviews this process.
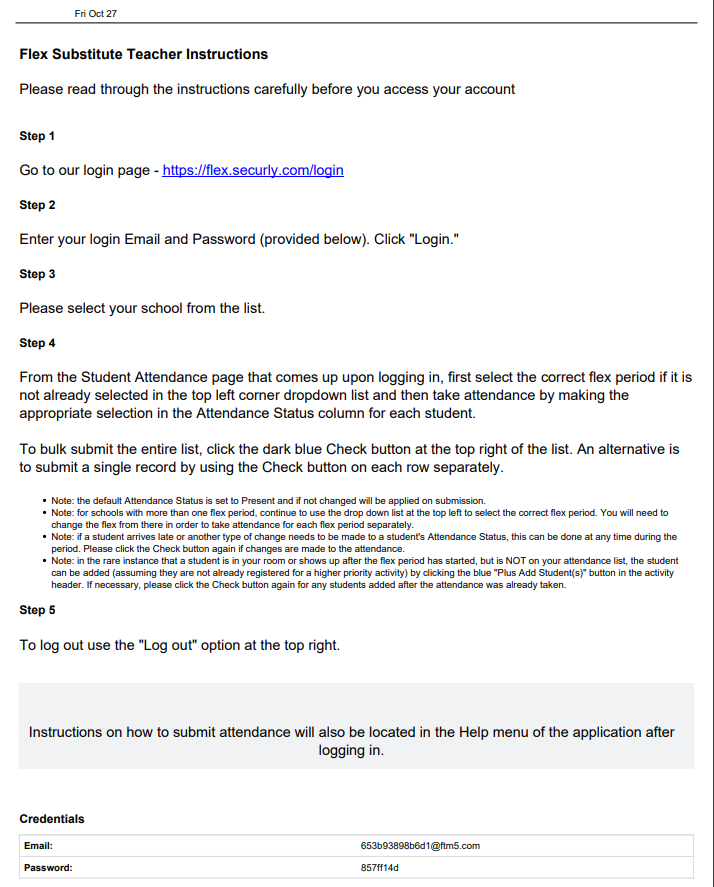
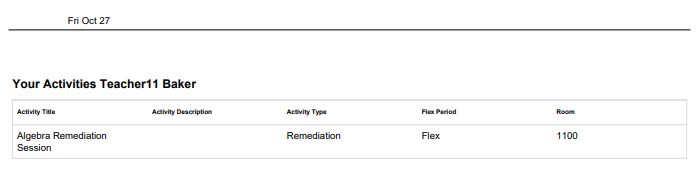
Other optional substitute workflows:
- Another less technologically dependent workflow for subs is to print off the attendance list for the teacher who is absent. The teacher can print off their own list and place it within their substitute folder or notes for their sub. Keep in mind that if cut off is the day of the Flex, the printout may not be accurate if printing the day before. An admin in the front office can also simulate any teacher and print out their attendance for the day, giving it to the substitute when they check in at the beginning of the day. The substitute can record attendance on the printout and turn it into the Front Office to update in Flex.
- Oftentimes, teachers, staff, and administrators will cover for one another. A teacher (or an admin simulating the teacher) can go to an activity and share attendance with an adult Flex user who will be supervising the activity on behalf of the teacher.
The screenshot below shows where to access print buttons and set up shared attendance from the “Student Attendance” screen in Flex.
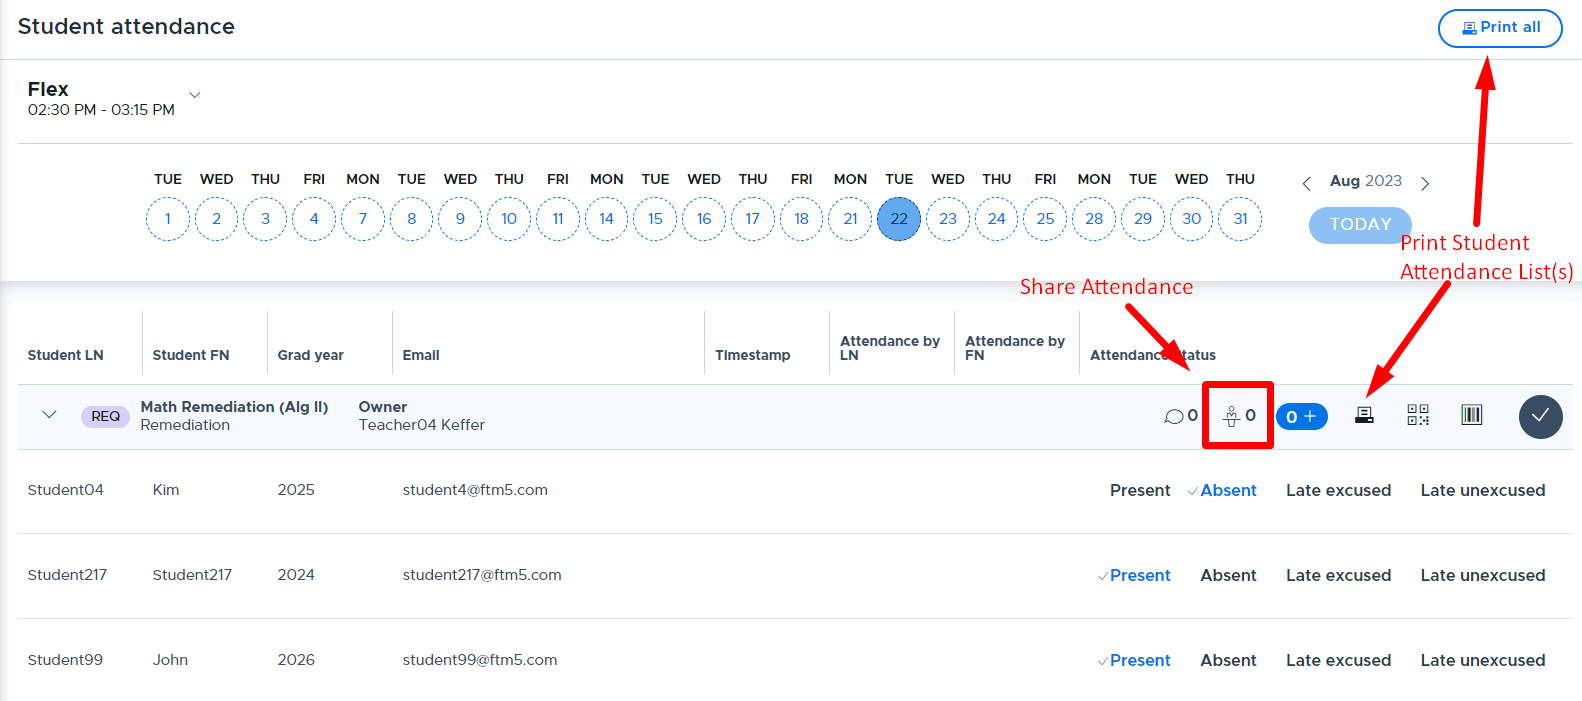
- If you have regular substitutes who have access to technology and you trust to log into and have access to Flex, you can add them as a user under My School Settings > Users. The substitute must have a school email and can log in with email single sign-on. Activities can be shared with this user as described above.
HELP
All users have access to the “HELP” menu in Flex that provides role-specific training videos and documentation. Click the “preview” button to open the index that contains all of the videos or documents. These indexes are also linked below for easy access.
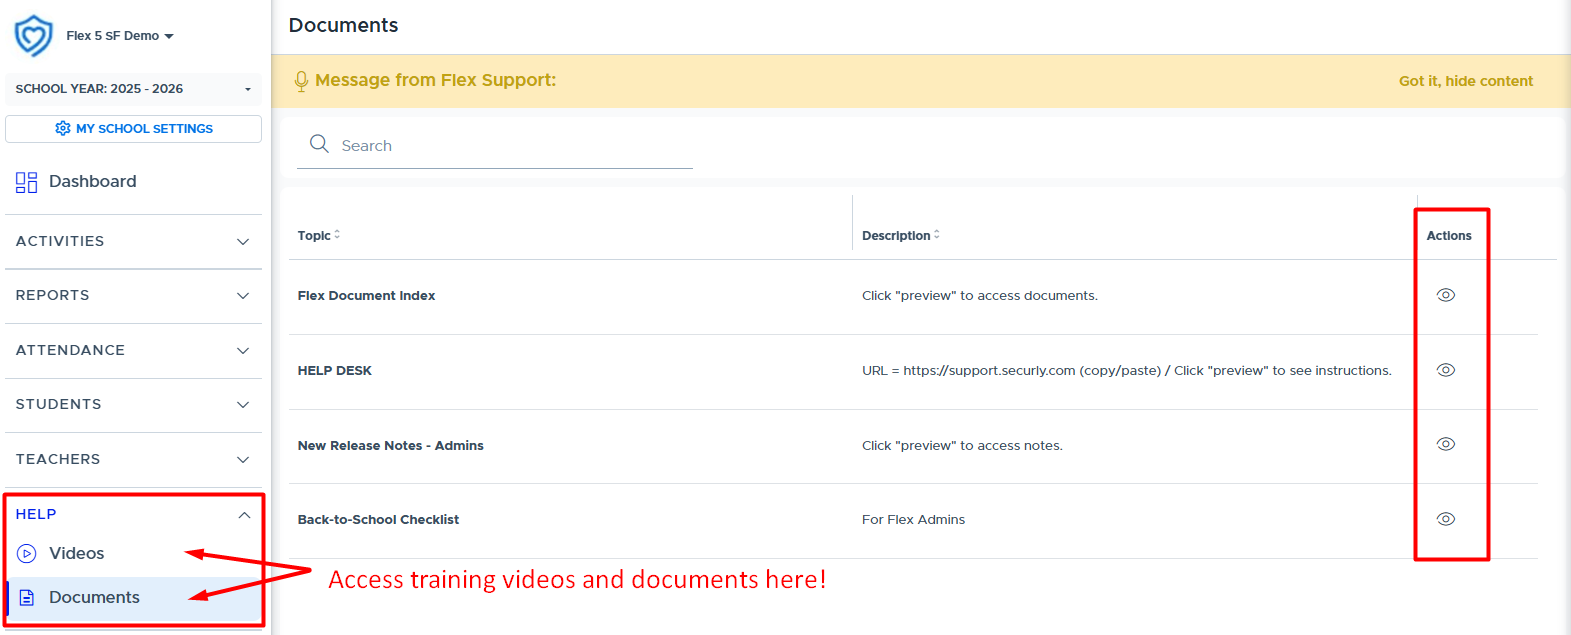
Videos
Here is the Admin Training Video Index that provides all available training videos. There are separate user-role specific video indexes for teachers/staff and students.
Documents
Here is the Admin Training Document Index that provides all document resources. There are separate user-role specific document indexes for teachers/staff and students.
Technical Information
Technical Information Document (for Technical Support)
Please provide the following document to your technical support area. This provides information about IPs and domains that should be added to your allowlist. Flex Technical Information Document
Attendance Import & Export Files
Attendance Import & Export Information explains what is needed to create an attendance file from your Student Information System (SIS) and import this into Flex. It also shows how this data is used and displayed in the Flex system.
Automated Attendance Export takes you to the section of this guide that explains what Flex attendance data is available to export so schools can aggregate data for reporting and/or import this back into their SIS.
Training Information
Training FAQs
It is recommended that a “Core Team” of teachers, or early adopters, be assembled to help guide the Flex implementation and assist with training others on how to use the system. As a system administrator and/or project leader, you may want to pull this Core Team into the decision making process when configuring your system. This might help them understand the intricacies of the Flex system.
Below are some frequently asked questions that come up when clients are preparing to train their teams to use Flex.
How can I train my teachers & staff?
Here are a few suggestions to train teachers and staff who are not part of the “Core Team” mentioned above.
- Hold an in-person training session to demonstrate Flex and share your internal guidelines for how your team should utilize the system.
- You might build in time to have all users login and start creating and scheduling activities.
- Be sure to review the “Help” section in Flex that provides access to many training resources.
- Provide The Five Basic Activity Steps document and ask them to review this and watch the videos. Provide login instructions and then hold a Q&A “work” session where questions can be asked and teachers can set up and schedule their initial activities.
- You may also want to provide the Priority Level Guide or create your own version of this depending on how you plan to utilize these at your school.
- Be sure to review the “HELP” section in Flex that provides access to many training resources.
- If you are newly implementing Flex, your Client Project Manager (CPM) can hold a virtual “Teacher Training” via Zoom for your entire staff - instead of training just the Core Team. The CPM will make every effort to customize this training to how your school is using Flex but it is always helpful to have a school Administrator involved to answer school-specific questions.
- During the Summer/Fall of 2024 we will be offering Back to School and Open Office Hour webinars. Please see the Flex Webinar Schedule schedule for more details.
- If you have training needs beyond what is offered, please reach out to your Relationship Manager to discuss “Professional Development” training options.
What resources are available for teachers/staff?
The best place to direct your Flex users to go for training resources is the “HELP” section of the Flex system. All users (admins, teachers, staff, and students) have a “Video” and “Document” list of training resources available to them within the Flex system, accessible from the “HELP” menu.
The primary training resources for teachers and staff are:
- Priority Level Guide
- The Five Basic Activity Steps
- Teacher Quick Reference Guide
- Teacher/Staff Video Index
Do you have any tips for conducting large group in-person training?
If you are conducting a large group Flex training, you'll want to focus on the teacher and student functionality in the system. To prepare for this, review/distribute the Priority Level Guide, The Five Basic Activity Steps, and the Teacher Quick Reference Guide. You'll then want to set up your user accounts and activity examples ahead of time. (Note: Be ready to explain how teachers will use the priority levels when creating activities at your school, internal workflows related to Flex, and review expectations for use of the Flex system.)
It may be helpful to structure the session so participants are paying attention to your training and then give them time periodically or at the end to “practice” in their system. Remember to start simple and add greater functionality and expectations as everyone becomes familiar with the program. It is also recommended to find a way to manage questions. If you are virtual, you might have a second person managing the chat or Q&A. If you’re running this in-person, maybe ask folks to hold their questions until the end of a section or the session.
What is the best approach for training students?
It is recommended that teachers share Flex with their students during a homeroom or advisory time using the Overview of Flex (for Students) video. (Or this video could be given to students ahead of time to watch on their own.)
Then have students log into the Flex system and have them ‘practice’ or possibly register for the first few flex sessions. Teachers should point out the “HELP” section in Flex to the students and explain any necessary details and expectations related to your school’s flex period and use of the Flex system. (For example: non-registration procedures, what time registration stops, etc.)
How do we handle Flex questions from our teachers and students?
(Do we direct them to the Flex Help Desk?)
Please do not direct teachers or students to contact the Flex Help Desk. This should be used by a few Flex admins at your school to request assistance as needed.
It’s important to come up with a support channel for your teachers and students when they have a Flex question. We would recommend students go to a teacher with their Flex questions. If a teacher doesn’t know the answer or has a question of their own, they should be told “who” the internal contacts at the school are for asking Flex questions.
If the school point of contact is unable to answer the question, they will create a Help Desk ticket to get support from the Flex team. In addition to providing details about the question or issue, please include the names of who is involved and examples of what is going on. Screenshots and information about what troubleshooting steps have already been taken are very helpful.