Below are explanations of the various icons and functions on the Default activity lists screen.
-
Add list: Add a new default activity list here.
-
Search: Enter the keyword to search the activity titles on the list.
.png)
-
Filters: Filter the list of activities by one or more of the following - Owner, Priority, or Select room.
.png)
- Start typing Owner or Room name to filter by this information.
- Click “Clear All” to reset filters.
-
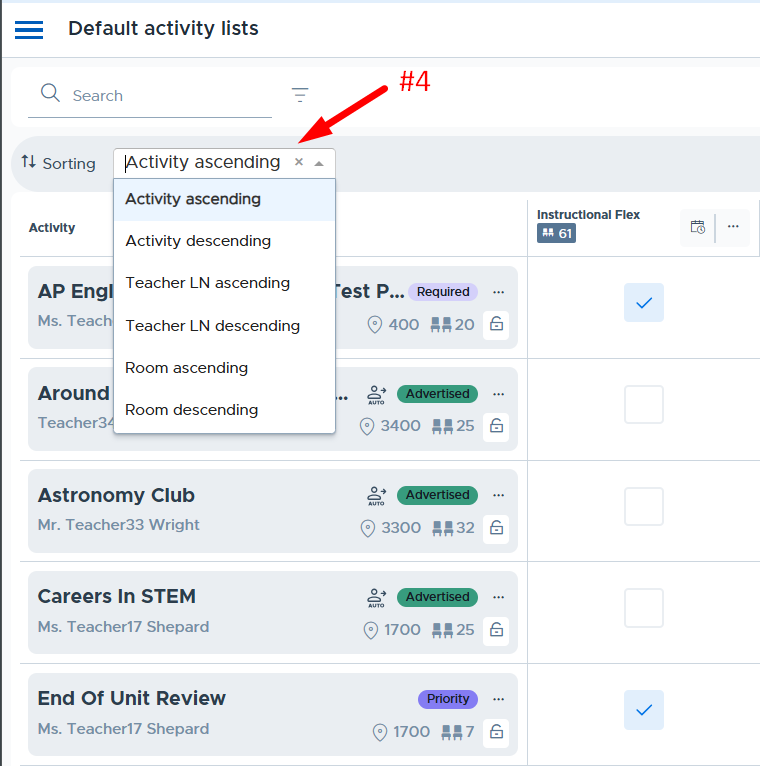
Sorting: Click the dropdown to see the options to sort the list of activities.
-
Activity Detail: The following details are displayed for each activity added to the Default activity list screen:
- Activity title
- Activity owner (first and last name)
- “Auto” - Activity has autoassign allowed. (Only displayed for schools using Autoassign.)
- Priority level name (with color)
- Room name/number
- Activity Cap
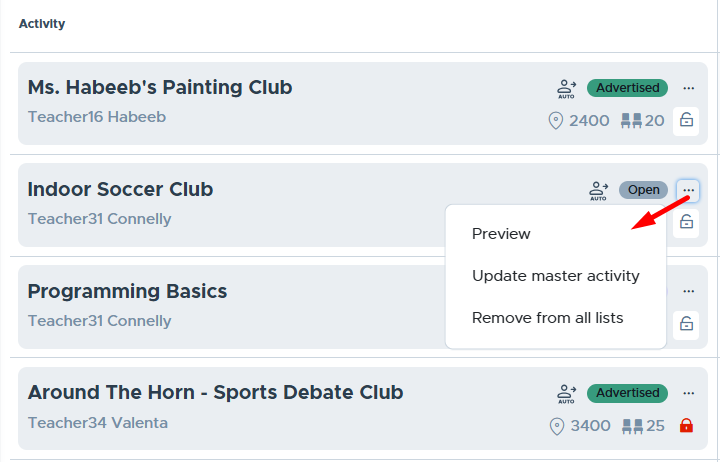
- Three dots/menu - Access to Preview, Update master activity, and Remove from all lists.
- Lock - Toggle Edit Restrictions: When toggled to red (on) this restricts the activity owner from editing the master activity and the following fields on scheduled activities: Activity Type, Priority Level, Room, and Activity Cap.
-
Default Activity Lists & Including Activities: Below is the section of the screen where the “lists” are displayed and an Admin can check the boxes to include the activity when scheduling the list. In addition, the following icons/information is available:
- Total Activity Cap - The “total” number of seats for all activities included in the list.
- Calendar icon - Used to schedule the list; see more information in the Scheduling a List section.
- Three dots/menu - Access to Rename or Delete the list. (Note: Deleting the list does not remove activities that were scheduled via the default activity list.)

-
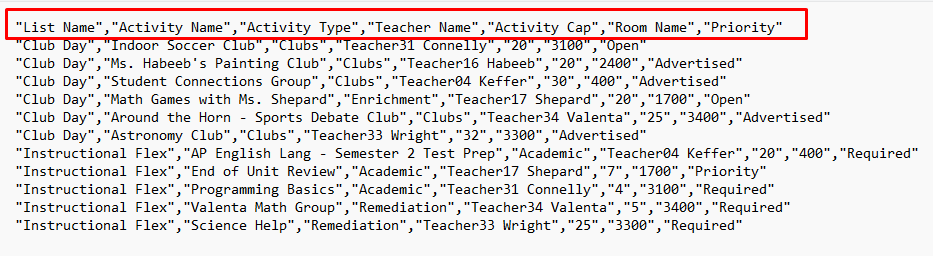
Export: The default activity list details can be exported into a CSV file. Below is a screenshot showing the data included in the export.
Additional Information
Below is some additional information that’s helpful to know when using Default Activity Lists.
-
Normal system functionality is available once an Admin schedules a Default Activity List. If it’s before the Cutoff Time, activity owners could remove what was scheduled via the default list and make changes.
- Activity edits can be limited by “locking” the activity. Please see more details in the “Locking an Activity” section.
- In addition, the Plus Add feature continues to function the same.
-
If an Admin needs to remove an activity from the calendar that was scheduled with a default activity list, this is done by simulating the activity owner and removing the activity from the My Schedule screen. This must be done before the cutoff time.
-
An Admin can schedule the same Default Activity List multiple times for the same date/period. This might be needed after changes are made to the list or if changes are made outside of the default list by activity owners.
-
It’s also possible for an Admin to schedule more than one default list for the same date/period. This is considered “layering” lists. The system will stamp out (schedule) any activity not already on the schedule. For example, a school might have lists for “A” vs “B” days and these don’t change. In addition, on certain days there are special clubs or activities added but the Admin prefers to manage these on a separate default list, which can be scheduled as needed in addition to the A or B day list.
-
If an adult is archived from Flex any activities owned by the adult will be removed from the schedule and any default activity lists. If the same adult is unarchived, their activities and schedule are returned but are no longer linked to the default activity list settings. An admin will need to re-add activities and lock them again as desired.